Network Allocation - Routing

Use routing to assign an IP subnetwork to a device.
Note

Note

A VLAN defined within Instant Port Profiles as Non-Forwarding cannot be used to create a routing interface.

Use this task to configure routing.

  1. Go to Configure > Network Policies.
  2. Create or select a Network Policy.
  3. Select Switching > Routing > Network Allocation and scroll to the Routing table.
  4. Select to add or to edit.
    Click to expand in new window
    IPv4 Interface
    IPv4 Interface
  5. Configure the following routing settings:
    Table 1. Routing Settings
    Setting Description
    Device Select a Device from the drop-down menu. drop-down menu.
    Network Allocation Select a Network Allocation from the drop-down menu.
    VLAN Attribute Select a VLAN Attribute from the drop-down menu.
    IPv4 Address / Subnet Mask Shows the assigned IP Address, such as 10.1.0.0/16.
    Routing Instance Shows the Routing Instance.
    VLAN Loopback Enable or Disable VLAN Loopback.
    DHCP Relay Leave selection of DHCP-Relay or choose to override the DHCP relay.
The Summary tab shows a summary of the routing details.
Note

Note

To perform device-level IPv4 Interface Routing configuration, go to Manage > Devices and select the supported device. Select Configure > Network Allocation > Interface Configuration.

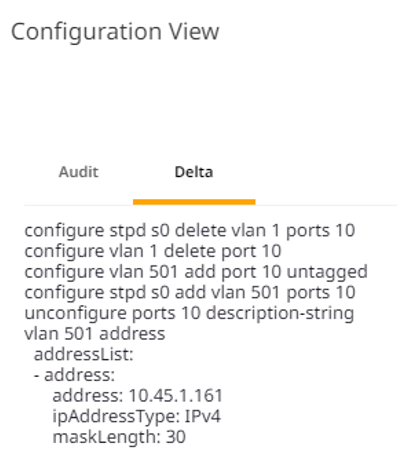
At this level we are creating the actual IPv4 interface on the VLAN, which differentiates it from the template-level configuration.

For example, if 10.45.1.161/30 is the host address, the IPV4 interface on the VLAN is created.

Click to expand in new window

If an IPv4 Interface is created from device-level configuration, then a Network Allocation created from a Network Policy is not applicable.

IPv4 Interfaces for devices are still viewable within the Switching > Routing > Network Allocation section.