Home > Reference > Aerohive Guest Access Configuration Guide

|
Extreme Guest Access Configuration Guide
Read about and configure Extreme Networks Guest Access in this topic.
This guide describes Guest Access features and how they work. This guide also contains the configuration steps for some of the most common guest management scenarios. To get started configuring Guest Access right away, see "Configuring Guest Access Common Scenarios".
Guest Access helps automate the guest experience on your wireless networks, providing scalable, easy-to-use guest management for single-site deployments and global enterprise networks.
Guest Access provides enterprise-grade security. System management and guest registration are protected by standards-based web encryption, and Guest Access to the wireless network is protected by enterprise grade Wi-Fi security – using either PPSK (Private Pre-Shared Key) technology to deliver unique encryption keys to every user and every device, or WPA2 Enterprise with user name and password credentials. These systems use RadSec to secure authentication between Extreme Networks access points and the authentication service, eliminating unprotected RADIUS calls over the Internet.
Guest Access oversees and grants wireless Internet access to guests using a special guest SSID. Guest Access is configured inside the ExtremeCloud IQ network policy configuration workflow.
Guest Access Features
Guests usually have one very basic requirement: easy access to a wireless network, typically for a limited amount of time. Examples of industries where Guest Access plays an important role include hospitality (hotels, airports, cafes), enterprise (corporations), education (K-12, universities and colleges), retail, (shopping malls, brick and mortar stores), and healthcare (nursing homes, residential care, hospitals, patients and patient visitors).
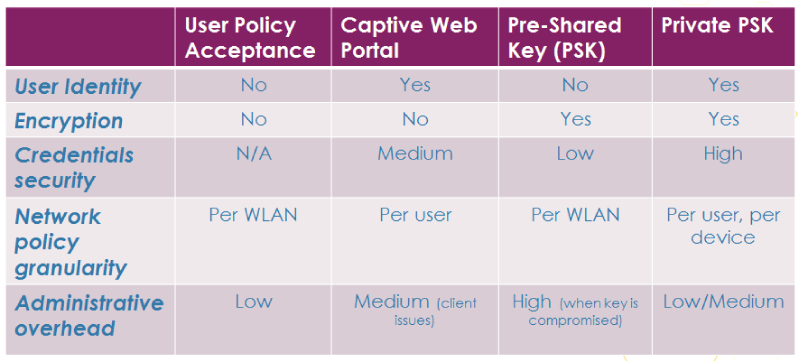
Typical options for Guest Access include:
This table describes some strengths and weaknesses of these options:
Guest Access Workflows
Guest Access supports multiple workflows:
Configure Guest Access Directly in HiveManager
Guest Access is an integral part of the ExtremeCloud IQ configuration workflow. The typical configuration steps are:
 admin_name > Global Settings > Accounts > Account Management. SeeAdmin Accounts.
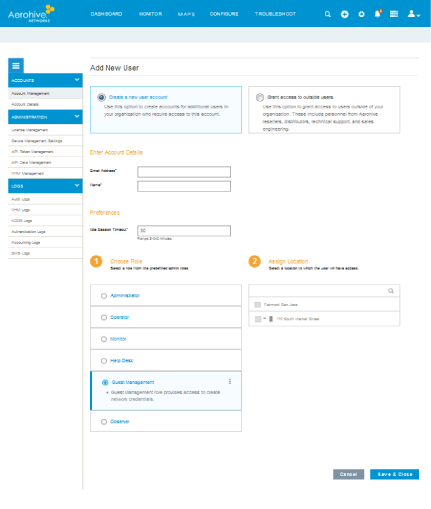
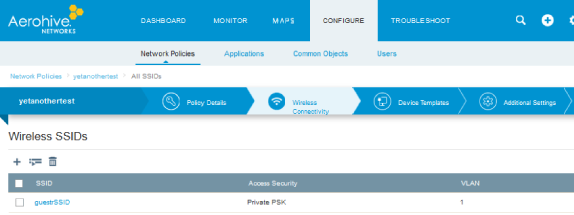
This illustration shows the User Group section in the SSID configuration workflow:

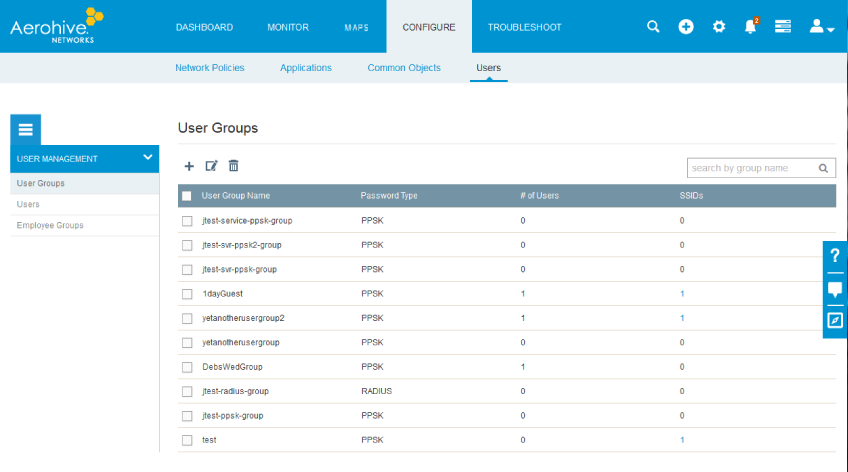
This illustration shows the User Groups window under Configure > Users:
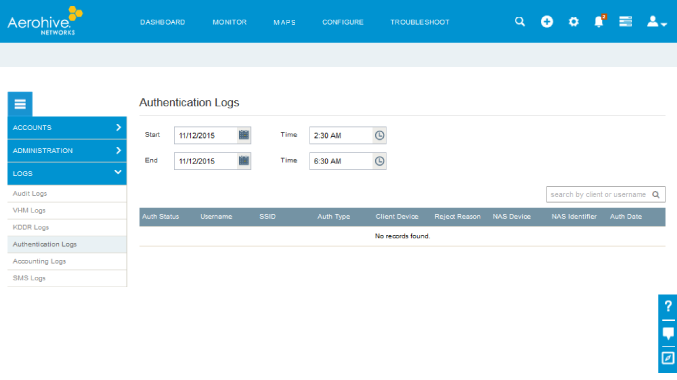
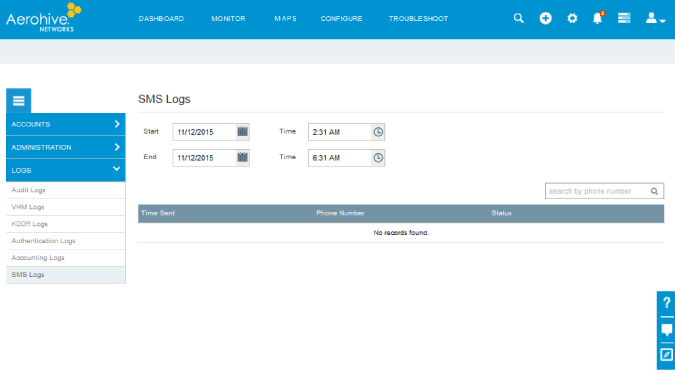
admin_name > Global Settings > Logs. See Accounting Logs, Authentication Logs. and SMS Logs.This image shows the Accounting Logs window.

This image shows the Authentication Logs window.
This image shows the SMS Logs window.
How Guest Access is Granted
Administrative permission for Guest Access is controlled by Role Based Access Control, which allows you to customize permission and better control management access. There are five roles: administrator, operator, help desk, guest management, and observer. The administrator role has full access to all of the features within Guest Access, and is the only role that can create other roles. For Guest Access, you can assign the role of guest manager to employees or users who can then create user accounts for guests, contractors, VIPs, and other visitors. Guest managers can view the guest management user interface, but cannot see the Onboard, Dashboard, Manage, Configure, and tabs. See Admin Accounts for more information on role-based access control.
Guest Access through a Captive Web Portal
ExtremeCloud IQ supports three types of captive web portals: Authentication, Self-registration, and Use Policy Acceptance. You can customize the look and feel of your captive web portal using colors, logos, and images, and multiple languages.
Reference Apps for Guest Access
This release also introduces the first of a series of reference applications that can be used for Guest Access: the Kiosk App for iOS is an iPad or iPad mini app that is intended as a self-service option for visitors. It is available through the Apple App Store, and also as source code from the Extreme Networks Developer Portal (https://developer.aerohive.com).
Future releases will continue to introduce new apps as they are developed, including the Lobby Receptionist App that allows lobby personnel to register visitors and also supports automatic password refresh for entire locations, such as campuses and nursing homes.
This guide describes the configuration steps for common Guest Access scenarios:
These scenarios assume that the network admin is doing the configuration steps. However, the admin might want to appoint someone else to act as guest manager, (any employee, for example, such as the lobby receptionist) by adding a guest management role. The guest manager can create. revoke, and view guest user accounts and PPSKs for the user groups they can access as defined in the employee group to which they belong. The steps for adding a guest manager are shown below.
Adding a Guest Management Account
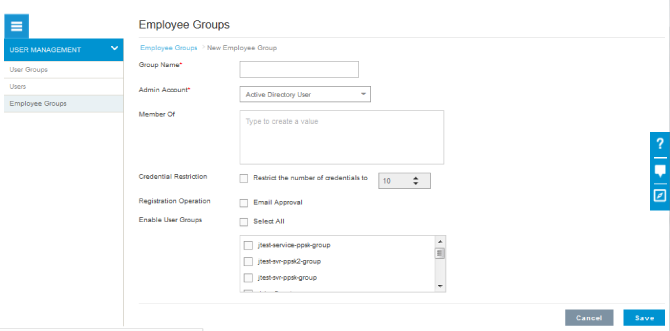
To assign the Guest Management role, navigate to admin_name > Global Settings > Accounts > Account Management. Select  , and at the top of the Add New User window, select Create a new user account. You must also create an Employee Group and connect it to guest management accounts.
and enter the following information:Group Name: Enter a name for this employee group.
Admin Account: Select Guest Management Role User from the drop-down list.
Guest Management User: Enter the valid email addresses of the guest managers that you want to associate with this employee group.
Enable User Groups: Select the check boxes for all of the guest user groups for which members of this employee group can create guest accounts.
In this scenario, the ExtremeCloud IQ admin, or manager, knows in advance which guests will be arriving and what their requirements are. For example, a school principal wants to allow only teachers and staff to connect to the guest network with their phones. In this case, the principal asks the admin or guest manager to create a user group for teachers and staff, and separate user accounts for each teacher and staff member. For a business that is having construction done on their premises, the contractors need limited access to the Internet, but not the employee network. In this case the admin or guest manager creates a user group for contractors and individual user accounts for each contractor. The login credentials for each guest are stored in the cloud, and are automatically sent as soon as the user account has been created and saved.
The steps the admin or guest manager takes to create the user group and user accounts are shown here:
Create a Guest SSID
to create a new SSID. Complete the fields on the New SSID window:For more information about how to create guest SSIDs, see Standard Wireless Network Settings.
Create a User Group
to create a new user group. Complete the fields in the New User Group window:Add Users to the User Group
When you complete the configuration for a user account and select Save, the user automatically receives the PPSK and login information in either an email or text message (or both), depending on the configured delivery method.
For more information about creating guest user accounts, see User Accounts.
In this scenario, the network admin creates an open guest SSID, and a secure PPSK SSID with a captive web portal and a UPA (use policy agreement). Guests log in to the open SSID and are redirected to the secure SSID captive web portal where they agree to the terms of the UPA, or enter credentials, or both. Configure this scenario using the following steps:
Create a PPSK-Enabled Guest SSID
to create a new SSID. Complete the fields on the New SSID window:Create a Self-Registration-Enabled User Group
to create a new user group. Complete the fields in the New User Group window.For more information about configuring user groups, see Add User Groups.
Create an Open SSID
to create an open SSID. Complete the fields on the New SSID window: to create a captive web portal. In the New Captive Web Portal window, enter the following information:Copyright © 2020 Extreme Networks. All rights reserved. Published March 2020.
