Upgrading the appliances
In the System provisioning toolbar, select  Tools and go to the Software upgrade tab.
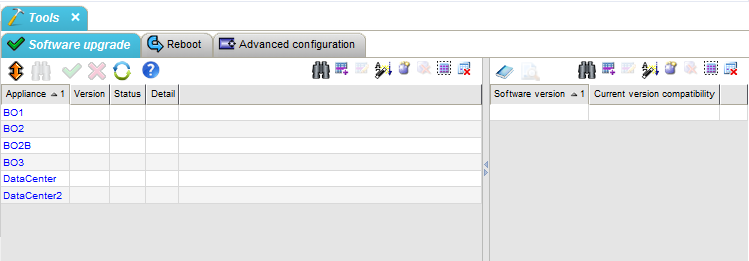
The following window is displayed:
This window is made of two frames:
|
•
|
the list of appliances to
be upgraded (left frame), |
|
•
|
the list of software
versions (right frame). |
The procedure is as follows:
|
1
|
When you select this tab for the first time, the list of configured appliances is
displayed in the left frame. The Version column
is not filled in. Select some appliances (or
all of them with the Select All button  ) and click the Status button ) and click the Status button  to
see the actual software versions and statuses of the selected devices. to
see the actual software versions and statuses of the selected devices. |
The statuses can be:
|
•
|
upgraded: the appliance is up-to-date with the software release which is specified
in the Version field, |
|
•
|
download scheduled: the
appliance will be upgraded, |
|
•
|
install scheduled: the appliance is currently being upgraded, |
|
•
|
error occurred: possible
reason of failure: |
No Space left for file: no more space on the appliance to download the file,
Cannot connect to server (check address/routes):
the FTP server is unreachable,
Access to server denied (check login/password):
there is a login/password problem on the FTP server,
File not found: xxxxxxx: the file is not in
the right directory on the FTP server or the directory is wrong,
Error while downloading: the connection between
the FTP server and the appliance is broken,
No disk space left for file: no more space to
uncompress the software package.
|
2
|
In the right frame,
click on the Get Catalog button  |
The Catalog Server window contains the following parameters:
|
•
|
Access Mode: three radio buttons enable you to choose between FTP, HTTP or HTTPS. |
|
•
|
Server (ExtremeCloud SD-WAN domain access): host name or IP address of the server reachable by SD-WAN (which reads the appliance versions present on the server). |
|
•
|
Server (appliance access): host name or IP address of the server reachable by the appliances (they will download the new software version from that server). This server can be different from the previous one in case of NATting; if it is the same, you do not need to enter it again. |
|
•
|
Server port: allows changing the default port for HTTP (80 by default) and HTTPS (443 by default). For FTP, only the default port (21) can be used; in this case the field is greyed out. |
|
•
|
Directory: the server
directory containing the software
files. |
|
•
|
Login: user name to use
to get the files. |
|
•
|
Password: user's password. |
|
•
|
Proxy server (for HTTP and HTTPS only): IP address of the proxy, if any. |
|
•
|
Proxy port (for HTTP and HTTPS only): port number of the proxy, if any. |
The list of software versions
on the server is displayed.
This table contains two columns:
|
•
|
software version: list
of the available software versions, |
|
•
|
Current version compatibility:
shows the compatibility with the running version of Application Configuration software (compatible or not). |
|
3
|
Select the appliances to be upgraded in the left frame and
the software version in the right
frame, then click the Upgrade button  . . |
|
4
|
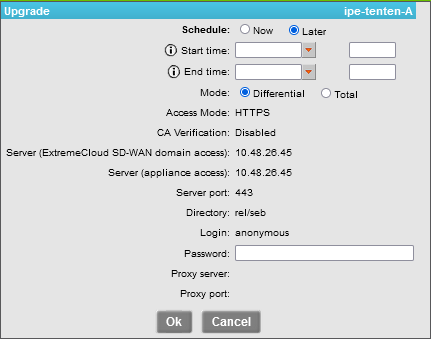
The displayed scheduling window reminds you of the defined parameters and enables you to schedule the upgrade (during the night for example),
or to launch it immediately by clicking Ok without
specifying any date or time: |
This window contains the following fields:
|
•
|
Start time: enter the start
date and time of the upgrade (this must be a future date, not the current date).
The Start time corresponds to the date
when downloading from the
FTP/HTTP/HTTPS server will start. The chronological sequence of downloads is managed
automatically by the system. |
|
•
|
End time: enter the end
date and time of the upgrade (this must be a future date, not the current
date). The End time corresponds to the
date when downloading will
end and when the appliance will reboot for the new version to be applied. |
Differential: download
only files necessary to upgrade the current version to the new version,
Total: download all
the files.
|
•
|
Password: re-enter the password. |
Click on Ok when done. The restart
of appliances after upgrade is automatically
performed at the date/time specified by the "End time" field.
If the Start time and End time fields are
empty, the upgrade starts immediately on the selected Appliances.
A message confirms that the selected Appliances have received the upgrade order.
A Cancel button  allows
you to cancel the upgrade request. Canceling an upgrade is possible before or
during the download of the software new version, but before the Appliance has started swapping.
allows
you to cancel the upgrade request. Canceling an upgrade is possible before or
during the download of the software new version, but before the Appliance has started swapping.
|
5
|
Check that the upgrade
has been completed correctly by selecting the appropriate Appliances and by clicking on the Status button . |