Defining Application Sets
In order to manage the Internet traffic, i.e. the connection from a site/subnet in your private network to any application, the first step consists in creating collections of applications (application sets) based on the SaaS dictionary or on Protocol and Port.
Warning: for system performance reasons, do not define more than 15 Application Sets.
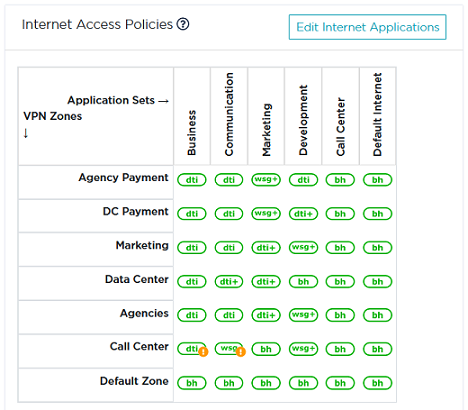
In the current Use Case, 5 application sets are created: Business, Communication, Marketing, Development and Call Center. Default Internet contains all the other applications.
Defining the Business application set
| 1 | In the Internet Access Policies panel of the Zone-Based Firewall window, click the  button. button. |
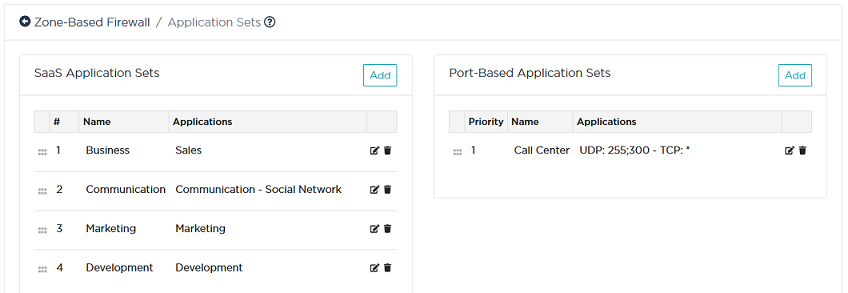
| 2 | Click  in the top right corner of the SaaS Application Sets panel to view the form. in the top right corner of the SaaS Application Sets panel to view the form. |
| 3 | Type 'Business' as the Name of the application set. |
| 4 | From the list of Applications, select 'Sales' and move it to the right list through the middle arrow bar. The listed applications correspond to existing SaaS applications that were created from the SaaS dictionary. They are associated with subnet information and identified through the "(identification on first packet)" label at the end of their respective descriptions. |
Note that you can find a specific application through the Search fields.
Note: Each application can only belong to one application set.
| 5 | Click Create to validate. |
Defining the Communication, Marketing and Development application sets
Proceed exactly as for the previous Business application set. Note that the Communication application set includes two SaaS applications.
Defining the Call Center application set
This application set is based on Protocol and Port.
| 1 | In the Internet Access Policies panel of the Zone-Based Firewall window, click the button. |
| 2 | Click in the top right corner of the Port-Based Application Sets panel to view the form. |
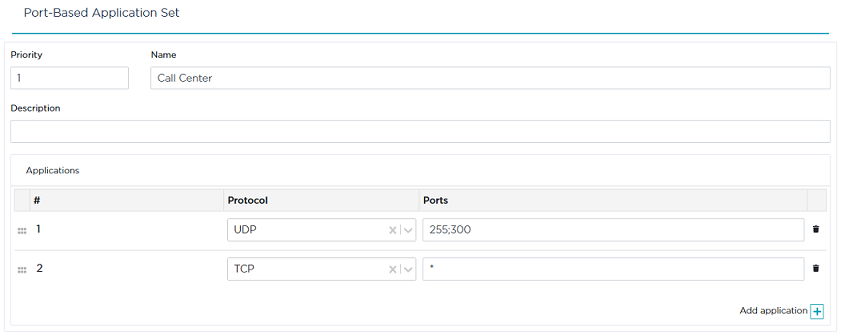
| 3 | Modify the Priority for this application set (1) if needed. 1 corresponds to the highest priority, 6 is the lowest priority value. |
High priority applications may overlap some lower priority applications.
| 4 | Type 'Call Center' as the Name of the application set. |
| 5 | In the bottom right corner of the Applications panel, click Add Application. The creation form is displayed. |
| 6 | From the Protocol list, select 'UDP' and enter '255;300' as Ports. |
Note: at any time, you may change the list position of an application by positioning the cursor over the  icon and dragging the line to the desired position.
| 7 | Define the parameters of the second application. Instead of selecting the TCP protocol from the list, type 6 in the Protocol field (refer to iana list of protocol numbers). Enter * as Port (all the available ports are taken into account). |
| 8 | Click Create to validate. |
Note: in the Zone-Based Firewall / Applications Sets window, you may change the priority of a Port-Based Application Set by positioning the cursor over the icon and dragging the line to the desired position. The priority values of all the Port-Based Application Sets automatically adjust to the new list order.
Modifying or deleting a VPN Zone
In the Zone-Based Firewall/Application Sets window:
| • | Click  to save your settings. to save your settings. |
| • | Click |
After you have defined your application sets, you must apply Internet Access Policies to them.