Restricting remote access to a controller or service platform ensures only trusted hosts can communicate with enabled management services. This ensures only trusted hosts can perform management tasks and provide protection from brute force attacks from hosts attempting to break into the controller or service platform managed network.
Administrators can permit management connections to be established on any IP interface on the controller or service platform (including IP interfaces used to provide captive portal guest access). Administrators can restrict management access by limiting access to a specific host (IP address), subnet, or ACL on the controller or service platform.
Refer to the Access Control tab to allow/deny management access to the network using strategically selected protocols (HTTP, HTTPS, Telnet, SSH or SNMP). Access options can be either enabled or disabled as required. Consider disabling unused interfaces to close unnecessary security holes. The Access Control tab is not meant to function as an ACL (in routers or other firewalls), where you can specify and customize specific IPs to access specific interfaces.
Source hosts - Management access can be restricted to one or more hosts by specifying their IP addresses
Source subnets - Management access can be restricted to one or more subnets
IP ACL - Management access can be based on the policies defined in an IP based ACL
In the following example, a controller has two IP interfaces defined with VLAN10 hosting management and network services and VLAN70 providing guest services. For security the guest network is separated from all trusted VLANs by a firewall.
| Interface | Description | IP Address | Management |
|---|---|---|---|
| VLAN10 | Services | Yes | Yes |
| VLAN70 | Guest | Yes | No |
By default, management services are accessible on both VLAN10 and VLAN70, and that‘s not desirable to an administrator. By restricting access to VLAN10, the controller only accepts management sessions on VLAN10. Management access on VLAN70 is longer available.
Administrators can secure access to a controller or service platform by disabling less secure interfaces. By default, the CLI, SNMP and FTP disable interfaces that do not support encryption or authentication. However, Web management using HTTP is enabled. Insecure management interfaces such as Telnet, HTTP and SNMP should be disabled, and only secure management interfaces, like SSH and HTTPS should be used to access the controller or service platform managed network.
The following table demonstrates some interfaces provide better security than others:
| Access Type | Encrypted | Authenticated | Default State |
|---|---|---|---|
| Telnet | No | Yes | Disabled |
| SNMPv2 | No | No | Enabled |
| SNMPv3 | Yes | Yes | Enabled |
| HTTP | No | Yes | Disabled |
| HTTPS | Yes | Yes | Disabled |
| FTP | No | Yes | Disabled |
| SSHv2 | Yes | Yes | Disabled |
To set an access control configuration for the Management Access policy:
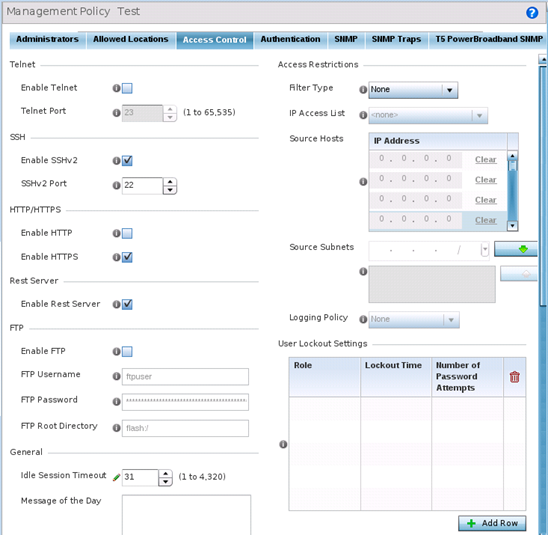
| Enable Telnet | Select the checkbox to enable Telnet device access. Telnet provides a command line interface to a remote host over TCP. Telnet provides no encryption, but it does provide a measure of authentication. Telnet access is disabled by default. |
| Telnet Port | Set the port on which Telnet connections are made (1 - 65,535). The default port is 23. Change this value using the spinner control next to this field or by entering the port number in the field. |
| Enable SSHv2 | Select the checkbox to enable SSH device access. SSH (Secure Shell) version 2, like Telnet, provides a command line interface to a remote host. SSH transmissions are encrypted and authenticated, increasing the security of transmission. SSH access is disabled by default. |
| SSHv2 Port | Set the port on which SSH connections are made. The default port is 22. Change this value using the spinner control next to this field or by entering the port number in the field. |
| Enable HTTP | Select the check box to enable HTTP device access. HTTP provides limited authentication and no encryption. |
| Enable HTTPS | Select the check box to enable HTTPS device access. HTTPS (Hypertext Transfer Protocol Secure) is more secure than plain HTTP. HTTPS provides both authentication and data encryption as opposed to just authentication. |

Note
If the a RADIUS server is not reachable, HTTPS or SSH management access to the controller or service platform may be denied.| Enable FTP | Select the check box to enable FTP device access. FTP (File Transfer Protocol) is the standard protocol for transferring files over a TCP/IP network. FTP requires administrators enter a valid username and password authenticated locally on the controller. FTP access is disabled by default. |
| FTP Username | Specify a username required when logging in to the FTP server. The username cannot exceed 32 characters. |
| FTP Password | Specify a password required when logging in to the FTP server. Reconfirm the password in the field provided to ensure it has been entered correctly. The password cannot exceed 63 characters. |
| FTP Root Directory | Provide the complete path to the root directory in the space provided. The default setting has the root directory set to flash:/ |
| Idle Session Timeout | Specify an inactivity timeout for management connects (in seconds) between 1 - 4,320. The default setting is 12.0 |
| Message of the Day | Enter message of the day text (no longer than 255 characters) displayed at login for clients connecting via Telnet or SSH. |
| Filter Type | Select a filter type for access restriction. Options include IP Access List, Source Address or None. To restrict management access to specific hosts, select Source Address as the filter type and provide the allowed addresses within the Source Hosts field. |
| IP Access List | If the selected filter type is IP Access List, select an access list from the drop-down menu or select the Create button to define a new one. IP based firewalls function like Access Control Lists (ACLs) to filter/mark packets based on the IP from which they arrive, as opposed to filtering packets on layer 2 ports. IP firewalls implement uniquely defined access control policies, so if you do not have an idea of what kind of access to allow or deny, a firewall is of little value, and could provide a false sense of network security. |
| Source Hosts | If the selected filter type is Source Address, enter an IP Address or IP Addresses for the source hosts. To restrict management access to specific hosts, select Source Address as the filter type and provide the allowed addresses within the Source Hosts field. |
| Source Subnets | If the selected filter type is Source Address, enter a source subnet or subnets for the source hosts. To restrict management access to specific subnets, select Source Address as the filter type and provide the allowed addresses within the Source Subnets field. |
| Logging Policy | If the selected filter is Source Address, enter a logging policy for administrative access. Options includes None, Denied Requests or All. |
| Role | Specify the user-role for which account lockout is to be enabled.
The options are:
Note: You can enable account lockout for multiple roles. After
specifying the role/roles, set the Lockout Time and Number of
Password Attempts.
User-account lockout is individually
applied to each account within the specified role/roles. For example,
consider the ‘monitor‘ role having two users: ‘user1‘ and ‘user2‘. The
Number of Password Attempts and Lockout Time is set at ‘5‘ attempts
and ‘10‘ minutes respectively. In this scenario, user2 makes 5
consecutive, failed login attempts, and the user2 account is locked
out for 10 minutes. However, during this lockout time the user1
account remains active. |
| Lockout Time | Specify the maximum time for which an account remains locked. Specify a value from 0 to 600 minutes. The value ‘0‘ indicates that the account is permanently locked. |
| Number of Password Attempts | Specify the maximum number of consecutive, failed attempts allowed before an account is locked. Specify a value from 1 to 100. |
 Print
this page
Print
this page Email this topic
 Feedback
 View PDF
 Download EPUB