Each profile requires a provisioning policy and clock synchronization settings as part of its general configuration. Each profile can have a unique provisioning policy and system time.
Controllers, service platforms and access points are automatically assigned a default profile unless an AP provisioning policy has been defined that specifically assigns access points to a user defined profile. During the general configuration process, a provisioning policy can be assigned to a specific profile or a new provisioning policy can be created and applied to the profile. Adoption is the process an AP uses to discover potential adopters (Controller APs of the same model, service platforms or controllers) in the network, pick the most desirable one, establish an association and obtain its configuration.
Network Time Protocol (NTP) manages time and/or network clock synchronization within the network. NTP is a client/server implementation. Controllers, service platforms and access points (NTP clients) periodically synchronize their clock with a master clock (an NTP server). For example, a RFS 4000 resets its clock to 07:04:59 upon reading a time of 07:04:59 from its designated NTP server.
Additionally, if the profile is supporting an access point, the profile‘s general configuration provides an option to disable the device‘s LEDs.
To define a profile‘s general configuration:
Select the Configuration tab from the Web UI.
Select Profiles from the Configuration tab.
Select Manage Profiles from the Configuration > Profiles menu.
Select General.
A General configuration screen displays for the new or existing profile.
If creating a new profile, provide a name (up to 32 characters) within the Profile parameter field.
Use the Type drop-down menu to specify the device model for which the profile applies. Controllers, service platforms and access points can only utilize profile resources with other device's of the same model type.
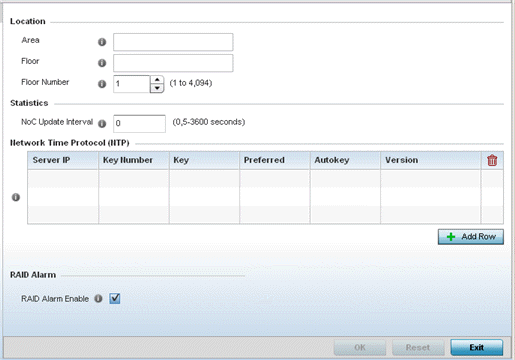
Refer to the Location field to define the device‘s deployment location area.
|
Area |
Enter a 64 character maximum description for the selected device‘s physical deployment area. This area can be further refined by floor and floor number descriptions. |
|
Floor |
Enter a 32 character maximum description for the selected device‘s building floor placement. This area can be further refined by floor and floor number descriptions. |
|
Floor Number |
Use the spinner control to assign a numeric deployment floor number (from 1 - 4094) for this device. The default floor is 1. |
Within the Statistics field, use the NoC Update Interval to set the statistics update interval (from 0, 5 - 3600 seconds) from the RF Domain manager to its adopting controller.
A value of 0 is allowable for an auto mode where the update interval is auto adjusted by the controller based on load information.
Select + Add Row below the Network Time Protocol (NTP) table to define the configurations of NTP server resources the used to obtain system time. Set the following parameters to define the NTP configuration:
| Server IP | Set the IP address of each server added as a potential NTP resource. |
| Key Number | Select the number of the associated authentication peer key for the NTP resource. |
| Key | Enter a 64 character maximum key used when the autokey setting is set to false (disabled). Select the Show option to expose the actual character string comprising the key. |
| Preferred | Select this option to designate this NTP resource as a preferred NTP resource. This setting is disabled by default. |
| AutoKey | Select the check box to enable an autokey configuration for the NTP resource. The default setting is disabled. |
| Version | Use the spinner control to specify the version number used by this NTP server resource. The default setting is 0. |
Refer to the RAID Alarm field to either enable or disable the chassis alarm that sounds when events are detected that degrade RAID support (drive content mirroring) on a NX 95XX series service platform.
RAID controller drive arrays are available within NX 95XX series service platforms (NX 9500, NX 9510) only. However, they can be administrated on behalf of a NX 95XX profile by a different model service platform or controller.
NX9000 series service platforms include a single Intel MegaRAID controller (virtual drive) with RAID-1 mirroring support enabled. The online virtual drive supports up to two physical drives that could require hot spare substitution if a drive were to fail. With the WiNG 5.5 release, an administrator can manage the RAID controller event alarm and syslogs supporting the array hardware from the service platform user interface and is not required to reboot the service platform BIOS.
Select OK to save the changes made to the general profile configuration. Select Reset to revert to the last saved configuration.
 Print
this page
Print
this page Email this topic
 Feedback
 View PDF
 Download EPUB