To review existing Virtual Interface configurations and either create a new Virtual Interface configuration, modify an existing configuration or delete an existing configuration:
Select Configuration > Profiles > Interface.
Expand the Interface menu to display its submenu options.
Select Virtual Interfaces.
Select Add to define a new Virtual Interface configuration, Edit to modify the configuration of an existing Virtual Interface or Delete to permanently remove a selected Virtual Interface.
The Basic Configuration screen displays by default, regardless of a whether a new Virtual Interface is created or an existing one is being modified.
If creating a new Virtual Interface, use the VLAN ID spinner control to define a numeric ID from 1 - 4094.
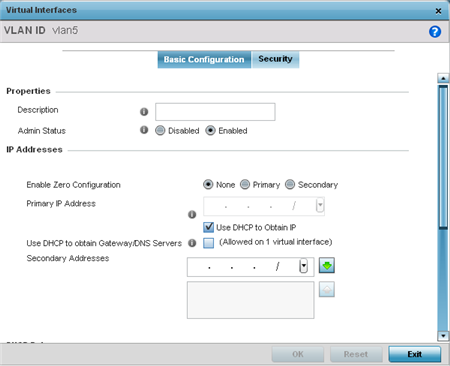
Define the following parameters from within the Properties field:
|
Description |
Provide or edit a description (up to 64 characters) for the Virtual Interface that helps differentiate it from others with similar configurations. |
|
Admin Status |
Either select either the Disabled or Enabled radio button to define this interface's current status. When set to Enabled, the Virtual Interface is operational and available. The default value is disabled. |
Set the following network information from within the IP Addresses field:
|
Enable Zero Configuration |
Define the IP address for the VLAN associated Virtual Interface. Zero Configuration can be a means of providing IP addresses for the virtual interface. Zero configuration (or zero config) is a wireless connection utility included with Microsoft Windows XP and later as a service dynamically selecting a network to connect based on a user's preferences and various default settings. Zero config can be used instead of a wireless network utility from the manufacturer of a computer's wireless networking device. |
|
Primary IP Address |
Define the IP address for the VLAN associated Virtual Interface. |
|
Use DHCP to Obtain IP |
Select this option to allow DHCP to provide the IP address for the Virtual Interface. Selecting this option disables the Primary IP address field. |
|
Use DHCP to obtain Gateway/DNS Servers |
Select this option to allow DHCP to obtain a default gateway address, and DNS resource for one virtual interface. This setting is disabled by default and only available when the Use DHCP to Obtain IP option is selected. |
|
Secondary Addresses |
Use the Secondary Addresses parameter to define additional IP addresses to associate with VLAN IDs. The address provided in this field is used if the primary IP address is unreachable. |
Refer to the DHCP Relay field to set the DHCP relay server configuration used with the Virtual Interface.
|
Respond to DHCP Relay Packets |
Select the Respond to DHCP Relay Packets option to allow the onboard DHCP server to respond to relayed DHCP packets on this interface. |
|
DHCP Relay IP Address |
Provide IP addresses for DHCP server relay resources. The interface VLAN and gateway should have their IP addresses set. The interface VLAN and gateway interface should not have DHCP client or DHCP Server enabled. DHCP packets cannot be relayed to an onboard DHCP Server. The interface VLAN and gateway interface cannot be the same. When changing from a default DHCP address to a fixed IP address, set a static route first. This is critical when the controller or service platform is being accessed from a subnet not directly connected to the controller or service platform and the default route was set from DHCP. |
Define the Network Address Translation (NAT) direction. Select either Inside, Outside or None.
Inside - The inside network is transmitting data over the network its intended destination. On the way out, the source IP address is changed in the header and replaced by the (public) IP address.
Outside - Packets passing through the NAT on the way back to the managed LAN are searched against the records kept by the NAT engine. There, the destination IP address is changed back to the specific internal private class IP address in order to reach the LAN over the network.
None - No NAT activity takes place. This is the default setting.

Note
Refer to Setting the Profile's NAT Configuration for instructions on creating a profile's NAT configuration.Select OK to save the changes to the basic configuration screen. Select Reset to revert to the last saved configuration.
 Print
this page
Print
this page Email this topic
 Feedback
 View PDF
 Download EPUB