

EXOS Cloning (clone.py)
Version 1.1.0.15
Minimum ExtremeXOS Required
- EXOS 21.1.1
- for stanalone and new stack member cloning
- EXOS 22.2
- for any stack cloning or slot synchronization
Most of the clone.py application features are compatible with EXOS 21.1 and later releases. Some features such as slot and cloning an entire stack require EXOS 22.2 and later.
clone.py began shipping as part of EXOS 22.3. To view the version of the cloning application available on an EXOS switch, run the command:
run script clone.py show
The latest version of the EXOS cloning application is here.
Files
| File | Description |
|---|---|
| onie-clone-1.1.0.15.xmod | ONIE switch clone image |
| summitX-clone-1.1.0.15.xmod | Summit switch clone image |
Overview
The clone.py application makes a complete software/configuration copy from one EXOS switch (master) to another (client).
- Cloning performs the following actions:
- copies the EXOS inactive operating system partition
- copies the EXOS active operating system partition
- (optionally) copies the
/usr/local/cfgdirectory (see –exos_only option) - aligns boot partitions with the master switch
- copies selected NVRAM elements
- Boot Partition
- CLI Banner
- Failsafe Username
- Failsafe Password
- Boot Mode (use for VPEX)
- SSH key
There are 2 basic ways to clone:
- Network cloning:
The master and client switches are connected to a network. The client makes a clone of the master across the network.
For network cloning, it is not necessary that the master and client switches are located physically together. As long as the IP address of the master is reachable by the client, the client may be cloned using network cloning.
Example: The master switch is located at the corporate offices in Chicago, USA. A switch is being installed in Paris, France. The new switch in Paris can clone the Chicago master switch over the network.
- USB cloning:
- The master switch image is recorded on a USB memory module which can be used to clone client switches.
Why use cloning?
- Complete “One Operation” Copy
Beyond the basic EXOS operating system image, there are additional modules (.xmod), which provide increased EXOS functionality, which may be added to your switches. Switches can contain policy files, scripts, additional configurations and applications.
Or you may create a reference switch with a baseline set of EXOS versions, scripts, policy files etc. just the way you would like all of your EXOS switches to be configured. Use the cloning application to align your new/existing client switches be just like the reference switch.
To align a new/existing client switch with existing switch contents/configurations would require downloading and installing all of the files/components to each client switch. The cloning application makes a complete software copy from one switch to another in one operation.
(See also: USB Zero Touch Provisioning in EXOS 22.3 for cloning new switches)
- Backup
- The cloning application can also be used to create a complete backup of a switch by cloning to a USB memory module. Both EXOS partitions, and the complete configuration directories are recorded on the USB memory module should the switch need to be restored.
- Restriction
The clone.py application can clone only clone from switches that use the same type of EXOS image.
For example, any switch that uses a summitX…xos image can be cloned to any other switch that uses a summitX…xos image.
A switch that uses an onie…xos image can be cloned to any other switch that uses an onie…xos image.
It is not possible to clone a switch that uses summitX…xos to an onie…xos switch.
I want to:
- Use My Network to:
- Use My USB Memory to:
- Synchronize My Stack:
Clone standalone switch to standalone switch over a network

Clone Standalone to Standalone
To clone over a network, both the master and client switch need the cloning application installed. (See Downloading The Cloning Application)
On the master switch
Start the cloning application. This only needs to be done once. The master switch may now serve client requests for cloning from any number of client switches.
Command:
run script clone.py master
Display:
clone.py is started as cloning master
Use "stop" option to stop cloning master services
On the client switch
For cloning on the client switch, let’s assume:
- the switch has an IP address either via DHCP or manually configured
- the switch can reach the IP address of the master switch
- Example if the master switch has the IP address
10.10.10.1. Usepingto test network connectivity from the client to the master switch.
ping vr VR-Mgmt 10.10.10.1for connectivity by the management portping vr VR-Default 10.10.10.1for connectivity by the front panel ports
Start the cloning operation on the client switch by entering the following CLI command:
run script clone.py from 10.10.10.1
Or to clone only the EXOS software and leave the client configuration unchanged:
run script clone.py from 10.10.10.1 --exos_only
Command:
run script clone.py from 10.10.10.1
Display:
++++++++++++++++++++++++++++++++++++++++++++++++++++++++++++++++++++++++++
+                             C A U T I O N                              +
+       Cloning will replace the EXOS partitions and configuration       +
+   on this switch with the contents of the master switch 10.10.10.1     +
++++++++++++++++++++++++++++++++++++++++++++++++++++++++++++++++++++++++++
Do you want to continue cloning? [y/N]: y
clone.py is started as cloning client.
This switch will become a copy of 10.68.61.131
DO NOT REMOVE POWER or REBOOT the switch until the operation is COMPLETE

Starting cloning process

Starting cloning process

Transfering NVRAM information from master switch
...........................
Transferring EXOS partitions and configuration

Transferring /usr/local/cfg directory.
Enabling partition write

Transferring inactive EXOS partition
Preserving file boot/system.cfg

Restoring file boot/system.cfg
......................
Transferring active EXOS partition
Preserving file boot/system.cfg
............
Restoring file boot/system.cfg
................................
Transferring control information from master switch
Copying remote file /proc/extr/nvram/bootsel to /proc/extr/nvram/bootsel
Copying remote file /proc/extr/nvram/cmdline to /proc/extr/nvram/cmdline
Copying remote file /proc/extr/nvram/fsu to /proc/extr/nvram/fsu
Copying remote file /proc/extr/nvram/fsp to /proc/extr/nvram/fsp

Config file fixup for this switch


Rebooting to master switch configuration
You may need to adjust any IP addresses that may have been copied from the master switch

************************
*   Cloning COMPLETE   *
************************
Rebooting ...
An example of cloning just the EXOS software leaving the local configuration unchanged:
Command using the --exos_only option:
run script clone.py from 10.10.10.1 --exos_only
Display:
+++++++++++++++++++++++++++++++++++++++++++++++++++++++++++++++
+                        C A U T I O N                        +
+   Cloning will replace the EXOS partitions on this switch   +
+     with the contents of the master switch 10.10.10.1       +
+++++++++++++++++++++++++++++++++++++++++++++++++++++++++++++++
Do you want to continue cloning? [y/N]: y
clone.py is started as cloning client.
This switch will become a copy of 10.68.61.131
DO NOT REMOVE POWER or REBOOT the switch until the operation is COMPLETE

Starting cloning process

Starting cloning process

Transferring NVRAM information from master switch
...........................
Transferring EXOS partitions and configuration

Transferring EXOS version information
Enabling partition write

Transferring inactive EXOS partition
Preserving file boot/system.cfg
.
Restoring file boot/system.cfg
.................
Transferring active EXOS partition
Preserving file boot/system.cfg
...
Restoring file boot/system.cfg
..................................
Transferring control information from master switch
Copying remote file /proc/extr/nvram/bootsel to /proc/extr/nvram/bootsel
Copying remote file /proc/extr/nvram/cmdline to /proc/extr/nvram/cmdline
Copying remote file /proc/extr/nvram/fsu to /proc/extr/nvram/fsu
Copying remote file /proc/extr/nvram/fsp to /proc/extr/nvram/fsp

Config file fixup for this switch


Rebooting to master switch EXOS image

************************
*   Cloning COMPLETE   *
************************
Rebooting ...
Clone a stack node replacement over a network
To add or replace a switch in a stack, cloning will convert a standalone switch to a stack member. Stacking attributes, such as slot number, are specified on the command line at the start of the cloning process. Once the new switch has cloned the stack master, it will reboot and become a stack member at the specified slot number.
- When cloning a switch to become a stacking member, additional NVRAM attributes are copied from the stack master to the new switch:
- stacking enabled
- stack MAC
- slot number – either provided or derived from the stacking master
- The
–Moption determines if the master-capable option is enabled.
To clone a new stack member over a network, the stacking master and the new stack member need the cloning application installed. (See Downloading The Cloning Application)
When cloning a stack member replacement or adding a new stack member to an existing stack, the simplest network configuration uses the switch management ports.
If the switch management port is normally not used, you can use it for cloning by assigning any IP address on the same subnet, such as a private IP 192.168.1.1 for the stack master and 192.168.1.2 for the new client switch, and connect the switch management ports directly to each other.
Example command on the master:
config mgmt ip 192.168.1.1/24
Example command on the new switch:
config mgmt ip 192.168.1.2/24
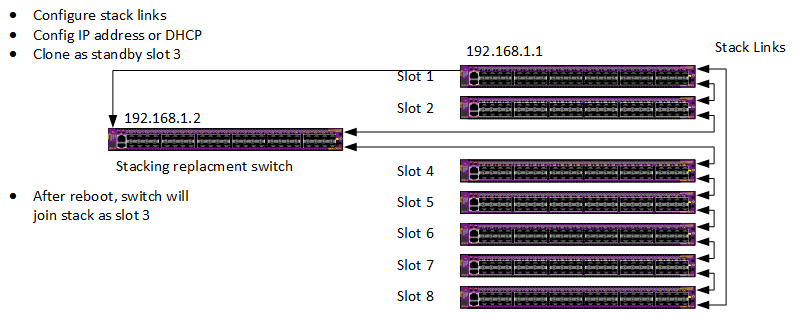
Clone Add/Replace Stack Switch
- The new/replacement stack member:
- The stacking links must be connected to the new stack member
- The stacking links must be configured properly for that switch type to have stacking connectivity
- Each switch type has different configuration options for enabling and configuring stacking links. See the EXOS users guide for more information
On the stack master
Command:
run script clone.py master
Display:
clone.py is started as cloning master
Use "stop" option to stop cloning master services
On the new stack member
First configure the switches stacking-support options so that stacking connectivity will be ready once the switch becomes stacking enabled. It is important to perform this step before cloning the new switch. If the switch is cloned as a stacking standby switch, console login and configuration options require contacting a stack master for user authentication. If the stacking links are not configured correctly, then only failsafe login is available
Once the standalone switch stack-support configuration is correct where the switches stack links match the stack, the clone operation will take care of everything else
On the stacking master, use the show stacking command to see if the new switch stacking links have been configured correctly with stacking-support.
In the examples below, 10.68.69.94 is the IP address of the stacking master
Command:
show stacking
Display:
Stack Topology is a Ring
This node is not in an Active Topology
Node MAC Address    Slot  Stack State  Role     Flags
------------------  ----  -----------  -------  ---
*00:04:96:98:94:d3  -     Disabled     Master   --- <-This is the standalone switch
 00:04:96:98:87:3a  4     Active       Standby  --O
 0e:00:00:00:00:85  5     Active       Standby  --O
 00:04:96:98:87:54  6     Active       Standby  --O
 0e:00:00:00:00:84  7     Active       Standby  --O
 00:04:96:14:0b:03  8     Active       Backup   --O
 00:04:96:14:0b:04  1     Active       Standby  --O
 0e:00:00:00:00:83  2     Active       Master   --O
* - Indicates this node
Flags:  (C) Candidate for this active topology, (A) Active Node
        (O) node may be in Other active topology
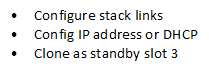
- Example:
- Clone new switch as standby slot 3
Command:
run script clone.py from 10.68.69.94 -s 3
Display:
#++++++++++++++++++++++++++++++++++++++++++++++++++++++++++++++++++++++++++++++
+                               C A U T I O N                                +
+         Cloning will replace the EXOS partitions and configuration         +
+     on this switch with the contents of the master switch 10.68.69.94      +
+                                                                            +
+                                  STACKING                                  +
+      You have requested this switch to be cloned to stack 10.68.69.94      +
+         Switches have a variety of stacking cabling options. See:          +
+                                                                            +
+                       configure stacking-support ...                       +
+                                    and                                     +
+                          enable stacking-support                           +
+                                                                            +
+   The stacking-support options MUST already be configured before cloning   +
+                  for stack connectivity to work correctly                  +
#++++++++++++++++++++++++++++++++++++++++++++++++++++++++++++++++++++++++++++++
Do you want to continue cloning? [y/N]: y
clone.py is started as cloning client.
This switch will become a copy of 10.68.69.94
DO NOT REMOVE POWER or REBOOT the switch until the operation is COMPLETE

Starting cloning process
Starting cloning process
Transferring EXOS partitions and configuration

Transferring active EXOS partition.......
Updating active partition
...................................
Transferring inactive EXOS partition...............
Transferring /usr/local/cfg directory....Transferring NVRAM information from master switch
Transferring control information from master switch
Transferring stacking information from master switch
Using first available slot 3

Rebooting to master switch configuration
You may need to adjust any IP addresses that may have been copied from the master switch
#************************
*   Cloning COMPLETE   *
#************************
Rebooting ...
Display:
Authentication Service (AAA) on the master node is now available for login.
admin
password:

ExtremeXOS
Copyright (C) 1996-2017 Extreme Networks. All rights reserved.
This product is protected by one or more US patents listed at http://www.extremenetworks.com/patents along with their foreign counterparts.
==============================================================================

You are connected to a Standby node.  Only a limited command set is supported.
You may use "telnet slot <slot_number>" to connect to the Master node to access
the full set of commands.

You are connected to a standby stack node\'s serial port.
Use "telnet slot <slot_number>" to connect to another node.

Press the <tab> or '?' key at any time for completions.
Remember to save your configuration changes.
After the new stack member switch reboots, you can verify its stack membership.
Command:
Slot-3 Stack.1 > show stacking
Display:
Stack Topology is a Ring
Active Topology is a Ring
Node MAC Address    Slot  Stack State  Role     Flags
------------------  ----  -----------  -------  ---
*00:04:96:98:94:d3  3     Active       Standby  CA-
 00:04:96:98:87:3a  4     Active       Standby  CA-
 0e:00:00:00:00:85  5     Active       Standby  CA-
 00:04:96:98:87:54  6     Active       Standby  CA-
 0e:00:00:00:00:84  7     Active       Standby  CA-
 00:04:96:14:0b:03  8     Active       Backup   CA-
 00:04:96:14:0b:04  1     Active       Standby  CA-
 0e:00:00:00:00:83  2     Active       Master   CA-
* - Indicates this node
Flags:  (C) Candidate for this active topology, (A) Active Node
        (O) node may be in Other active topology
The ‘*’ next to the top switch indicates the new switches position in the stack. The cloning operation has successfully cloned the switch into the slot 3 position as a standby switch.
On the stack master
- Example
- Clone new switch as master-capable backup switch in slot 2
On the master switch:
Command:
Slot-1 Stack.1 > show slot
Display:
Slots    Type                 Configured           State       Ports
--------------------------------------------------------------------
Slot-1   X450G2-48p-10G4      X450G2-48p-10G4      Operational   52
Slot-2                                             Empty         28
Slot-3   X450G2-24t-10G4                           Operational   28
Slot-4   X450G2-24p-G4                             Operational   28
Slot-5                                             Empty          0
Slot-6                                             Empty          0
Slot-7                                             Empty          0
Slot-8                                             Empty          0
The display shows that slot 2 is missing. This was the backup switch for the stack.
Command:
Slot-1 Stack.3 > run script clone.py master
Display:
clone.py is started as cloning master
Use "stop" option to stop cloning master services
On the new stack member
On the new switch, clone the new stack member as master-capable slot 2
Command:
run script clone.py from 10.68.69.50 -M -s 2
Display:
++++++++++++++++++++++++++++++++++++++++++++++++++++++++++++++++++++++++++++++
+                               C A U T I O N                                +
+         Cloning will replace the EXOS partitions and configuration         +
+     on this switch with the contents of the master switch 10.68.69.50      +
+                                                                            +
+                                  STACKING                                  +
+      You have requested this switch to be cloned to stack 10.68.69.50      +
+                            as a stacking master                            +
+         Switches have a variety of stacking cabling options. See:          +
+                                                                            +
+                       configure stacking-support ...                       +
+                                    and                                     +
+                          enable stacking-support                           +
+                                                                            +
+   The stacking-support options MUST already be configured before cloning   +
+                  for stack connectivity to work correctly                  +
++++++++++++++++++++++++++++++++++++++++++++++++++++++++++++++++++++++++++++++
Do you want to continue cloning? [y/N]: y
clone.py is started as cloning client.
This switch will become a copy of 10.68.69.50
DO NOT REMOVE POWER or REBOOT the switch until the operation is COMPLETE

Starting cloning process

Starting cloning process

Transferring NVRAM information from master switch
...........................
Transferring stacking information from master switch
Cannot find stacking node information for slot 2
Adding switch as a new stack member slot 2
Switch will be stacking master capable

Transferring EXOS partitions and configuration

Transferring /usr/local/cfg directory.
Enabling partition write

Transferring inactive EXOS partition
Preserving file boot/system.cfg

Restoring file boot/system.cfg
........
Transferring active EXOS partition
Preserving file boot/system.cfg
.....
Restoring file boot/system.cfg
........
Transferring control information from master switch
Copying remote file /proc/extr/nvram/bootsel to /proc/extr/nvram/bootsel
Copying remote file /proc/extr/nvram/cmdline to /proc/extr/nvram/cmdline
Copying remote file /proc/extr/nvram/fsu to /proc/extr/nvram/fsu
Copying remote file /proc/extr/nvram/fsp to /proc/extr/nvram/fsp

Config file fixup for this switch


Rebooting to master switch configuration
You may need to adjust any IP addresses that may have been copied from the master switch

************************
*   Cloning COMPLETE   *
************************
Rebooting ...
Checking to see the results of cloning a new stack backup switch.
Command:
Slot-2 Stack.1 > show switch
Display:
SysName:          Stack
SysLocation:
SysContact:       support@extremenetworks.com, +1 888 257 3000
System MAC:       0E:00:00:00:00:83
System Type:      X450G2-24p-10G4 (Stack)

SysHealth check:  Enabled (Normal)
Recovery Mode:    All
System Watchdog:  Enabled

Current Time:     Fri Nov 17 11:01:57 2017
Timezone:         [Auto DST Disabled] GMT Offset: 0 minutes, name is UTC.
Boot Time:        Fri Nov 17 10:57:14 2017
Boot Count:       643
Next Reboot:      None scheduled
System UpTime:    20 hours 23 minutes 53 seconds

Slot:             Slot-2 *                     Slot-1
                  ------------------------     ------------------------
Current State:    BACKUP (In Sync)             MASTER

Image Selected:   primary                      primary
Image Booted:     primary                      primary
Primary ver:      22.1.1.5                     22.1.1.5
Secondary ver:    22.4.0.37                    22.4.0.37

Config Selected:  primary.cfg
Config Booted:    primary.cfg

primary.cfg       Created by ExtremeXOS version 22.4.0.37
                  754635 bytes saved on Thu Nov 16 14:30:15 2017
The new switch was correctly cloned to slot 2 as the backup switch.
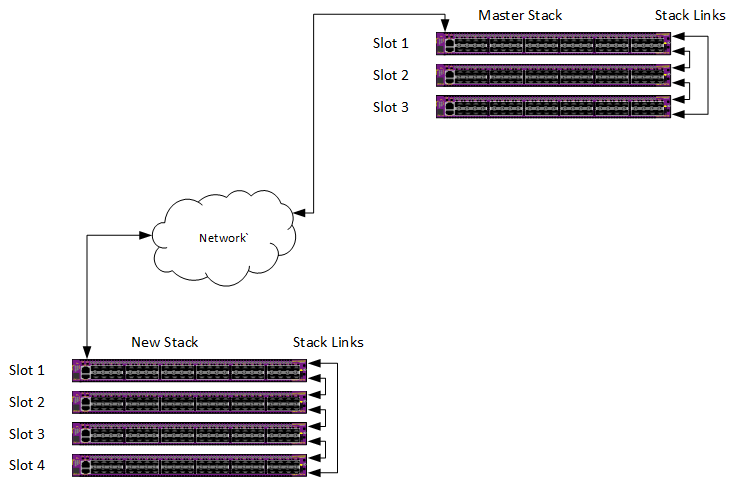
Clone an entire stack over a network
EXOS 22.2 is a minimum requirement for using the cloning application ‘Stack Cloning’ capability. Each stack member switch must be running EXOS 22.2 or later.
To clone over a network, both the master stack and new stack switch need the cloning application installed. (See Downloading The Cloning Application)
When constucting a new stack, it is sometimes challenging to get the right software on the standalone switches to correctly form a stack. Aligning the boot partition of all the stack member switches is also important for future software upgrades. Using the cloning application, the process of getting the right software on each of the stack members is simplified.
Clone Entire Stack
On the master stack
Start the cloning application. This only needs to be done once. The master switch may now serve client requests for cloning.
Command:
run script clone.py master
Display:
clone.py is started as cloning master
Use "stop" option to stop cloning master services
On the new stack
- Cloning cannot assist with getting the stacking link connectivity correct. Each switch type has unique configurations for
enable stacking-supportconfig stacking easy-setup
It doesn’t matter if the switches have mismatched software, or the boot partitions do not align. The cloning application will take care of that.
Check the new stack to see the current status
Command:
Slot-1 Stack.1 > show slot
Display:
Slots    Type                 Configured           State       Ports
--------------------------------------------------------------------
Slot-1   X450G2-48p-10G4      X450G2-48p-10G4      Operational   52
Slot-2   X450G2-24p-10G4                           Failed        28
Slot-3   X450G2-24t-10G4                           Failed        28
Slot-4   X450G2-24p-G4                             Failed        28
Slot-5                                             Empty          0
Slot-6                                             Empty          0
Slot-7                                             Empty          0
Slot-8                                             Empty          0
The stack has been formed with some kind of software on all of the switches. The display shows that slots 2,3,4 are incompatible with the stack master.
In this example, the new stack is cloned from the master stack. The master stack IP address is 10.68.61.81.
The stack cloning operation is performed in 2 steps:
- clone the new stack master switch from the master stack
- synchronize the rest of the new stack members with the new stack master switch using the EXOS autoexec.xsf capability
Depending on the types of switches, the stack cloning operation may take 4-5 minutes per stack member. Newer switches take less time.
First step: Start the cloning application on the new stack master switch. It will clone the new stack master switch from the master stack.
Command:
run script clone.py from 10.68.61.81
Display:
+++++++++++++++++++++++++++++++++++++++++++++++++++++++++++++++++++++++++
+                             C A U T I O N                             +
+      Cloning will replace the EXOS partitions and configuration       +
+   on this switch with the contents of the master switch 10.68.61.81   +
+++++++++++++++++++++++++++++++++++++++++++++++++++++++++++++++++++++++++
Do you want to continue cloning? [y/N]: y
No more user input is needed after the question is answered.
Display:
clone: 1.1.0.15

+++++++++++++++++++++++++++++++++++++++++++++++++++++++++++++++++++++++++
+                             C A U T I O N                             +
+      Cloning will replace the EXOS partitions and configuration       +
+   on this switch with the contents of the master switch 10.68.61.76   +
+++++++++++++++++++++++++++++++++++++++++++++++++++++++++++++++++++++++++
Do you want to continue cloning? [y/N]: y
clone.py is started as cloning client.
This switch will become a copy of 10.68.61.76
DO NOT REMOVE POWER or REBOOT the switch until the operation is COMPLETE

* (Software Update Required) Slot-1 Stack.2 # Cloning stack master. DO NOT REBOOT OR POWER CYCLE this switch

Starting cloning process

Starting cloning process
..
Transferring NVRAM information from master switch
...........................
Transferring EXOS partitions and configuration

Transferring /usr/local/cfg directory
Enabling partition write

Transferring inactive EXOS partition
Preserving file boot/system.cfg
.
Restoring file boot/system.cfg
.......
Transferring active EXOS partition
Preserving file boot/system.cfg
.............
Restoring file boot/system.cfg
.........
Transferring control information from master switch
Copying remote file /proc/extr/nvram/bootsel to /proc/extr/nvram/bootsel
Copying remote file /proc/extr/nvram/cmdline to /proc/extr/nvram/cmdline
Copying remote file /proc/extr/nvram/fsu to /proc/extr/nvram/fsu
Copying remote file /proc/extr/nvram/fsp to /proc/extr/nvram/fsp

Config file fixup for this switch
..
++++++++++++++++++++++++++++++++++++++++++++++++++++++++++++++++++++++++
+   CLONING will continue to synchronize the remaining stack members   +
+                       after the stack reboots                        +
++++++++++++++++++++++++++++++++++++++++++++++++++++++++++++++++++++++++


Rebooting to master switch configuration
You may need to adjust any IP addresses that may have been copied from the master switch
Rebooting ...
reboot: Restarting system

Copyright 2014 Extreme Networks, Inc.

Starting CRC of Default image
Using Default image ...

Copyright 2014 Extreme Networks, Inc.


Press and hold the <spacebar> to enter the bootrom:  0
Loading Secondary OS Image

Starting ExtremeXOS 22.2.1b5
Copyright (C) 1996-2017 Extreme Networks.  All rights reserved.
This product is protected by one or more US patents listed at http://www.extremenetworks.com/patents along with their foreign counterparts.


(pending-AAA) login:

Authentication Service (AAA) on the master node is now available for login.
At this point, the new stack master switch has been cloned from the master stack.
The cloning application performs the next step where the new master synchronizes the rest of the new stack members.
There may be a few minute delay at this point while EXOS prepares to run the autoexec.xsf script to finish the stack cloning operation.
Display:
Loading autoexec.xsf.
*********************
CLONING STACK MEMBERS
*********************
Cloning slot 4 started
............................................................................
Slot 4 cloning COMPLETE
Cloning slot 3 started
.........................................................
Slot 3 cloning COMPLETE
Cloning slot 2 started
..........................................................
Slot 2 cloning COMPLETE
****************
CLONING COMPLETE
****************
Script Loaded Successfully.
The output of loading autoexec script can be seen by executing "show script output autoexec".
Clone standalone switch to standalone switch using USB memory
Customers can create a complete switch image and store it on USB memory. The clone.py application is also stored on the USB memory. The USB memory can then be used to clone other switches, or restore a switch to the state when the switch information was saved to USB. In EXOS 22.3, a clone image stored on USB memory may be used to auto clone a switch using the USBZTP feature. (See USB ZTP for more details.)

Clone To/From USB Memory
Copying a switch to USB
Copying the entire contents of a switch to a USB memory module is the same procedure for both a standalone and a stack image.

Clone a switch to USB memory
Command:
# run script clone.py usb -o
Display:
clone: 1.1.0.15

+++++++++++++++++++++++++++++++++++++++++++++++++++++++++++++++++++++++++++
+   Clone EXOS and configuration partitions on this switch to the file:   +
+            /usr/local/ext/xos1439G-00484_2018-02-04_2037.cln            +
+++++++++++++++++++++++++++++++++++++++++++++++++++++++++++++++++++++++++++
Do you want to continue cloning? [y/N]: y
.......................................
-rwxr-xr-x    1 root     root    459603456 Feb  4 20:38 /usr/local/ext/xos1439G-00484_2018-02-04_2037.cln

 1K-blocks      Used Available Use%
   7848960    448984   7399976   6%


************************
*   Cloning COMPLETE   *
************************
The image file name contains the switch serial number, date and time the clone image was created.
USB to switch
To create a standalone clone from a USB memory module, insert the USB memory into the switch.
Using the ls /usr/local/ext command, determine the name of the clone image file (ending with .cln)
Command:
# ls /usr/local/ext
Display:
-rwxr-xr-x    1 root     root       149626 Feb  4 20:38 clone.py
-rwxr-xr-x    1 root     root    459603456 Feb  4 20:38 xos1439G-00484_2018-02-04_2037.cln
Enter the command to clone the switch from the desired file name on the USB memory module:
Command:
run script clone.py usb -i xos1439G-00484_2018-02-04_2037.cln
Display:
clone: 1.1.0.15

++++++++++++++++++++++++++++++++++++++++++++++++++++++++++++++++++
+                         C A U T I O N                          +
+   Cloning will replace the EXOS partitions and configuration   +
+        on this switch with the contents of the usb file        +
+       /usr/local/ext/xos1439G-00484_2018-02-04_2037.cln        +
++++++++++++++++++++++++++++++++++++++++++++++++++++++++++++++++++
Do you want to continue cloning? [y/N]: y
DO NOT REMOVE POWER or REBOOT the switch until the operation is COMPLETE
Switch will reboot when cloning is COMPLETE
...
Transferring NVRAM information from USB
..........................
Transferring /usr/local/cfg directory

Transferring inactive EXOS partition from USB
..........
Transferring active EXOS partition from USB
.............
Config file fixup for this switch
..

****************************
*   USB Cloning COMPLETE   *
****************************
reboot: Restarting system
Clone an entire stack using USB memory
Cloning an entire stack from a USB memory module has the same requirements as cloning a stack over the networks. Clone an entire stack over a network.
Instead of cloning the new stack over the network, an existing stack master image is copied to a USB memory module using the procedure Copying a switch to USB.
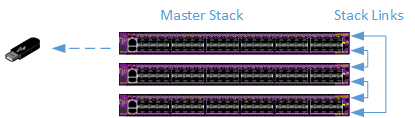
Copy Existing Stack Master to USB
Once you have formed the new stack and are ready to clone it using the image captured on a USB memory module.
Insert the USB into the new stack master. Note: The clone image must come from another stack
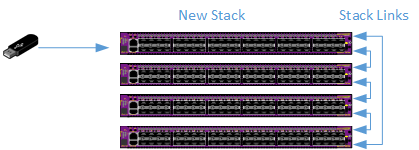
Copy USB to New Stack Master
Command:
# run script clone.py usb -i /usr/local/ext/xos1031G-00001_2018-02-02_1351.cln
While the new stack master is performing the cloning operation, the other switches in the new stack may reboot.
Display:
clone: 1.1.0.15

++++++++++++++++++++++++++++++++++++++++++++++++++++++++++++++++++
+                         C A U T I O N                          +
+   Cloning will replace the EXOS partitions and configuration   +
+        on this switch with the contents of the usb file        +
+       /usr/local/ext/xos1031G-00001_2018-02-02_1351.cln        +
++++++++++++++++++++++++++++++++++++++++++++++++++++++++++++++++++
Do you want to continue cloning? [y/N]: y
DO NOT REMOVE POWER or REBOOT the switch until the operation is COMPLETE
Switch will reboot when cloning is COMPLETE
......
Transferring NVRAM information from USB
.........................
Transferring /usr/local/cfg directory
.
Transferring inactive EXOS partition from USB
....
Preserving file alt/boot/system.cfg
....
Restoring file alt/boot/system.cfg

Transferring active EXOS partition from USB
.....
Preserving file boot/system.cfg
...
Restoring file boot/system.cfg

Config file fixup for this switch
..
++++++++++++++++++++++++++++++++++++++++++++++++++++++++++++++++++++++++
+   CLONING will continue to synchronize the remaining stack members   +
+                       after the stack reboots                        +
++++++++++++++++++++++++++++++++++++++++++++++++++++++++++++++++++++++++
reboot: Restarting system
The new stack master switch will reboot at this point. Once the new stack master has rebooted, it will synchronize the remaining stack members using the EXOS autoexec.xsf facility. Stack members will be cloned based on stack link distance from the master. Switches furthest away from the master, via stack links, will be cloned first.
Display:
(pending-AAA) login:

Authentication Service (AAA) on the master node is now available for login.

Loading autoexec.xsf.
*********************
CLONING STACK MEMBERS
*********************
clone: 1.1.0.15
Cloning slot 4 started
........................................................
Slot 4 cloning COMPLETE
Cloning slot 3 started
....................................................................
Slot 3 cloning COMPLETE
Cloning slot 2 started
.......................................................
Slot 2 cloning COMPLETE
****************
CLONING COMPLETE
****************
Script Loaded Successfully.
The output of loading autoexec script can be seen by executing "show script output autoexec".
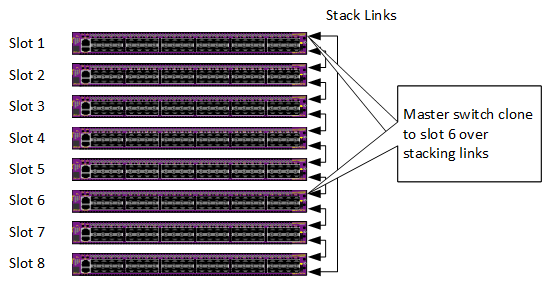
Synchronize an entire stack to the master
Beginning with EXOS 22.2, the move of functionality from the Linux kernel to user space rendered the stacking command synchronize slot <> non-functional. While the CLI remained the same, the implementation was replaced by the clone.py application.
In this mode the clone.py application uses the stacking link to copy the file system partitions and stacking NVRAM objects from the stack master to the specified slot
EXOS sync slot command
When using the CLI command to start the clone.py application, only one slot may be specified.
When running the clone.py application directly, any number of slots including the keyword ‘all’ may be specified. If more than one slot is specified, the master is cloned to each slot one at a time. Early versions would clone the entire stack at once but ran into issues if some slots finished and rebooted, disrupting the stack link to other switches that had not completed the cloning operation.
Application Description
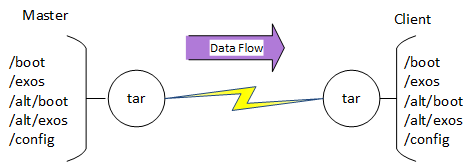
The clone.py application uses a master/client model. The master use the Linux tar utility to tar the EXOS partitions directly to a socket connection to the client. The client uses the Linux tar utility to read the input directly from the socket connect to the master.
There are no intermediate tar files created on either the master or client switch.
Master
When the clone.py is run on a switch as a master, it acts as a server and listens for connection requests from clone.py applications running as clients.
The master will serve up to 8 cloning clients at a time. The master listens on VR-Mgmt and VR-Default for external client requests and VR-Control for stacking cloning requests.
Client
When the clone.py application runs as a client, it attempts to connect with the clone master on VR-Mgmt and VR-Default for standalone operations, and VR-Control for synchronize slot <>.
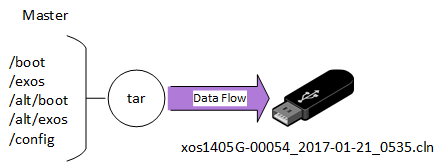
USB
When the clone.py application is used to create a clone image on the USB memory, it creates a file with a .cln suffix
When the clone.py application is used to reimage a switch, the file name is provided in the command. Typically it will be the <file>.cln created by the creation process
Downloading The Cloning Application
If the EXOS switch can connect with the github directly, use the following CLI command to upgrade clone.py to the latest version:
Using the management port
download url https://github.com/extremenetworks/EXOS_Apps/raw/master/Clone/summitX-clone-1.1.0.15.xmod
Or
download url https://github.com/extremenetworks/EXOS_Apps/raw/master/Clone/onie-clone-1.1.0.15.xmod
Using a front panel port
download url https://github.com/extremenetworks/EXOS_Apps/raw/master/Clone/summitX-clone-1.1.0.15.xmod vr VR-Default
Or
download url https://github.com/extremenetworks/EXOS_Apps/raw/master/Clone/onie-clone-1.1.0.15.xmod vr VR-Default
EXOS Command Line
Top level help
There are multiple levels of help available in clone.py. The top level help displays the clone.py options. Each option may have additional help.
Command:
run script clone.py -h
Display:
usage: clone [-h] [-d] {master,stop,show,from,usb} ...

positional arguments:
  {master,stop,show,from,usb}
    master              Start the remote cloning server on this switch
    stop                Stop the clone application
    show                Show the running status of clone.
    from                Cloning this switch from the <ipaddress> provided.
    usb                 Cloning this switch to/from the usb memory at
                        /usr/local/ext/

optional arguments:
  -h, --help            show this help message and exit
  -d, --debug           Enable debug
master
Start clone.py as a server for other clone.py clients. The contents of the clone master switch will be duplicated to the clients
Command:
run script clone.py master
Display:
clone.py is started as cloning master
Use "stop" option to stop cloning master services
Command:
run script clone.py stop
Display:
Stopping clone.py
clone.py is stopped
stop
Stop clone.py. A message displays whether clone.py is stopped or was not running
Command:
run script clone.py stop
Display:
Stopping clone.py
clone.py is stopped
Command:
run script clone.py stop
Display:
clone.py is not running
show
Displays if clone.py is running and the version number
Command:
run script clone.py show
Display:
clone.py Version: 1.0.0.3 is running
Command:
run script clone.py show
Display:
clone.py Version: 1.0.0.3 is not running
from
from help
getting help for the from option
Command:
run script clone.py from -h
Display:
usage: clone from [-h] [-f] [-s STACKING_SLOT] [-M] [-e] <ipaddress>

positional arguments:
  <ipaddress>           The IP address of the master switch you are cloning to
                        this switch

optional arguments:
  -h, --help            show this help message and exit
  -f, --force           Force the cloning operation. Do not ask for
                        confirmation
  -s STACKING_SLOT, --stacking_slot STACKING_SLOT
                        Also clone stacking information from a stack slot.
                        Slot 0 finds the lowest available slot number
  -M, --stacking_master
                        For stacking, enable this switch to be master_capable
  -e, --exos_only       Only clone EXOS partitions. Do not clone the
                        configuration
<ipaddress>- The ipaddress of the switch running clone.py as a master. E.g. run script clone.py from 10.10.10.1 will attempt to contact a clone.py master running on 10.10.10.1 on both the VR-Mgmt and VR-Default VRs
-h- show this help message and exit
-f, --force- By default, clone.py prompts for a confirmation if it should proceed with the cloning operation. If clone.py is used by another script or CLI command, the prompt is not desired. The –force option bypasses the confirmation prompt
-s, --stacking_slot <slot>- This option is used to tell clone.py to clone the switch as a member of a stack. The <ipaddress> is the stack masters IP address and clone.py is running as a clone master on the stack master. The slot can be provided so that the switch will have that stacking slot number when cloning is complete, or slot number can be 0. If slot is 0, clone.py will ask the stacking master which slot number is the first available
-M, --stacking_master- When –s is specified indicating that clone.py is cloning the switch to be a stack member, the default behavior is to configure the switch as a standby node. Using this option, the switch is configured to be
stacking master-capable on -e, --exos_only- If this option is provided, the
/usr/local/cfgpartition is not copied from the clone master. This is useful to synchronize /exos, /boot, /alt/exos, /alt/boot and which is the boot partition. It is faster that performing 2 upgrades and aligning which is the booted image using conventional CLI commands. The contents of the/usr/local/cfgpartition are unaffected
from Standalone to Standalone
Creating a standalone clone from a standalone master. In this example clone.py is running as master on 10.68.65.81
Command:
run script clone.py from 10.68.65.81
Display:
+++++++++++++++++++++++++++++++++++++++++++++++++++++++++++++++++++++++++
+                             C A U T I O N                             +
+      Cloning will replace the EXOS partitions and configuration       +
+   on this switch with the contents of the master switch 10.68.65.81   +
+++++++++++++++++++++++++++++++++++++++++++++++++++++++++++++++++++++++++
Do you want to continue cloning? [y/N]: y
clone.py is started as cloning client.
This switch will become a copy of 10.68.65.81
DO NOT REMOVE POWER or REBOOT the switch until the operation is COMPLETE

Starting cloning process
Starting cloning process
Transferring EXOS partitions and configuration

Transferring active EXOS partition...............
Updating active partition
..................................................
Transferring inactive EXOS partition........................
Transferring /usr/local/cfg directory..........
Transferring NVRAM information from master switch
Transferring control information from master switch

Rebooting to master switch configuration
You may need to adjust any IP addresses that may have been copied from the master switch
************************
*   Cloning COMPLETE   *
************************
Rebooting ...
from Stack to Standalone
This example shows a standalone switch being cloned from a stack master. The –s or –stacking_slot <slot> tells clone.py the type of clone to be done
When cloning to become a stacking member, additional NVRAM attributes are copied * stacking enabled * stack MAC * slot number – either provided or derived from the stacking master * The –M option determines if the master-capable option is enabled.
On the stack master
Command:
Stack.1 > run script clone.py master
Display:
clone.py is started as cloning master
Use "stop" option to stop cloning master services

Slot-2 Stack.2 #
On the standalone switch First configure the switches stacking-support options so that stacking connectivity will be ready once the switch becomes stacking enabled. It is important to perform this step before cloning the standalone switch. If the switch is cloned as a stacking standby switch, console login and configuration options require contacting a stack master for user authentication. If the stacking links are not configured correctly, then only failsafe login is available
Once the standalone switch stack-support configuration is correct so the switches stack links match the stack, the clone operation will take care of everything else
Use the show stacking command to see if the stacking links have been configured correctly with stacking-support.
Command:
> show stacking
Display:
Stack Topology is a Ring
This node is not in an Active Topology
Node MAC Address    Slot  Stack State  Role     Flags
------------------  ----  -----------  -------  ---
*00:04:96:98:94:d3  -     Disabled     Master   --- <-This is the standalone switch
 00:04:96:98:87:3a  4     Active       Standby  --O
 0e:00:00:00:00:85  5     Active       Standby  --O
 00:04:96:98:87:54  6     Active       Standby  --O
 0e:00:00:00:00:84  7     Active       Standby  --O
 00:04:96:14:0b:03  8     Active       Backup   --O
 00:04:96:14:0b:04  1     Active       Standby  --O
 0e:00:00:00:00:83  2     Active       Master   --O
* - Indicates this node
Flags:  (C) Candidate for this active topology, (A) Active Node
        (O) node may be in Other active topology
Example: Clone as standby, let the stacking master select the first available slot number
Command:
> run script clone.py from 10.68.69.94 -s 0
Display:
++++++++++++++++++++++++++++++++++++++++++++++++++++++++++++++++++++++++++++++
+                               C A U T I O N                                +
+         Cloning will replace the EXOS partitions and configuration         +
+     on this switch with the contents of the master switch 10.68.69.94      +
+                                                                            +
+                                  STACKING                                  +
+      You have requested this switch to be cloned to stack 10.68.69.94      +
+         Switches have a variety of stacking cabling options. See:          +
+                                                                            +
+                       configure stacking-support ...                       +
+                                    and                                     +
+                          enable stacking-support                           +
+                                                                            +
+   The stacking-support options MUST already be configured before cloning   +
+                  for stack connectivity to work correctly                  +
++++++++++++++++++++++++++++++++++++++++++++++++++++++++++++++++++++++++++++++
Do you want to continue cloning? [y/N]: y
clone.py is started as cloning client.
This switch will become a copy of 10.68.69.94
DO NOT REMOVE POWER or REBOOT the switch until the operation is COMPLETE

* > Starting cloning process
Starting cloning process
Transferring EXOS partitions and configuration

Transferring active EXOS partition.......
Updating active partition
...................................
Transferring inactive EXOS partition...............
Transferring /usr/local/cfg directory....Transferring NVRAM information from master switch
Transferring control information from master switch
Transferring stacking information from master switch
Using first available slot 3

Rebooting to master switch configuration
You may need to adjust any IP addresses that may have been copied from the master switch
************************
*   Cloning COMPLETE   *
************************
Rebooting ...

reboot: Restarting system

Copyright 2014 Extreme Networks, Inc.

Starting CRC of Default image
Using Default image ...

Copyright 2014 Extreme Networks, Inc.


Press and hold the <spacebar> to enter the bootrom:  0
Loading Primary OS Image

Starting ExtremeXOS 22.2.0b38
Copyright (C) 1996-2017 Extreme Networks.  All rights reserved.
This product is protected by one or more US patents listed at http://www.extremenetworks.com/patents along with their foreign counterparts.

 ______      _
|  ____|    | |
| |__  __  _| |_ _ __ ___ _ __ ___   ___
|  __| \ \/ / __| '__/ _ \ '_ ` _ \ / _ \
| |____ >  <| |_| | |  __/ | | | | |  __/
|______/_/\_\\__|_|  \___|_| |_| |_|\___|
 _   _      _                      _
| \ | |    | |                    | |
|  \| | ___| |___      _____  _ __| | _____
| . ` |/ _ \ __\ \ /\ / / _ \| '__| |/ / __|
| |\  |  __/ |_ \ V  V / (_) | |  |   <\__ \
|_| \_|\___|\__| \_/\_/ \___/|_|  |_|\_\___/

(pending-AAA) login:

Authentication Service (AAA) on the master node is now available for login.
admin
password:

ExtremeXOS
Copyright (C) 1996-2017 Extreme Networks. All rights reserved.
This product is protected by one or more US patents listed at http://www.extremenetworks.com/patents along with their foreign counterparts.
==============================================================================


You are connected to a Standby node.  Only a limited command set is supported.
You may use "telnet slot <slot_number>" to connect to the Master node to access
the full set of commands.

You are connected to a standby stack node's serial port.
Use "telnet slot <slot_number>" to connect to another node.

Press the <tab> or '?' key at any time for completions.
Remember to save your configuration changes.


* Slot-3 Stack.1 > show stacking
Display:
Stack Topology is a Ring
Active Topology is a Ring
Node MAC Address    Slot  Stack State  Role     Flags
------------------  ----  -----------  -------  ---
*00:04:96:98:94:d3  3     Active       Standby  CA-
 00:04:96:98:87:3a  4     Active       Standby  CA-
 0e:00:00:00:00:85  5     Active       Standby  CA-
 00:04:96:98:87:54  6     Active       Standby  CA-
 0e:00:00:00:00:84  7     Active       Standby  CA-
 00:04:96:14:0b:03  8     Active       Backup   CA-
 00:04:96:14:0b:04  1     Active       Standby  CA-
 0e:00:00:00:00:83  2     Active       Master   CA-
* - Indicates this node
Flags:  (C) Candidate for this active topology, (A) Active Node
        (O) node may be in Other active topology
* Slot-3 Stack.2 >
usb
This option is used to create a clone image file on USB memory
usb help
Command:
run script clone.py usb -h
Display:
usage: clone usb [-h] [-f] [-e] [-i USB_INPUT | -o | -v USB_FILE]

optional arguments:
  -h, --help            show this help message and exit
  -f, --force           Force the cloning operation. Do not ask for
                        confirmation
  -e, --exos_only       Only clone EXOS partitions. Do not clone the
                        configuration
  -i USB_INPUT, --usb_input USB_INPUT
                        The clone input file name on /usr/local/ext/<file>
  -o                    Create a clone of this switch in /usr/local/ext/<file>
  -v USB_FILE, --usb_file USB_FILE
                        Display the EXOS versions contained in a clone file
                        /usr/local/ext/
-h- show this help message and exit
-f, --force- By default, clone.py prompts for a confirmation if it should proceed with the cloning operation. If clone.py is used by another script or CLI command, the prompt is not desired. The –force optoin bypasses the confirmation promt
-e, --exos_only- If this option is provided, the
/usr/local/cfgpartition is not copied from the clone master. This is useful to synchronize /exos, /boot, /alt/exos, /alt/boot and the boot partition selection. It is faster that performing 2 upgrades and aligning which is the booted image using conventional CLI commands. The contents of the/usr/local/cfgpartition are unaffected. -i USB_INPUT, --usb_input USB_INPUT- When cloning a switch from a USB memory file created by
usb –o, this option specifies the file name of theclone.py –o <filename>used as input to the clone.py application. -o- clone.py creates a clone image file on USB memory
/usr/local/ext -v USB_FILE, --usb_file USB_FILE- Show the EXOS versions of a file created by usb –o. The EXOS versions for /exos and /alt/exos are useful pieces of information to know when cloning a new switch. This command extracts the EXOS versions from the .cln file and displays the EXOS versions.
usb -o
This option creates a clone image file on USB memory, Using the –e (–exos_only) option, the /usr/local/cfg partition is not included in the clone file.
This option requires a USB memory is inserted into the switches USB port. USB memory is mounted on directory /usr/local/ext.
Command:
run script clone.py usb -o -e
Display:
+++++++++++++++++++++++++++++++++++++++++++++++++++++++++
+   Clone EXOS partitions on this switch to the file:   +
+   /usr/local/ext/xos1405G-00125_2017-01-21_1757.cln   +
+++++++++++++++++++++++++++++++++++++++++++++++++++++++++
Do you want to continue cloning? [y/N]: y
......................................
-rwxr-xr-x    1 root     root    453981696 Jan 21 17:58 /usr/local/ext/xos1405G-00125_2017-01-21_1757.cln

 1K-blocks      Used Available Use%
   7958912    443428   7515484   6%

************************
*   Cloning COMPLETE   *
************************
In the example above, the clone file name xos1405G-00125_2017-01-21_1757.cln has the following parts * xos – constant identifying this file was create from EXOS serial number of the switch used to create the clone image file * 2017-01-21_1757 – The date and time the clone image file was create * .cln – file suffix indicating this file was created by clone.py
In addition to creating the clone image, the clone.py application is also copied to the USB memory.
See clone.pyc in the example below:
Command:
ls /usr/local/ext
Display:
-rwxr-xr-x    1 root     root        81344 Jan 21 17:58 clone.pyc
-rwxr-xr-x    1 root     root    453981696 Jan 21 17:58 xos1405G-00125_2017-01-21_1757.cln

 1K-blocks      Used Available Use%
   7958912    443428   7515484   6%
Including the clone.py on the USB memory makes it easier to insert this USB memory into other switches and image them. The application is already included on the USB memory so it will not be necessary to install it on the new switch.
usb –i <file>
This option will clone a new switch from a file on USB memory.
Command:
run script clone.py usb -i xos1405G-00125_2017-01-21_1757.cln
Display:
++++++++++++++++++++++++++++++++++++++++++++++++++++++++++++++++++
+                         C A U T I O N                          +
+   Cloning will replace the EXOS partitions and configuration   +
+        on this switch with the contents of the usb file        +
+       /usr/local/ext/xos1405G-00125_2017-01-21_1757.cln        +
++++++++++++++++++++++++++++++++++++++++++++++++++++++++++++++++++
Do you want to continue cloning? [y/N]: y
DO NOT REMOVE POWER or REBOOT the switch until the operation is COMPLETE
Switch will reboot when cloning is COMPLETE

Transferring /usr/local/cfg directory
...
Transferring inactive EXOS partition
...........
Transferring active EXOS partition
..............
****************************
*   USB Cloning COMPLETE   *
****************************
...reboot: Restarting system
Using the –e option will only image the EXOS partitions. The /usr/local/cfg partition will not be included in the cloning process
Command:
run script clone.py usb -i xos1405G-00125_2017-01-21_1757.cln -e
Display:
+++++++++++++++++++++++++++++++++++++++++++++++++++++++++++++++
+                        C A U T I O N                        +
+   Cloning will replace the EXOS partitions on this switch   +
+              with the contents of the usb file              +
+      /usr/local/ext/xos1405G-00125_2017-01-21_1757.cln      +
+++++++++++++++++++++++++++++++++++++++++++++++++++++++++++++++
Do you want to continue cloning? [y/N]: y
DO NOT REMOVE POWER or REBOOT the switch until the operation is COMPLETE
Switch will reboot when cloning is COMPLETE

Transferring inactive EXOS partition
.................
Transferring active EXOS partition
...........
****************************
*   USB Cloning COMPLETE   *
****************************
.....reboot: Restarting system
usb –v
A clone image file created by usb –o contains serial number, date and time, but does not tell much about the contents of the file.
The –v option inspects the contents and reports which EXOS versions are stored.
Command:
run script clone.py usb -v xos1405G-00125_2017-01-21_1757.cln
Display:
File: /usr/local/ext/xos1405G-00125_2017-01-21_1757.cln
Contains:
EXOS: 22.2.0.38
EXOS: 22.3.0.7
slot
See EXOS synchronize slot command
