Configuring the Access Point using the Typical Setup
Wizard
To configure the Access Point using the Typical Setup Wizard:
- Select Typical Setup from the
Choose One type to Setup the
Access Point field on the Initial Setup
Wizard.
The
Typical Setup Wizard
displays the
Access Point
Settings screen to define the Access Point's Standalone versus
Virtual Controller AP functionality. This screen also enables selection of the
country of operation for the Access Point.
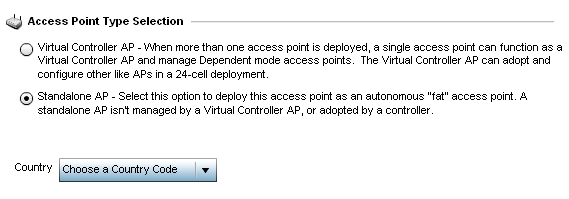
Access Point Type selection
- Select an Access Point Type from the
following options:
- Virtual Controller AP -
When more than one Access Point is deployed, a single Access Point can
function as a Virtual Controller AP. Up to 24 Access Points can be connected
to, and managed by, a single Virtual Controller AP of the same Access Point
model. These connected Access Points must be the same model as the Virtual
Controller AP.
- Standalone AP - Select
this option to deploy this Access Point as an autonomous fat Access Point. A
Standalone AP isn't managed by a Virtual Controller AP, or adopted by a
controller.

Note
If wanting to adopt the Access Point to a controller
or service platform, use the controller or service platform‘s resident UI to
connect to the Access Point, provision its configuration and administrate
the Access Point‘s configuration.
Note
If designating the Access Point as a Standalone AP,
its recommended the Access Point‘s UI be used exclusively to define its
device configuration, and not the CLI. The CLI provides the ability to
define more than one profile and the UI does not. Consequently, the two
interfaces cannot be used collectively to manage profiles without an
administrator encountering problems.
- Select the Country Code of the country where the
Access Point is deployed. Selecting a proper country is a critical task while
configuring the Access Point, as it defines the correct channels of operation
and ensures compliance to the regulations of the selected country. This field is
only available for the Typical Setup Wizard.
- Select Next to set the Access
Point‘s network mode.
The
Typical Setup Wizard
displays the
Network
Topology screen to define how the Access Point handles network
traffic.
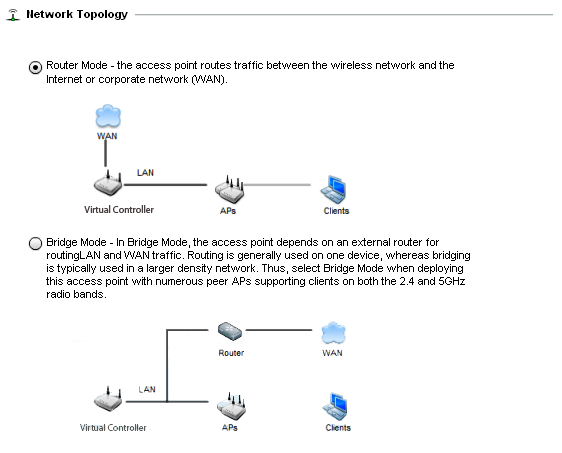
Initial Setup Wizard Networking mode
- Select an Access Point Mode from the available
options.
- Router Mode -In Router
Mode, the Access Point routes traffic between the local network (LAN) and
the Internet or external network (WAN). Router mode is recommended in a
deployment supported by just a single Access Point.
- Bridge Mode - In Bridge
Mode, the Access Point depends on an external router for routing LAN and WAN
traffic. Routing is generally used on one device, whereas bridging is
typically used in a larger density network. Select Bridge Mode when
deploying this Access Point with numerous peer Access Points supporting
clients on both the 2.4GHz and 5GHz radio bands.
Note
When Bridge Mode is selected, WAN configuration
cannot be performed and the Typical Setup Wizard does not display the WAN
configuration screen.
- Select Next.
The
Typical Setup Wizard
displays the
LAN
Configuration screen to set the Access Point's LAN interface
configuration.
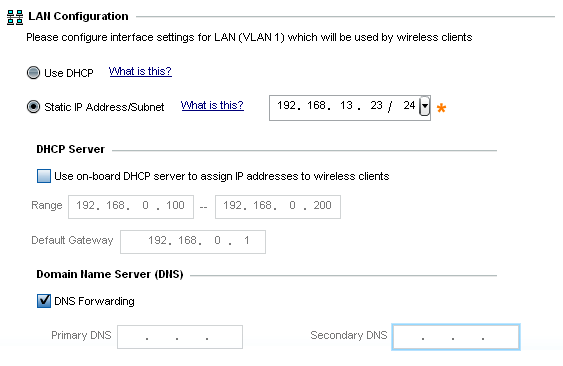
Initial Setup Wizard LAN Configuration
- Set the following DHCP and Static IP
Address/Subnet information for the LAN interface:
- Use
DHCP - Select the checkbox to enable an automatic
network address configuration using the Access Point‘s DHCP server.
- Static
IP Address/Subnet - Enter an IP Address and a subnet for
the Access Point's LAN interface. If Use DHCP is selected, this field is
not available. When selecting this option, define the following
DHCP
Server and Domain Name Server (DNS) resources, as those
fields will become enabled on the bottom portion of the screen.
- Use on-board DHCP server
to assign IP addresses to wireless clients -
Select the checkbox to enable the Access Point‘s DHCP server to
provide IP and DNS information to clients on the LAN
interface.
- Range - Enter
a starting and ending IP Address range for client assignments on
the LAN interface. Avoid assigning IP addresses from x.x.x.1 -
x.x.x.10 and x.x.x.255, as
they are often reserved for standard network services. This is a
required parameter.
- Default
Gateway - Define a default gateway address for
use with the default gateway. This is a required parameter.
- DNS
Forwarding - Select this option to allow a DNS server to
translate domain names into IP addresses. If this option is not
selected, a primary and secondary DNS resource must be specified. DNS
forwarding is useful when a request for a domain name is made but the
DNS server, responsible for converting the name into its corresponding
IP address, cannot locate the matching IP address.
- Primary DNS -
Enter an IP Address for the main Domain Name
Server providing DNS services for the Access
Point's LAN interface.
- Secondary DNS
- Enter an IP Address for the backup Domain Name
Server providing DNS services for the Access
Point's LAN interface.
- Select Next.
The
Typical Setup Wizard
displays the
Wireless LAN
Setup screen to set the Access Point‘s Wireless LAN interface
configuration.
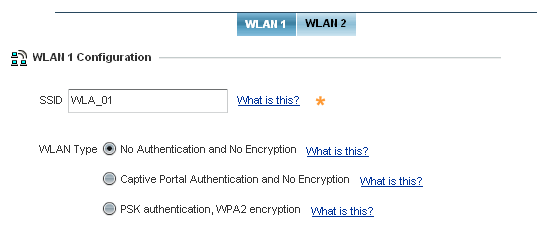
Typical Setup Wizard WLAN Steup
- Set the following WLAN1 Configuration
parameters:
- SSID - Configure the
SSID for the WLAN.
- WLAN Type - Configure
the encryption and authentication to use with this WLAN.
- No Authentication and No
Encryption - Configures a network without any
authentication. This option also configures the network without
encryption. This means that any data transmitted through the
network is in plain text. Any device between end points can see
the information transmitted. This is the least secure of all
network configurations.
- Captive Portal
Authentication and No Encryption - Configures a
network that uses a RADIUS server to authenticate users before
allowing them on to the network. Once on the network, no
encryption is used for the data being transmitted through the
network. Select this option to use a Web page (either internally
or externally hosted) to authenticate users before access is
granted to the network.
- PSK authentication, WPA2
encryption - Configures a network that uses PSK
authentication and WPA2 encryption. Select this option to
implement a pre-shared key that must be correctly shared between
the Access Point and requesting clients using this WLAN.
- Select Next.
The Typical Setup Wizard
displays the RADIUS Server
Configuration screen if required. Otherwise, the Typical Setup Wizard
displays the Summary and
Commit screen.
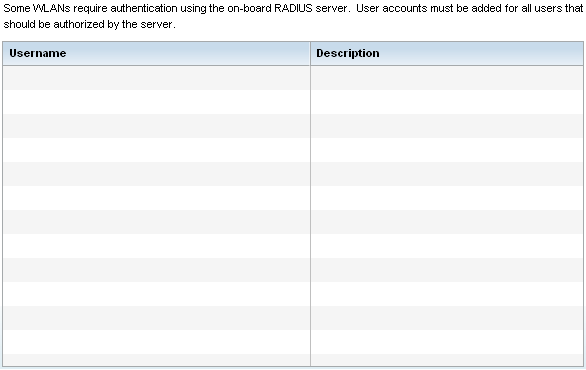
- Use the Radius Server
Configuration screen to configure the users for the onboard
RADIUS server. Use the screen to add, modify, and remove RADIUS users.
Radius Server Configuration
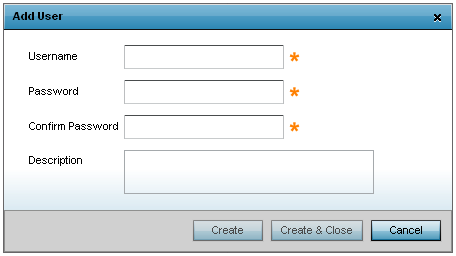
- Select Add User to display the
dialog to enter user information to add to the RADIUS server user
database.
Radius Server User database
- Enter the following user information:
- Username - Provide a user
name used to authenticate the user.
- Password - Provide a password
used to authenticate the user.
- Confirm Password - Confirm
the password by entering the same password as entered in the Password
field.
- Description - Provide a
description to identify the user created in the RADIUS server
database.
- To create the entry in the RADIUS server database
and add another user, select Create. To create the entry
in the RADIUS server database and close the Add User
dialog, select Create & Close.
- Select Modify User on the
RADIUS Server Configuration screen to modify
information for an existing user from the RADIUS database. Highlight the user
entry then select Modify User.
Note
The Username cannot be modified with this
dialog.
- Select Delete User on the
RADIUS Server Configuration screen to remove
information for an existing user from the RADIUS database. Highlight the user
entry and select Delete User.
- Select Confirm on the
dialog displayed. The entry for the user is removed from the RADIUS
database.
- To dismiss the dialog without adding, modifying or
removing entries in the RADIUS server database, select
Cancel.
- Select Next.
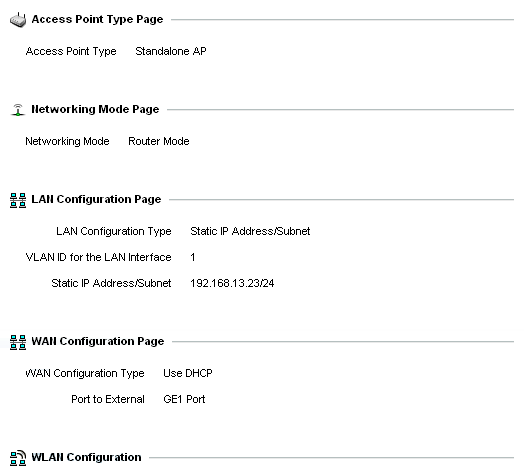
The
Typical Setup Wizard
displays the
Summary and
Commit screen to summarize the screens (pages) and settings
updated using the
Typical Setup
Wizard.
Initial Setup Wizard Summary
No user intervention or additional settings are
required. Its an additional means of validating the Access Point‘s updated
configuration before it‘s deployed. However, if a screen displays settings
not intended as part of the initial configuration, then any screen can be
selected again from within the Navigation Panel and its settings modified
accordingly.
- If the configuration displays as intended, select
Save/Commit to implement these settings to the Access
Point‘s configuration. If additional changes are warranted based on the summary,
either select the target page from the Navigational Panel,
or use the Back and Next buttons
to scroll to the target screen.
 Print
this page
Print
this page Email this topic
 Feedback
 View PDF
 Download EPUB