Basic Access Point Configuration
Once the Access Point is installed and powered on, complete the
following steps to get the device up and running and access management
functions:
- Attach an Ethernet cable from the Access Point to
a controller with an 802.3af compatible power source or use the PWRS-14000-148R
power supply to supply power to the AP-8162 (once fully cabled).
If your host system is a DHCP server, an IP address is automatically assigned
to the AP-8162 and can be used for device connection. However, if a DHCP server
is not available, you‘ll need to derive the IP address from the AP MAC address.
Using this method, the last two bytes of the MAC address become the last two
octets of the IP address.
MAC address - 00:C0:23:00:F0:0A
Zero-Config IP address - 169.254.240.10
To derive the Access Point‘s IP address using its MAC address:
- Open the Windows calculator be selecting . This menu path may vary slightly depending on your
version of Windows.
- With the Calculator displayed, select . Select the Hex radio button.
- Enter a hex byte of the Access Point‘s MAC address. For example,
F0.
- Select the Dec radio button.The
calculator converts F0 into 240. Repeat this process for the last Access Point
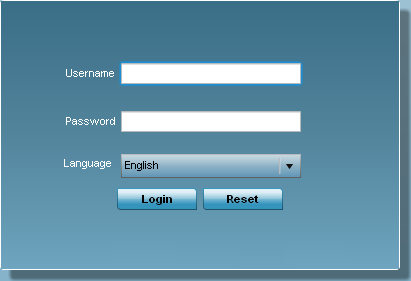
MAC address octet.Point the Web browser to the Access Point‘s IP address. The
following login screen displays:
- Enter the default username admin in the
Username field.
- Enter the default password admin123 in the
Password field.
- Click the Login button to load the management
interface.

Note
When logging in for the first time, you‘re prompted to change the password
to enhance device security in subsequent logins.
Note
If you get disconnected when running the wizard, you can connect again
with the Access Point‘s actual IP address (once obtained) and resume the
wizard.
- If this is the first time the management interface has been accessed, the
Initial Setup Wizard automatically displays.
Note
The Initial Setup Wizard displays the same pages and content for each
Access Point model supported. The only difference being the number of radios
configurable by model, as an AP7131 model can support up to three radios,
AP6522, AP6532, AP6562, AP8132 and AP7161 models support two radios and
AP6511 and AP6521 models support a single radio.
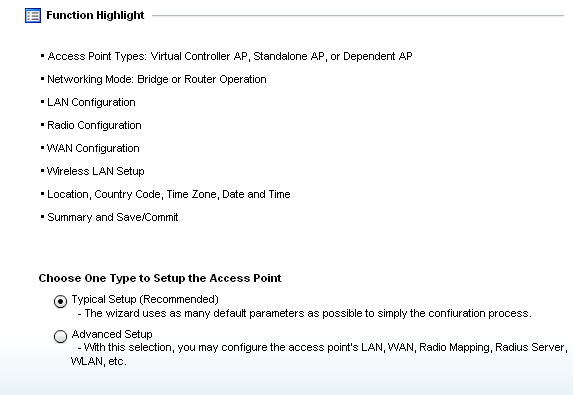
- The Introduction screen displays the various
actions that can be performed using the wizard under the
Function Highlight field.
- Use the Choose One type to Setup the Access
Point field options to select the type of wizard to run.
The Typical Setup is the recommended wizard. This
wizard uses the default parameters for most of the configuration
parameters and sets up a working network with the least amount of manual
configuration.
- The Advanced Setup wizard is for administrators
who prefer more control over the different configuration parameters. A
few more configuration screens are available for customization when the
Advanced Setup wizard is used.
- The first page of the Initial Setup Wizard
displays the Navigation Panel and
Function Highlights for the configuration
activities comprising the Access Point's initial setup. This page also
displays options to select the typical or advanced mode for the
wizard.
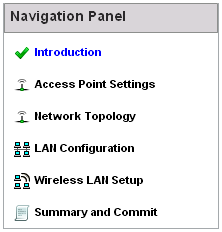
- The Navigation Panel for the Typical
Setup Wizard displays the basic configuration
options.
A green checkmark to the left of an item in the
Navigation Panel defines the task as having its
minimum required configuration set correctly. A red
X defines a task as still requiring at least
one parameter be defined correctly.
- Select Save/Commit within each page to save the updates
made to that page's configuration. Select Next to proceed
to the next page listed in the Navigation Panel without
saving your updates.
Note
While you can navigate to any page in the navigation panel, you cannot
complete the
Initial AP Setup Wizard until each task in
the
Navigation Panel has a green checkmark.
For the purposes of this guide, use the Typical Setup
(Recommended) option to simplify the process of getting the Access Point up and
running quickly with a minimum number of changes to the Access Point‘s default
configuration.
For information on using the Access
Point‘s Advanced Setup option, refer to the WiNG Access Point System Reference
Guide to familiarize yourself with the feature set supported by the WiNG
operating system. The guide is available at
www.extremenetworks.com/documentation/.
 Print
this page
Print
this page Email this topic
 Feedback
 View PDF
 Download EPUB