This document provides information on Puppet, a third-party virtual machine (TPVM) application that runs on SLX-OS platforms. Puppet is a scripting language available from Puppet Labs that system administrators can use to automate configuration and management of a data center.
Using Puppet, you can:
The Extreme Puppet solution requires the following software:
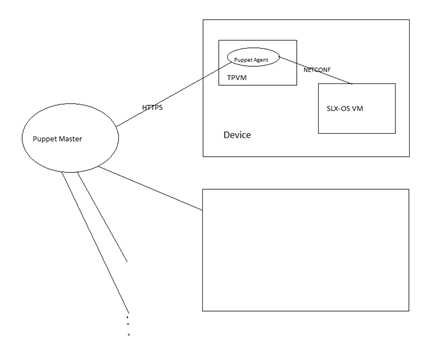
We support a hybrid Puppet setup which allows the provider to run on a Puppet agent installed by the customer on the TPVM. NETCONF is used as the API to communicate from the TPVM to the SLX-OS VM in the Extreme device.
Puppet can also run in a stand-alone architecture, where each managed server has its own complete copy of the configuration, and it compiles its own catalog. The managed nodes run the Puppet apply application, as a scheduled task/cron job (or on demand for initial configuration for smaller configuration tasks).
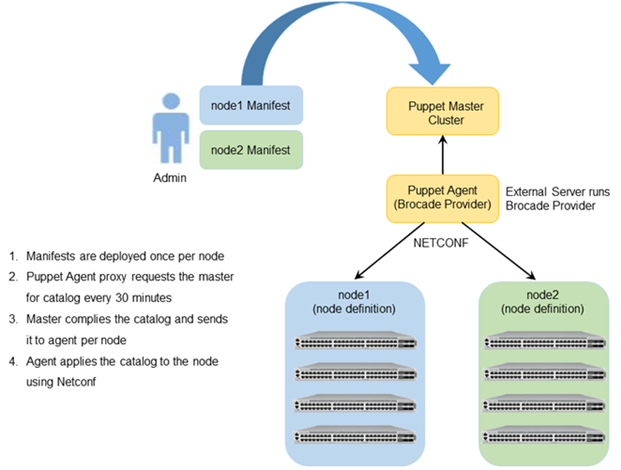
The following illustration depicts how the major Puppet components interact.
| Component | Role |
|---|---|
| Puppet master | In a standard Puppet client-server deployment, the server is known as the master. The Puppet master controls the data center configuration. The puppet master serves configuration catalogs on demand to the puppet agent service that runs on the clients. The master uses an HTTP server to provide catalogs. The master can reside in any location, but the master must have connectivity to the agents. The master contains the Puppet-language file or files known as manifests. |
| Agent | Puppet agents are Puppet client daemons that receive their configuration information from the Puppet master. A computer running the puppet agent is called an agent node. The Agent nodes must have connectivity to both the Puppet Master and to the Extreme node cluster or clusters it is configuring. |
| Extreme Provider | Extreme Providers implement resource types on a specific type of system, using the system's own tools. The Extreme Provider executes the manifests for the purpose of configuring the associated node cluster(s) and switches. The Extreme Provider uses NETCONF calls to configure the switch or switches. These Netconf calls are transparent to the Puppet administrator and user. In general, providers are simple Ruby wrappers around shell commands, so they are usually short and easy to create. Instructions are given later in this chapter and where to obtain the Provider and run it on the Puppet Master. |
| Manifest | A file containing code written in the Puppet language, and named with the .pp file extension. The manifest usually defines nodes, so that each managed agent node receives a unique catalog. |
| Catalog | A catalog is a compilation of all the resources that are applied to a given system and the relationships between those resources. |
The main steps needed to employ Puppet in your environment are:
Extreme SLX-OS devices running SLX-OS firmware can be configured using the Puppet module. This module supports basic interface, L2 port configuration, LAG and VLAN configurations. This module is derived from Netdev_stdlib with a modification required to configure the SLX-OS devices.
Follow these steps to install the Puppet Master and Agent:
The Puppet master is not packaged with the SLX-OS software. Download the Puppet master from https://apt.puppetlabs.com/. You must install the Puppet Master on a separate server. The Puppet Agent can be installed on the TPVM, and must have connectivity to the puppet Master. On chassis-based devices, the virtual-IP can be used to communicate from the TPVM to the SLX-OS VM.
root@ldap:/etc/puppetlabs/code/environments/production#cat

manifests/site.pp

node tpvm.englab.extreme.com {

   slxos_netdev_interface { "ethernet 0/7":

      ensure        => present,

      admin         => up,

      description   => "Ethernet 0/7",

      mtu           => 1548,

      speed         => "10000",

      target     => "http://admin:password@10.11.12.14:830",

   }

   slxos_netdev_interface { "ethernet 0/8":

      ensure        => present,

      admin         => up,

      description   => "Ethernet 0/8",

      mtu           => 1548,

      speed         => "10000",

      target     => "http://admin:password@10.11.12.14:830",

   }

   slxos_netdev_interface { "ethernet 0/9":

      ensure        => present,

      admin         => up,

      description   => "Ethernet 0/9",

      mtu           => 1548,

      speed         => "10000",

      target     => "http://admin:password@10.11.12.14:830",

   }

   slxos_netdev_vlan { "vlan 2":

      ensure        => present,

      vlan_id       => 2,

      description   => "Vlan 2",

      target     => "http://admin:password@10.11.12.14:830",

   }

   slxos_netdev_vlan { "vlan 3":

      ensure        => present,

      vlan_id       => 3,

      description   => "Vlan 3",

      target     => "http://admin:password@10.11.12.14:830",

   }

   slxos_netdev_vlan { "vlan 4":

      ensure        => present,

      vlan_id       => 4,

      description   => "Vlan 4",

      target     => "http://admin:password@10.11.12.14:830",

   }

   slxos_netdev_l2_interface { "ethernet 0/7":

      tagged_vlans  => ["2","3"],

      require       => Slxos_netdev_vlan["vlan 2", "vlan 3"],

      target     => "http://admin:password@10.11.12.14:830",

   }

   slxos_netdev_lag { "10":

      minimum_links => 5,

      lacp          => active,

      type          => standard,

      links         => ["ethernet 0/3", "ethernet 0/4"],

      target     => "http://admin:password@10.11.12.14:830",

   }


}

root@ldap:/etc/puppetlabs/code/environments/production#
Refer to the following URLs for complete Puppet documentation.
If you are using Puppet to manage resources, the properties that you configure with Puppet can be changed by using the command line interface (CLI). However, if any such properties are changed from the CLI, the Puppet-managed settings go back into effect when the script is run. This takes place either every 30 minutes (automatically) or when you manually run the script. If you want to change the 30-minute proxy-request interval, you can change the run interval property of the main configuration file. For more information, refer to https://docs.puppetlabs.com/puppet/latest/reference/config_file_main.html.