Working with the Basic Installation Wizard
The Extreme Networks ExtremeWireless Software system
provides a basic installation wizard that can help administrators configure the
minimum ExtremeWireless Appliance settings that are necessary to deploy a fully functioning
ExtremeWireless Appliance on a network.
Administrators can use the basic installation wizard to quickly configure the
ExtremeWireless Appliance for deployment, and then once the installation is
complete, continue to revise the ExtremeWireless Appliance configuration
accordingly.
The basic installation wizard is automatically launched when an
administrator logs on to the ExtremeWireless Appliance
for the first time, including if the system has been reset to the factory default
settings. In addition, the basic installation wizard can also be launched at any
time from the left pane of the ExtremeWireless Appliance
Configuration screen.
To configure the ExtremeWireless Appliance
with the Basic Installation Wizard:
-
Log on to the ExtremeWireless Appliance.
-
From the main menu, click Controller, and then click
.
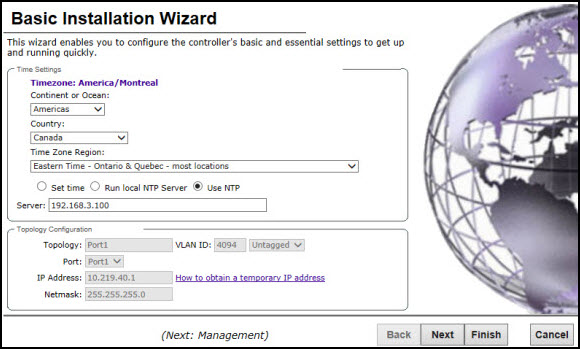
The
Basic Installation Wizard
screen is displayed.
-
In the Time Settings section, configure the Wireless Appliance timezone:
- Continent or Ocean – Click the appropriate large-scale geographic
grouping for the time zone.
- Country – Click the appropriate country for the time zone. The
contents of the drop-down list change, based on the selection in the
Continent or Ocean drop-down list.
- Time Zone Region – Select the appropriate time zone region for
the selected country from the drop-down menu.
-
To configure the Wireless Appliance‘s time, do one of the following:
- To manually set the ExtremeWireless Appliance time, click Set time and specify
values for the Year, Month, Day, HR, and Min.
To use
the ExtremeWireless Appliance as the NTP time server, select Run local NTP Server.
In the Server field, enter the IP address or Domain Name for the NTP
server.
- To use NTP to set the ExtremeWireless Appliance time, select Use NTP, and then type
the IP address of an NTP time server that is accessible on the enterprise
network.
The Network Time Protocol is a protocol
for synchronizing the clocks of computer systems over packet-switched
data networks.

Note
The Server Address field supports both IPv4 and IPv6 addresses.
-
You can configure up to three DNS servers. The
Server Address field supports both IPv4 and IPv6 addresses. In the Topology
Configuration section, the physical interface of the Wireless Appliance data
port, the IP Address and Netmask values for the data port, and the
VLAN (Virtual LAN) ID display as read-only values.
For information on how to obtain a
temporary IP address from the network, click How to obtain a temporary IP
address.
-
Click Next.
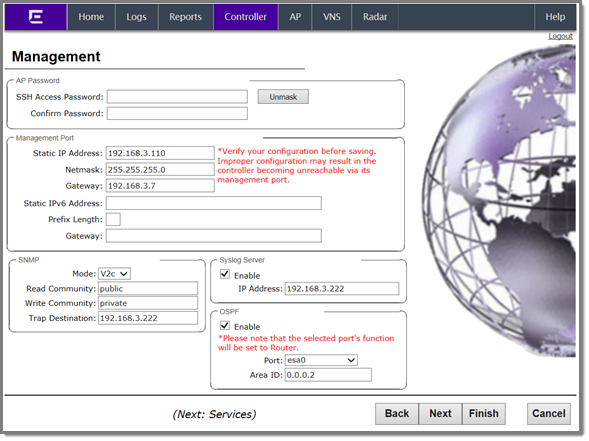
The
Management screen
displays.
-
In the AP Password section, enter a password for
the AP. Click Unmask
to display the password characters as you type. Access Points are shipped with
default passwords. You must create a new SSH Access Password here.
Note
Passwords can
include the following characters: A-Z a-z 0-9
~!@#$%^&*()_+|-=\{}[];<>?,.
Password cannot
include the following characters: / ` ' " : or a space.
-
In the Management Port section, confirm the port configuration values that were
defined when the Wireless Appliance was physically deployed on the network. If
applicable, edit these values:
- Static IP
Address — Displays the IPv4 address for the ExtremeWireless Appliance's management port. Revise this as appropriate for
the enterprise network.
- Netmask — Displays the appropriate subnet mask for the IP address
to separate the network portion from the host portion of the
address.
- Gateway — Displays the default gateway of the network.
- Static
IPv6 Address — Displays the IPv6 address for the ExtremeWireless Appliance's management port. Revise this as appropriate for
the enterprise network.
- Prefix Length — Length of the IPv6 prefix. Maximum is 64
bits.
- Gateway — Displays the default gateway of the network.
-
In the SNMP (Simple Network Management Protocol) section,
click V2c or
V3 in the Mode
drop-down list to enable SNMP, if applicable.
If you selected V2c, the Community
options display:
- Read Community —
Type the password used for read-only SNMP communication.
- Write Community —
Type the password used for write SNMP communication.
- Trap Destination —
Type the IP address of the server used as the network manager that
receives SNMP messages.
If you selected V3, the Syslog Server
options display:
- Enable — Click in
the box to enable Syslog Server.
- IP Address — Enter
the IP address for the Syslog Server.
-
In the OSPF section, select the Enable checkbox to
enable OSPF, if applicable.
Use OSPF in a routed
VNS (Virtual Networks Services) to allow the
ExtremeWireless Appliance to participate in dynamic route selection. OSPF is a protocol designed for
medium and large IP networks with the ability to segment routes into different
areas by routing information summarization and propagation.
- Area ID — Type the
area. 0.0.0.0 is the main area in OSPF.
-
In the Syslog Server section, select the Enable checkbox
to enable the syslog protocol for the ExtremeWireless Appliance, if
applicable. Syslog is a protocol used for the transmission of event notification
messages across networks.
-
In the IP Address box, type the IP address of the syslog server and then click
Next.
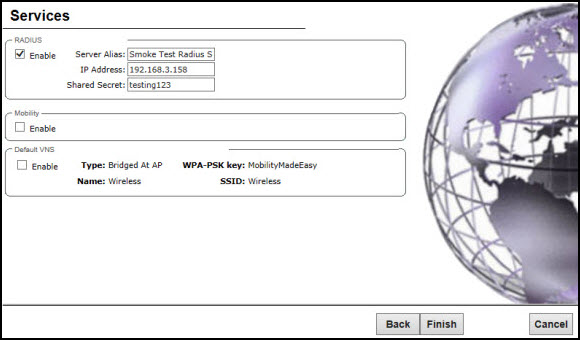
The
Services screen displays.
-
In the RADIUS (Remote Authentication Dial In User Service)
section, select the Enable checkbox to enable RADIUS login authentication, if
applicable.
RADIUS login authentication uses a RADIUS
server to authenticate user login attempts. RADIUS is a client/server
authentication and authorization access protocol used by a network access server
(NAS) to authenticate users attempting to connect to a network device.
- Server Alias —
Type a name that you want to assign to the RADIUS server.
- IP Address — Type
the RADIUS server‘s IP address.
- Shared Secret —
Type the password that is used to validate the connection between the
Wireless Appliance and the RADIUS server.
-
In the Mobility section, select the Enable checkbox to enable the
ExtremeWireless Appliance mobility feature, if applicable. Mobility allows a
wireless device user to roam seamlessly between different Wireless APs on
different appliances.
A dialog displays, informing you that NTP is required for the mobility feature
and prompting you to confirm you want to enable mobility.
Note
If the Wireless
Appliance is configured as a mobility agent, it acts as an NTP client and
uses the mobility manager as the NTP server. If the Wireless Appliance is
configured as a mobility manager, the Wireless Appliance‘s local NTP is
enabled for the mobility domain.
-
Click OK to continue, and then do the following:
- Role —
Select the role for the ExtremeWireless Appliance, Manager or Agent. One appliance on the network is
designated as the mobility manager and all appliances are designated as
mobility agents.
- Port — Click the interface on the ExtremeWireless Appliance to
be used for communication between mobility manager and mobility agent.
Verify that the selected interface is routable on the network.
- Manager
IP — Type the IP address of the mobility manager port if the
appliance is configured as the mobility agent.
-
In the Default VNS section, select the Enable checkbox to enable a
default VNS for the appliance.
The default VNS parameters display.
-
Click Next.
The
Success screen displays.
-
Change the factory default administrator password.
Enter the new password and confirm it, and then click Save.
-
Click OK, and then Close.
The ExtremeWireless Assistant
main menu screen displays.
Note
The appliance reboots after you click
Save if the time zone is changed
during the Basic Install Wizard. If the IP address of the management port is changed
during the configuration with the Basic Install Wizard, the
ExtremeWireless Assistant session is terminated
and you will have to log back in with the new IP address.

 Print
this page
Print
this page Email this topic
 Feedback
 View PDF
 Download EPUB