Home > GUI > Configuration > Subnetworks

|
Subnetworks
Create and modify a subnetwork.
Navigate using the tab icons. Hover over an icon to see the name of the tab.
Configure > Network Policies > policy_name > Router Settings > Network Allocation > New Subnetwork
or
Configure > Network Policies > policy_name > Router Settings > Network Allocation > Edit Subnetwork
or
Configure > Network Policies > Common Objects > Network > Subnetwork Space > Add
When you create a subnetwork for branch sites, you have a choice between making one large "parent" subnetwork that ExtremeCloud IQ sections into individual segments for each site or a smaller subnetwork that each site reuses. You define the subnetwork type—whether it is for internal, guest, or management traffic—and configure options for DHCP, DNS, NTP, and NAT.
To configure or modify a subnetwork for multiple branches, enter the following, and then select Save:
Name: Enter a name. This name will appear in the Subnetwork drop-down list in the Network Allocation window in the Router Settings section of a network policy.
Description: Enter a brief description (optional).
Network Type: Choose Internal Use, Guest Use, or Management from the drop-down list.
Internal Use - A subnetwork for internal use is one that routers can apply to regular users, such as employees or students. DNS and DHCP services are optional. The addressing for internal subnetworks can be unique among all branch sites so that routers can tunnel traffic through a VPN gateway to a central site and to other branch sites without needing NAT. If you decide to replicate the same subnetwork at each site, then routers will require NAT to send traffic between themselves and a VPN gateway.
Guest Use - Routers use a subnetwork for guest use for temporary users, such as visitors. DHCP or DHCP relay is required and DNS service is optional. Because guests are not expected to access resources through VPN tunnels at the corporate or other branch sites, the addressing for a guest subnetwork is the same for all routers at all branch sites. Routers do not allow guest traffic to pass through a VPN tunnel to the main site. Guests are only allowed to access the Internet.
Management - A management subnetwork is the one on which an Extreme Networks router and Extreme Networks APs and switches at the same branch site communicate with each other. DNS and DHCP services are required.
For internal and management subnetworks, you can create unique subnetworks or replicate the same one for each of your sites. The only choice for guest subnetworks is to replicate them.
Create a unique subnetwork at each site: Select to create unique subnetworks for each site.
Local IP Address Space: Enter the parent IP address scope. The parent scope contains the IP address scopes of all remote sites. For example, the parent scope 10.0.0.0/16 contains subnetworks 10.0.1.0/24, 10.0.2.0/24, 10.0.3.0/24, and so on to 10.0.255.0/24, inclusively.
Partition the local IP address space into subnetworks: Use the slider to select the best match for how many branch offices you need to configure and how many clients there are at each branch. All values are displayed as powers of two, so an exact match is unlikely; however, select the maximum number of foreseeable branches and be sure the number of clients per branch exceeds the maximum foreseeable number of clients at any one branch. If you cannot fit the maximum number of clients and branches within your chosen parent scope, you must increase the parent scope.
Use the first IP address of the partitioned subnetwork for the default gateway: Select to use the first IP address as your default gateway.
Use the last IP address of the partitioned subnetwork for the default gateway: Select to use the last IP address as your default gateway.
Replicate the same subnetwork at each site: Select to copy the same subnetwork for each site.
If you have any branch sites in your enterprise topology that have overlapping or conflicting IP address schemes and making changes to those address structures would pose difficulties, you can use NAT on the tunnel interfaces on the routers at each site. The branch routers can then map local subnetworks to different addresses that can be routed through VPN tunnels across your network. With this approach, you can configure the Extreme Networks branch routers, which function as NAT gateways, to map their local subnetwork addresses, one-for-one, to NAT subnetwork addresses. ExtremeCloud IQ maps each host address on the local subnetwork side of the router uniquely to a corresponding network host address on the NAT subnetwork side of the router.
Extreme Networks refers to the one-to-one mapping of IP addresses in a local subnetwork to corresponding addresses in a NAT subnetwork. For example, if 192.168.1.0/24 is the local subnetwork for Site 1 and 10.10.10.0/24 is the NAT subnetwork for Site 1, then the router translates the source IP address of outbound traffic from a host at address 192.168.1.10 to 10.10.10.10. Conversely, the router translates the destination IP address of inbound traffic to 10.10.10.10 to 192.168.1.10.

In the same example, Site 2, which is a different branch, has a host with the same IP address of 192.168.1.10. For the device at Site 1 to connect to the host at Site 2, the router at Site 1 translates 192.168.1.10 to 10.10.10.10, and the router at Site 2 translates 192.168.1.10 to 10.10.20.0. The VPN gateway at headquarters is then able to route 10.10.10.10 and 10.10.20.10. Additionally, a device at headquarters can communicate with these two hosts as well.
Local IP Address Space: Enter the IP address and netmask of the local subnetwork at each branch site, and select either the first or last IP address as the default gateway depending on how it is configured.
Use the first IP address of the partitioned subnetwork for the default gateway: Select this option to use the first IP address as your default gateway.
Use the last IP address of the partitioned subnetwork for the default gateway: Select this option to use the last IP address as your default gateway.
Enable DHCP: Select to enable branch routers to provide client devices with network settings dynamically through DHCP. Clear to disable DHCP and configure network settings on devices manually.
Enable branch router as DHCP server: Enabling the DHCP server on the routers removes the necessity to have additional hardware at the remote sites provide the service. When you select this option, additional configuration items appear.
Enter the following information, and then continue with the subnetwork configuration:
Address Pool: By default, no IP addresses are reserved. There are two slide controls to reserve IP addresses within the pool. Use the controls to select where you want your DHCP pool of addresses to begin and end. The left slide control reserves addresses at the start of the pool. The right slide control reserves addresses at the end of the pool. Below the slide control is the total number of remaining unreserved addresses in the pool.
For example, in the subnetwork configured in the illustration below, ten addresses at the start of the pool and ten addresses at the end are reserved for static address assignments.
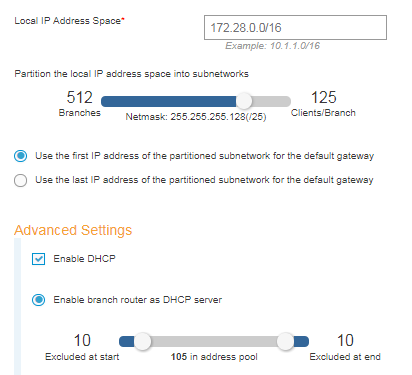
For the first subnetwork (172.28.0.0 – 172.28.0.127):
| IP Address | Description |
|---|---|
| 172.28.0.0 | Subnetwork name; not used by devices. |
| 172.28.0.1 | Reserved for Extreme Networks routers; not available to client devices. |
| 172.28.0.2 – 172.28.0.11 | First ten addresses. The position of the left DHCP address pool slider indicates that these addresses are reserved. The DHCP service does not assign these addresses to client devices. |
| 172.28.0.12 – 172.28.0.116 | DHCP pool of addresses. The DHCP service assigns these addresses to client devices. There are 105 addresses in this pool, as noted below the DHCP address pool slider control. |
| 172.28.0.117 – 172.28.0126 | Last ten addresses. The position of the right address pool slider indicates that these addresses are also reserved and are not available for DHCP client devices. |
| 172.28.0.127 | Broadcast address; not used by devices. |
Lease Time: Enter the DHCP address lease time in seconds. By default the server leases addresses for 86,400 seconds (one day). You can set the lease time from 60 seconds to 86,400,000 seconds (1000 days). Do not include commas when entering lease time values.
NTP Server IP: Enter the IP address of the NTP (Network Time Protocol) server with which you want the clients to synchronize their system clocks.
Domain Name: Enter your network domain name.
Use ARP to check IP address conflicts: Select to enable Extreme Networks routers functioning as DHCP servers to check if an IP address is in use before offering to lease it to a DHCP client. A DHCP server does this by broadcasting an ARP request. If the server receives an ARP response, it concludes that the IP address is already in use and chooses the next available IP address from its address pool and broadcasts another ARP request to check if the second address is in use. The DHCP server continues this procedure until an ARP broadcast does not elicit a response, indicating that no device is currently using that address. Having confirmed that the lease will not produce an IP address conflict, the DHCP server then offers that address to the client.
Clear to disable ARP broadcasts during the DHCP message exchange. You might do this if there are a large number of clients requesting DHCP leases and the extra effort to check address availability is unnecessarily consuming resources. By default, ARP checking is enabled.
Custom Options: In this section you can enter standard (1 – 224) and custom (225 – 254) DHCP options.
The following table lists the standard options that are not supported here because the information is retrieved elsewhere automatically.
| DHCPOption | Source |
|---|---|
| 1 | DHCP_SUBNET |
| 3 | DHCP_ROUTER |
| 6 | DHCP_DNS_SERVER |
| 7 | DHCP_LOG_SERVER |
| 15 | DHCP_DOMAIN_NAME |
| 26 | DHCP_MTU |
| 42 | DHCP_NTP_SERVER |
| 44 | DHCP_WINS_SERVER |
| 51 | DHCP_LEASE_TIME |
| 58 | DHCP_T1 (Renewal time) |
| 59 | DHCP_T2 (Rebinding time) |
| 69 | DHCP_SMTP |
| 70 | DHCP_POP3 |
You can find information on specific standard DHCP options in RFC 2132, “DHCP Options and BOOTP Vendor Extensions”.
Enable DHCP relay: Enable this to support a centralized DHCP server on a branch router. If you have deployed a centralized DHCP server on your network, you must first enable the DHCP relay on an Extreme Networks branch router to disable the DHCP server function on the branch router. This allows the device to redirect client DHCP requests to a centralized DHCP server. The branch router now behaves as a proxy for client DHCP requests and no longer performs DHCP services. This is part of the DHCP Reservations and DHCP Relay feature.
DNS Service: Choose the DNS service profile from the drop-down list. If you do not see a service profile that you want to use, select + to create a new one. When the network type is for internal or guest use, an Extreme Networks router applies this service to the DNS requests from clients connecting to the router either directly or through an intermediary AP or switch. When the network type is management, the router applies this to DNS requests from Extreme Networks APs and switches on the same management network behind the router and to the mgt0 interface of the router itself.
NAT Settings
Enable NAT through the VPN tunnels: Select to enable routers to perform NAT on traffic traversing their tunnel interfaces. If you selected Replicate the same subnetwork at each site near the beginning of the New Subnetwork window, NAT is always enabled and this check box cannot be cleared.
Number of branches: If you selected Replicate the same subnetwork at each site, enter the number of branch sites you want to replicate. If you selected Create a unique subnetwork at each site, this field is read-only because you specified the number of branches previously.
NAT IP Address Space Pool: Enter the NAT IP address space, which must be large enough to be mapped to the local subnetwork at every branch site of the local subnetwork IP address space.
Mask: (Read-only field) ExtremeCloud IQ calculates the netmask required to support the number of NAT subnetwork branches you want replicated and the NAT address pool you entered.
Subnetworks are part of a longer configuration workflow which is described in the following section.
This table lists the configuration steps for SD-WAN with the corresponding Help topics for more information:
| Step | Description | Corresponding Help Topic |
|---|---|---|
| 1 |
Add routers and VGVAs (VPN Gateway Virtual Appliances) to the VHM. |
|
| 2 |
Create a network policy with routing enabled. |
Network Policies |
| 3 |
Configure device, port, and routing policy settings for the VGVA by navigating to Manage > Devices > vgva_name and editing the Device Configuration, Port Configuration, and Routing Policy sections. |
|
| 4 |
In the network policy, create a device template for the router. |
|
| 5 |
Create a VPN service for the network policy. |
VPN Service |
| 6 |
Configure network allocation with new subnetworks and corresponding VLANs for routers to use at branch sites. |
|
| 7 |
Use a predefined Layer 7 application set, or create and use a custom application set when configuring SD-WAN routing policy rules. |
Application Sets |
| 8 |
Enable SD-WAN and configure an SD-WAN route group. This group sets a priority of your WAN links when using a VPN service to connect to a specified VPN gateway, and also allows you to configure aggressive, normal, or moderate responses to operational faults, including jitter, packet loss, and latency. |
|
| 9 |
Create a routing policy that routes traffic from the router subnets through the WAN interface to the public network or through a VPN tunnel to the corporate network or data center based on Layer 7 applications, incoming LAN interfaces, source and destination addresses, and user profiles. |
Routing Policy |
| 10 |
Put the VGVAs online and upload the configuration from ExtremeCloud IQ to them. |
Upload a Configuration |
| 11 |
Add the network policy (with routing and SD-WAN enabled) to an auto provisioning profile for the routers so that when they connect to ExtremeCloud IQ, they automatically receive their configuration. Distribute the devices to the branch sites with instructions to put them on the network. After the devices connect to ExtremeCloud IQ and automatically receive their configuration, they will reboot and then reconnect to ExtremeCloud IQ and become operational. |
Auto Provisioning Settings |
Copyright © 2020 Extreme Networks. All rights reserved. Published March 2020.