This topic describes the planning components of the user interface.
If you are creating a floor plan for the first time, you will want to access the first procedure in the workflow, which isCreate a Plan and Upload a Floor Image. Each topic in the workflow will tell you what your next step in the workflow will be, guiding you easily from start to finish.
The purpose of this section is simply to familiarize you with the different parts of the floor plan editor. Reference this section at any time if you want to understand the purpose of the floor editor tools.
The Floor Plan Editor lets you configure and view the floor plan, and displays the details about number of APs, sensors, size of the area, and other information about the floor plan.
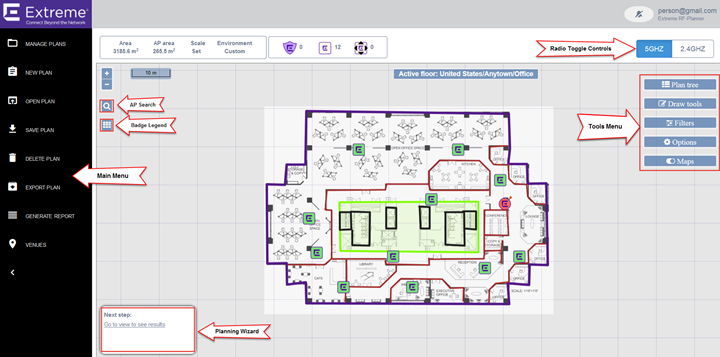
| Main Menu | Create, manage, save, and export plans, generate reports, and manage venues. | ||||||||||
| Tools Menu | Select the tools to configure, view, and filter floor plan coverage. The tools are:
| ||||||||||
| Planning Wizard | Guides you through the basic steps to create a floor plan, instead of using the Floor Plan Menu. However, to fine tune and view your coverage, use the Floor Plan Menu. | ||||||||||
| Radio Toggle Controls | Toggle between 2.4 Ghz and 5.0 Ghz radios to view the difference in coverage. | ||||||||||
| Search | Search for a specific AP or sensor by serial number, or search for a floor map. | ||||||||||
| Badge Legend | View the badge descriptions that you optionally assign to APs and floor maps. The badges and colors include the channel width, the radio status (On, Off, Error), the power, and the channel. | ||||||||||
| Zoom Buttons | Zoom in and out of the floor plan image. |
 Print
this page
Print
this page Email this topic
 Feedback
 View PDF
 Download EPUB