About this task
Use this task set up Google Workspace with Open ID Connect (OIDC) in Google Cloud
(GCP).
Procedure
-
Log into Google Cloud using
https://console.cloud.google.com.
-
To create a new project:
-
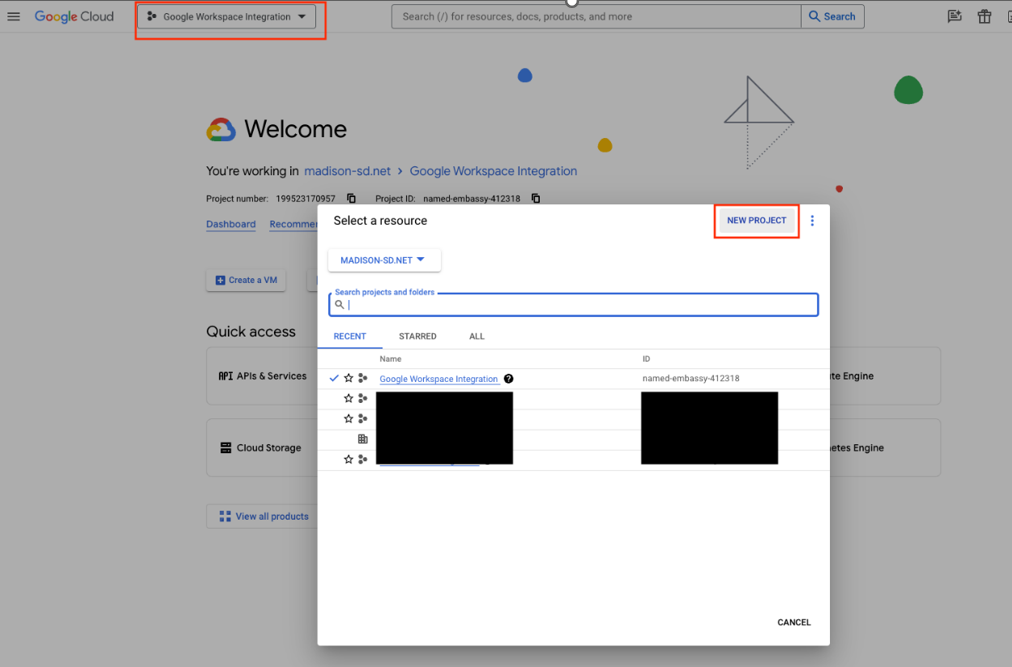
From the drop-down menu
at the top of the screen, select NEW
PROJECT.
-
Enter a name in the
Project
Name field and select CREATE.
-
Select the newly created
Project and under the Quick
Access menu, select APIs &
Services.
-
Go to OAuth consent
screen.
-
Under User
Types, select the Internal
radio button and select
CREATE.
-
In the App
Information section, enter the App Name, select a User
support email from the drop-down list.
-
In the Developer contact
information section, enter an email address and select
SAVE AND
CONTINUE.
-
On the Scopes
screen, make no updates and select SAVE AND
CONTINUE.
-
On the Summary
screen, to complete the configuration, select BACK TO
DASHBOARD.
-
To create new API credentials:
-
Go to
Credentials, and select CREATE
CREDENTIALS.
-
Select OAuth client ID from the available
options.
-
On the Create OAuth client ID screen, select
Web application from the Application type
drop-down list, and enter a name for the OAuth client.
-
From the Universal ZTNA Identity Provider screen,
copy the two Redirect URIs from the Set up Redirect URIs
section and enter them in the Authorized redirect
URIs section in Google Workspace.
-
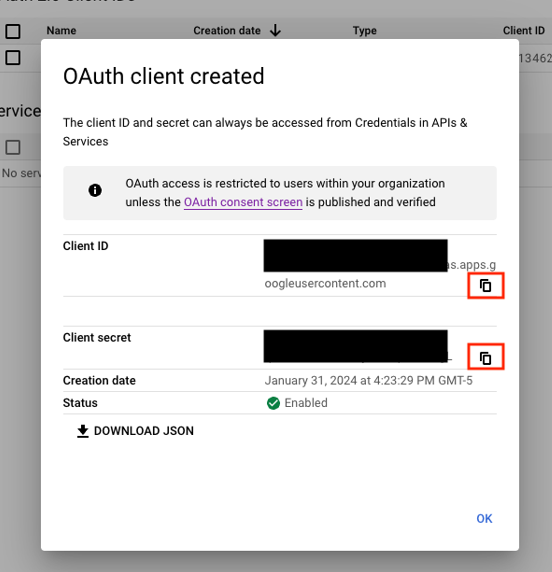
Select CREATE.
The system displays and OAuth client
created dialog.
-
Copy the Client ID and Client secret to use in Universal ZTNA.
-
On the
Universal ZTNA IDP Configuration screen, in the
Setup Extreme Cloud ZTNA section, enter in the
saved Client ID and Client Secret.
-
Select Validate Information to check to confirm
that the information is valid.
-
Once the information is successfully validated, select
Update to apply the integration.
To configure the
integration to be able to authenticate users against Google Workspace, a
Secure LDAP Configuration must be added to Google.
-
To add a secure LDAP configuration to Google:
-
Log into the admin portal for Google workspace.
-
Go to .
-
Select ADD CLIENT.
The system displays the Client Details
page.
-
Enter the LDAP client name and select
CONTINUE.
The system displays the Access Permissions
page.
-
Under Verify user credentials, select the
Entire domain option.
-
Under Read user information, select the
Entire domain option.
-
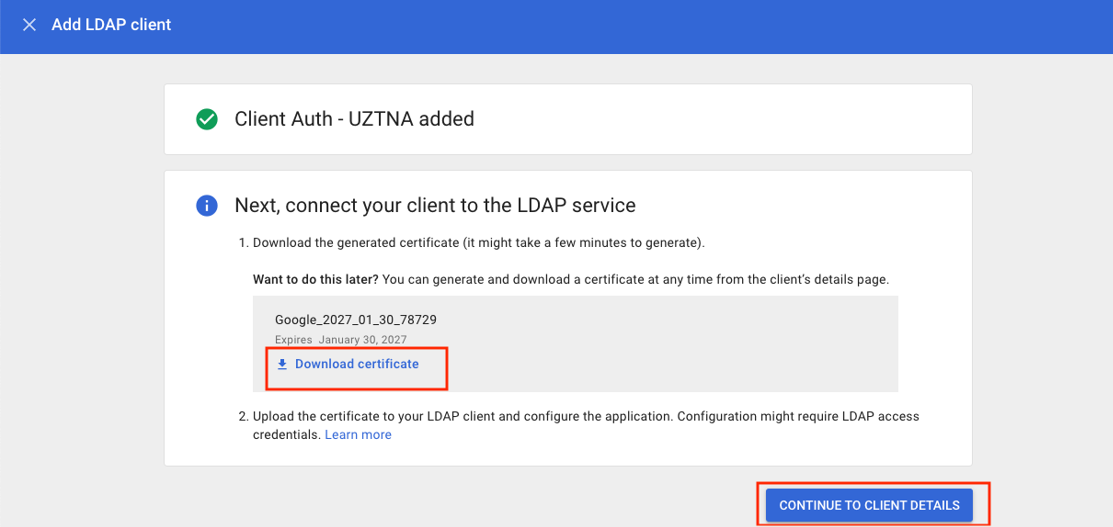
select ADD LDAP CLIENT.
-
Once the certificate is generated, select Download
certificate and save it for use in Universal ZTNA.
-
Select CONTINUE TO CLIENT DETAILS.
-
By default, the LDAP client is not enabled. Under Service
Status, select the drop-down option.
The system displays the Service Status
screen.
-
To enable the LDAP client, select the ON for
everyone option and select
SAVE.
-
On the Identity Provider page in Universal ZTNA, select the Secure Access to
Networks check box and upload the previously saved
certificate bundle (zip file).
-
Select Validate Information.