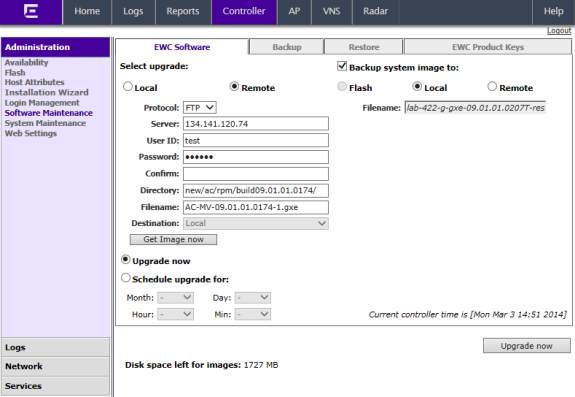
Running the Upgrade from the FTP Server
To run the upgrade from the
FTP Server via the Wireless Assistant GUI:
-
From the top menu, click
Controller.
-
From the left pane, click
.
-
Select Remote.
The FTP server boxes are
displayed.
-
Type the following:
- Protocol – FTP.
- Server – The IP address of
the FTP server to retrieve the image file from.
- User ID – The user ID used
to log into the FTP server.
- Password – The password for
the user ID.
- Confirm – The password to
log on to the FTP server. This field is to confirm you have typed the correct
password.
- Directory – The directory
on the server in which the image file that is to be retrieved is stored.
- Filename – The name of the
image file to retrieve.
-
To schedule a software
upgrade, select the Schedule upgrade for option. The
earliest you can schedule an upgrade is five minutes into the future.
-
Use the Month, Day, Hour, and Minute drop-down lists to schedule the upgrade.
-
Click Schedule upgrade.
-
Review the upgrade settings in the dialog box, and then click
OK to confirm the upgrade settings. The EWC Software
tab fields gray
out.

Note
A scheduled upgrade is not a recurring event. The
wireless controller only allows one scheduled upgrade to be configured at a
time.
-
To upgrade the software immediately, select the Upgrade now option.
-
Click the Upgrade now button.
-
Review the upgrade settings in the dialog box, and then click
OK to confirm the upgrade settings. A window displays
the upgrade status.
The wireless controller reboots
after the upgrade process is completed.
 Print
this page
Print
this page Email this topic
 Feedback
 View PDF
 Download EPUB