You can create a policy role that will
customize network access.
To create a new policy role:
Go to Configure > Policy > Roles > Add and configure the following parameters.
Name
myTest2-policy
Default Action
Set to Deny.
The policy rule will deny everything except for the rules we
define as allowed.
Select the L3 L4
Rules section and click New.
Configure the following
rules:
Allow traffic to subnet
0.0.0.0/0, any protocol, Port DHCP Server (68).
Allow traffic to subnet
0.0.0.0/0, any protocol, port Port DHCP Client (67).
Allow traffic to subnet
10.48.51.50/28, any protocol, any port.
Allow traffic to subnet
10.48.49.9/32, any protocol, any port.
Click Save to save the policy.
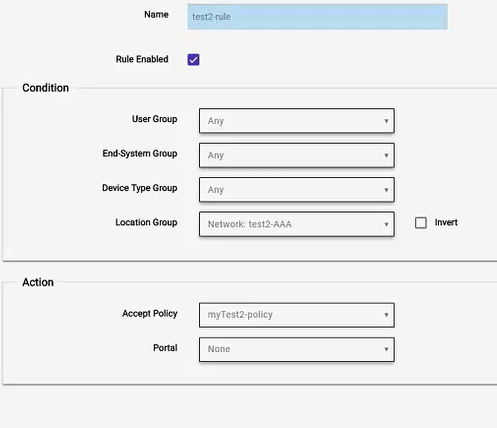
Go to Onboard > Rules.
Edit the test2-rule Accept
Policy. Apply myTest2-policy instead of Enterprise User
policy.
Highlight test2-rule and click .
From the Accept Policy
field, select myTest2-policy.
Engine Rule with
Unique Policy
Click Save.
Upon authentication to the network, the client reaches the engine rule
test2-rule. Client is accepted to the network based on the
unique Accept Policy myTest2-policy.
Next, enable myTest2-policy within the device group profile.
 .
.