When the controller is configured to include signatures, it is easy for the ECP to ignore them. The ECP simply extracts the information it is interested in from the provided attributes and ignores the rest.
However, it is highly likely that an administrator that enables response signing wants to use the signatures to authenticate the redirected requests it receives. This section covers how to do that. The whole process is shown in Verifying a Signed Request Basic Validation Checks.
The algorithm used to sign the redirection response (and therefore the redirected request to the ECP) is based on Amazon Web Services API Signature Version 4. AWS documentation refers to this approach as “Pre-signed URLs”.
The following steps indicate the basic procedure for verifying the signature. Refer to Basic Flow for Verifying a Signature for the graphical flow.
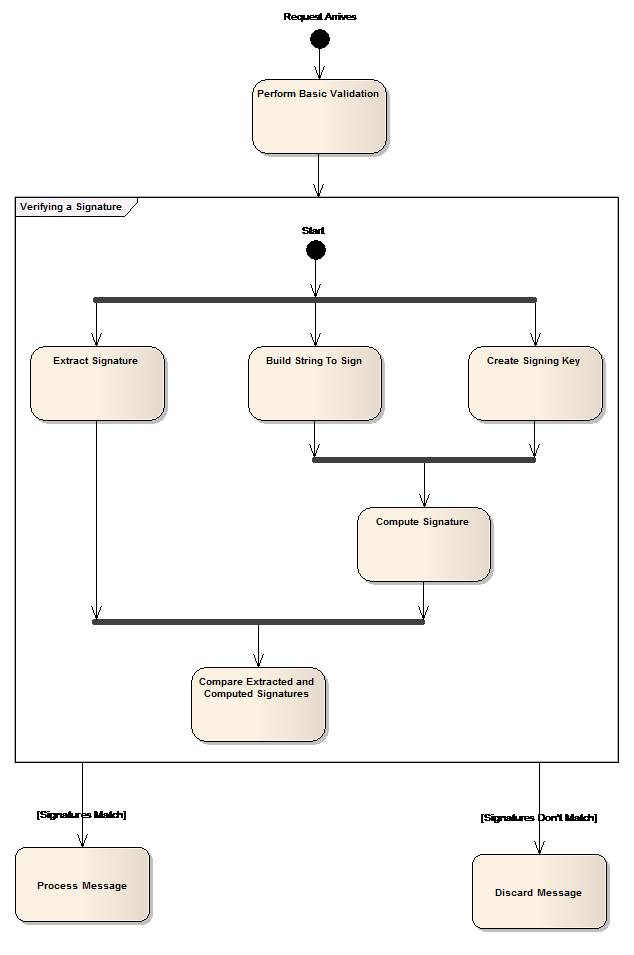
The following items can be considered when validating the redirect prior to computing the signature:
timestamp <= now <= timestamp + x_amz_expires
Or if an allowance for clocks being out of sync is made,
timestamp - fuzz <= now <= timestamp + x_amz_expires
If not, the request is invalid, possibly the result of a user bookmarking the ECP landing page on a previous visit. The request should be rejected or discarded.
The first 1/3 of “verifyAwsUrlSignature” and the private method “validateQueryParms” in section crypt_aws_s4.php provide examples of performing these types of checks in PHP.
The signature is in the “X-Amz-Signature” query string parameter. Obviously the signature itself can‘t be included in the computation of the signature so it must be removed from the request and set aside for later comparison. How the signature is removed from the request will depend on the program language and framework used to implement the external captive portal. The method “simpleaws::verifyAwsUrlSignature” in crypt_aws_s4.php illustrates one way to remove the signature when the query parameters are in a PHP array.
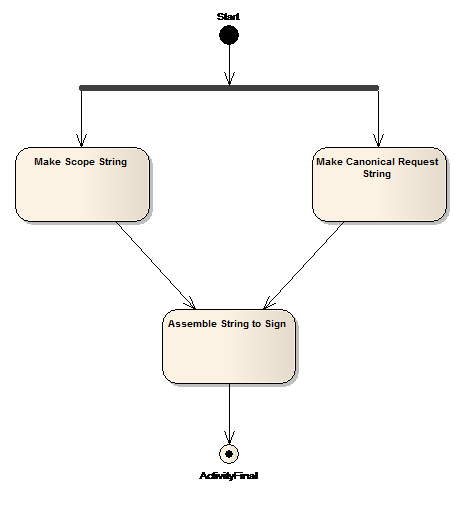
Steps in Building the String to Sign shows the main actions required to build the string that will be signed out of the request:
The scope string is easy to build out of a valid request. It is made from parts of the string in the “X-Amz-Credentials” parameter. If the credentials are valid then the scope string can be created by un-escaping the forward slashes it contains (i.e. replace ‘%2f‘ with ‘/‘), and then taking all the characters to the right of the first forward slash. The scope ends up being the fully qualified credential, less the identity string.

Note
Parts of the Scope
The fully qualified Amazon credential consists of:
The canonicalized request string has the format:
"GET\n"
.<URL-Path-Component>."\n"
.<URL-Query-Parameters>."\n"
.'host:'.<URL-Host>
."\n\nhost\nUNSIGNED-PAYLOAD";
Where:
GET is the request type.
For FF-ECP this will always be the literal “GET.”<URL-Path-Component>
is the substring beginning with the ‘/‘ at the end of the host or host-plus-port
portion of the URL and either the end of the URL or the ‘?‘ marking the beginning of
the query parameter string. For example, the URL-Path-Component of https://192.168.18.152:5825/adir/bdir/cdir/resource.htm?x=7&y=gg is
/adir/bdir/cdir/resource.htm<URL-Query-Parameters> is the substring following the ‘?‘
character and extending either to the end of the URL or up to but not including the
‘#‘ fragment character.<URL-Host> is the
host portion of the URL string. It excludes any port number included in the URL. In
the preceding URL, the URL-Host is 192.168.18.152..‘ is the catenation
operator.Finally the string that will actually be signed is composed as:
"AWS4-HMAC-SHA256\n"
.<Date>."\n"
.<scope>."\n"
.sha256(<canonicalized-request-string>)
where
AWS4-HMAC-SHA256 is a
literal identifying the overall signing algorithm being used.<Date> is the value
of the “X-Amz-Date” parameter extracted from the redirected request.<Scope> is the scope
string that was assembled as described above.<canonicalized-request-string> is the canonicalized request string
assembled as described above.sha256() is a procedure
that applies the standard sha256 algorithm to the canonicalized-request-string. Its
output should be in the form of a string of lowercase hex digit characters.The process for generating signatures uses symmetric key encryption. The controller and the ECP use a shared key (the one configured on the controller‘s WLAN Service‘s captive portal configuration dialog) and the same encryption algorithm to generate and validate the signature.
The shared key is not used directly. Instead it is used to generate a secure hash (“HMAC”) that is then used as the key to sign the request. The process for creating the key is shown below in Creating the Signing Key.

In the above figure:
And each of the “Create…” actions consists of generating a secure HMAC using SHA256 from the inputs. The output secure hash is in binary format (not encoded as a hex character string). The output of each step acts as the signing key for the subsequent step. The signing key for the first step is the shared secret, pre-pended with the literal ‘AWS4‘.
Note that for any given identity the correct signing key only needs to be computed once per day. If the calculations are cached the cache should include an entry for the previous day to cope with the request being sent just before midnight UTC. The previous day‘s key only needs to be kept for a small overlapping period (perhaps 10 minutes at the most).
At this point the signature for the request is computed as a secure HMAC using SHA256. The signing key is created as described in Creating the Signing Key and the string to sign is created as described in Building the String to Sign.
Verifying the signature in the request consists of standard string comparison between the transmitted and computed keys. If they aren‘t identical the request is invalid. The client can be sent a web page containing a generic reject message or the request can be discarded silently.