Device Fingerprinting
With an increase in
Bring Your Own Device (BYOD) corporate networks, there's a parallel increase in the number of possible attack scenarios within the network. BYOD devices are inherently unsafe, as the organization's security mechanisms do not extend to these personal devices deployed in the corporate wireless network. Organizations can protect their networks by limiting how and what these BYODs can access on and through the corporate network.
Device fingerprinting assists administrators by controlling how BYOD devices access a corporate wireless domain.
Device fingerprinting uses DHCP options sent by the client in request or discover packets to derive a unique signature specific to device class. For example, Apple devices have a different signature from Android devices. The signature is used to classify the devices and assign permissions and restrictions on each device class.

Note
Ensure DHCP is enabled on the WLAN on which device fingerprinting is to be enabled.
To define a device fingerprinting configuration on controllers, service platforms and Access Points:
-
Select
Configuration.
-
Select
Security.
-
Select
Device Fingerprinting.
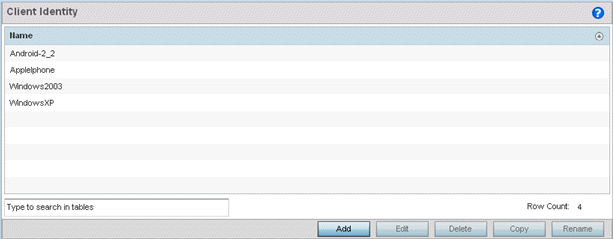
The
Client Identity screen displays, populated by default with existing client identity configurations.
Device Fingerprinting - Client Identity Screen
-
Select
Add to create a new client identity policy,
Edit to modify a selected policy, or
Delete to remove obsolete policies from the list of those available.
Use
Rename to change the name of an existing client identity policy, or
Copy a policy to a different location.
Client identity policies use
signatures to identify and group clients. Signatures are sets of attributes unique to the device model and manufacturer. Once identified, signatures classify and assign network access permissions collectively without having to administer multiple devices individually.
-
If you are adding a new client identity configuration, define a 32-character maximum name and select the
OK button at the bottom of the screen to enable the remainder of the screen‘s editable parameters.
-
Select the
+ Add Row button to add a new signature in the client identity.
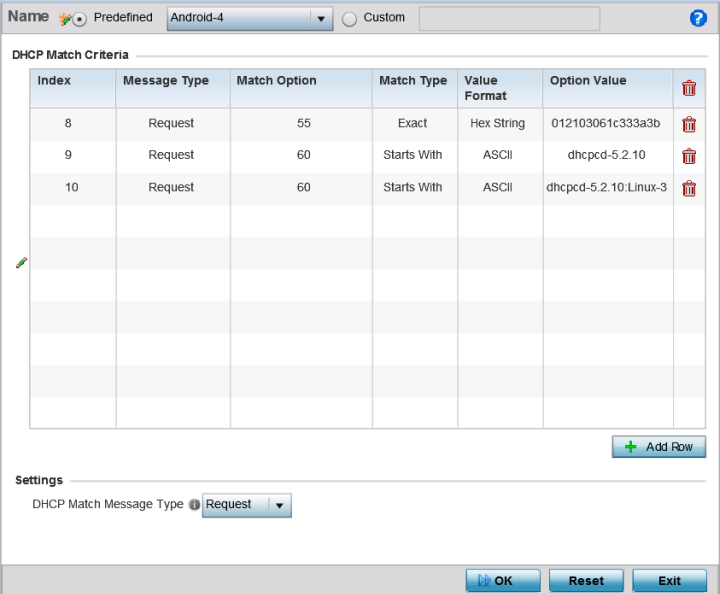
Device Fingerprinting - Add/Edit - Client Signature Screen
-
Optionally, select
Pre-defined and choose from a list of pre-defined client identities.
Once selected, the
DHCP Match Criteria field is populated with fingerprints for the selected client identity.
-
To create a custom identity configuration, select
Custom and provide a name in the adjacent field.
Select the
OK button at the bottom of the screen.
-
Provide the following information for each device signature configuration:
| Index
|
Use the spinner control to assign an index (numeric identifier) for this signature. A maximum of 16 signatures can be created.
|
| Message Type
|
Use the drop-down menu to designate the DHCP message type matched for signatures.
- Request – Looks for a signature in DHCP request messages. This is the default value.
- Discover – Looks for a signature in DHCP discover messages.
|
| Match Option
|
Options are passed in DHCP discover and request messages as Option Code, Option Type, and Option Value sets. When
Option Codes is selected, the Option Code passed in the DHCP discover/request is extracted and a fingerprint is derived. The derived fingerprint is used to identify the device.
- Option – Indicates a specific DHCP Option is used to identify a device. When selected, a text box is enabled to input the DHCP Option used for fingerprinting.
- Option Codes – Indicates the Option Code passed in the DHCP request and discover message is used for matching.
|
| Match Type
|
Use the drop-down menu to select how signatures are matched. Available options include:
- Exact – The complete signature string matches the string specified in the
Option Value field.
- Starts-with – The signature is checked if it starts with the string specified in the
Option Value field.
- Contains – The signature is checked if it contains the string specified in the
Option Value field.
|
| Value Format
|
Use the drop-down menu to select the character format of the value being checked. The value can be either ASCII or Hexadecimal.
|
| Option Value
|
Use this text box to set the 64-character maximum DHCP option value to match.
|
-
Use the
DHCP Match Message Type drop-down menu (from the
Settings field at the bottom of the screen) to specify the DHCP message type configured option values are matched against.
The following options are available:
| Discover
|
Looks for a signature in DHCP discover messages.
|
| Request
|
Looks for a signature in DHCP request messages. This is the default value.
|
| Any
|
The fingerprint is checked with either the DHCP request or the DHCP discover message.
|
| All
|
The fingerprint is checked with both the DHCP request and the DHCP discover message.
|
-
Select
OK to save the changes.
Select
Reset to revert to the last saved configuration.
-
Expand the
Device Fingerprinting menu item on the left-hand side of the screen and select
Client Identity Group.
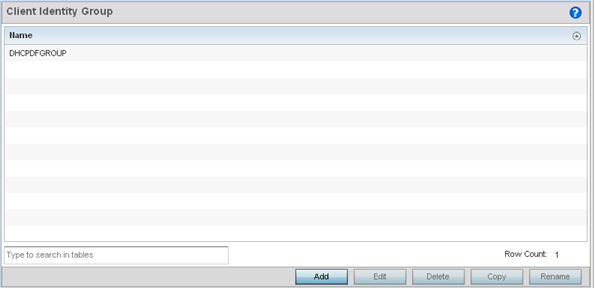
Device Fingerprinting - Client Identity Group Screen
An
identity group is a collection of client identity variables. Each client identity in the group is set a value indicating its priority when device fingerprinting.
Device fingerprinting relies on specific information sent by a client when acquiring an IP address and configuration information from a DHCP server. Device fingerprinting uses the DHCP options sent by the wireless client in DHCP request or discover packets to derive a signature specific to a device class. For example, Apple devices have a different signature from Android devices. The signature is used to classify the devices and assign permissions and restrictions on each class.
-
Select
Add to create a new policy,
Edit to modify the attributes of an existing policy, or
Delete to remove obsolete policies from the list of those available.
Use
Rename to change the name of an existing policy, or
Copy a policy to a different location.
Client identity group policies configure the signatures used to identify clients and use the signatures to classify and assign network access permissions.
-
If you are adding a new client identity group, provide a 32-character maximum name and select the
OK button at the bottom of the screen.
-
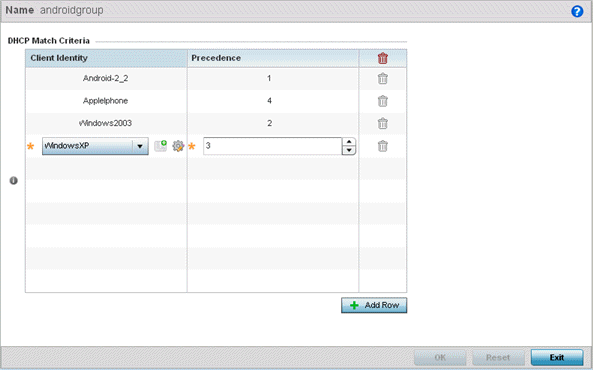
Select the
+ Add Row button to populate the screen's
Client Identity and
Precedence parameters.
Device Fingerprinting - Add/Edit - Client Identity Group Screen
-
Select the
Client Identity policy to include in this group from the drop-down menu.
-
Use the
Precedence spinner control to set the sequence (or priority) each listed client identity is checked or matched.
Lower integers are assigned the highest priority.
-
Select
OK to save the changes.
Select
Reset to revert to the last saved configuration.
 Print
this page
Print
this page Email this topic
 Feedback
 View PDF
 Download EPUB