This section describes ZTP IP routing in a two-node topology.
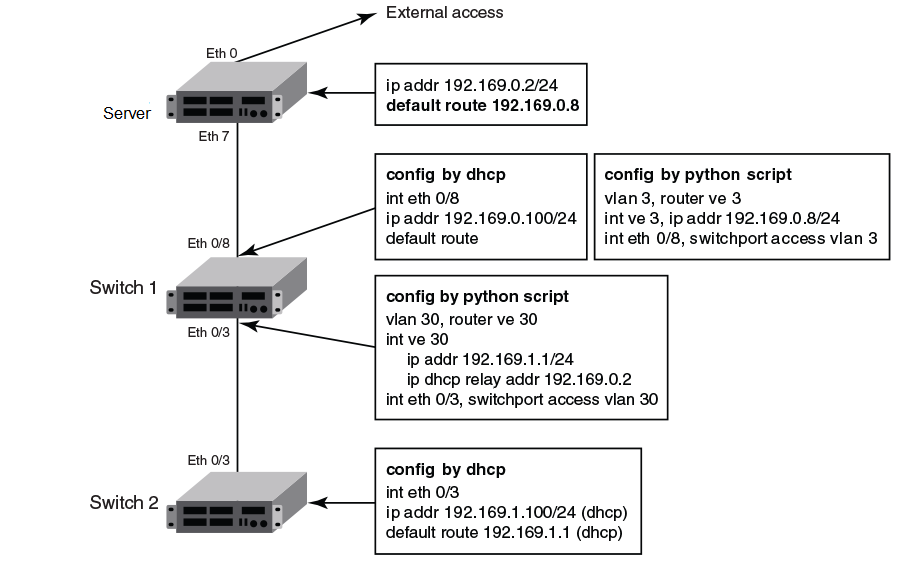
In the following figure, Switch 1 Eth 0/8 has direct connection to the DHCP or FTP/HTTP server. Switch 1 acts as a router for Switch 2 to reach the DHCP or FTP/HTTP server. A default route on Switch 1 is configured on the server for traffic sent from the DHCP server to reach Switch 2 (see the default route below). External access to the DHCP server is on Eth 0. There are two configurations for Switch 1:
DHCP relay is configured on Eth 0/3 in Switch 1 for DHCP requests from Switch 2. Switch 1 Eth 0/8 and Eth 0/3 must be in different subnets.

Note
The Python script for Switch 1 should be manually tested to verify the routing configuration before ZTP is started for Switch 2.class "level_1" {
match if option dhcp-client-identifier = "EXTREMENETWORKS##SLX9140##EXH3319M01J"; <EXH3319M01J is the device serial number>
}
class "level_2" {
match if option dhcp-client-identifier = "EXTREMENETWORKS##SLX9140##EXH3314M00L"; <EXH3314M00L is the device serial number>
}
subnet 192.169.0.0 netmask 255.255.255.0 {
pool {
allow members of "level_1";
range 192.169.0.100 192.169.0.200;
}
option bootfile-name "/config/ztp.cfg";
option tftp-server-name "192.169.0.2";
option routers 192.169.0.2;
option subnet-mask 255.255.255.0;
option broadcast-address 192.169.0.255;
}
subnet 192.169.1.0 netmask 255.255.255.0 {
pool {
allow members of "level_2";
range 192.169.1.100 192.169.1.200;
}
option bootfile-name "/config/ztp.cfg";
option tftp-server-name "192.169.0.2";
option routers 192.169.1.1; ip address as routers in level 2 subnet
option subnet-mask 255.255.255.0;
option broadcast-address 192.169.1.255;
}
The following is an example configuration file.
version=3 date=04/29/2016 supported_nos=17s.1.00 17r.1.00 common_begin vcsmode=SA fwdir=/bld/Nightly_nos_fusion_davinci_dev_160822_0600/dist scriptcfgflag=2 #0-config file only, 1-script only, 2 both script=/script/ztp.py common_end # model SXL9140 hosts host_client_id=EXTREMENETWORKS##SLX9140 for Switch 2 startup=/config/startup.cfg host_end # switch 1 as router node host_client_id=EXTREMENETWORKS##SLX9140##EXH3319M01J startup=/config/freedom1_ospf.cfg host_end
The following sequence summarizes the configuration flow:
device# dhcp ztp log
ZTP, Wed Jun 29 17:32:36 2016, ========== ZTP start ==========
ZTP, Wed Jun 29 17:32:36 2016, disable raslog
ZTP, Wed Jun 29 17:32:36 2016, CLI is ready
ZTP, Wed Jun 29 17:33:11 2016, inband ports are enabled
ZTP, Wed Jun 29 17:33:11 2016, serial number = EXH3343L014
ZTP, Wed Jun 29 17:33:11 2016, model name = SLX9140
ZTP, Wed Jun 29 17:33:11 2016, use inband interfaces only
ZTP, Wed Jun 29 17:33:13 2016, get link down on all the interfaces
ZTP, Wed Jun 29 17:33:13 2016, retry in 10 seconds
ZTP, Wed Jun 29 17:33:23 2016, inband ports are enabled
ZTP, Wed Jun 29 17:33:24 2016, serial number = EXH3343L014
ZTP, Wed Jun 29 17:33:24 2016, model name = SLX9140
ZTP, Wed Jun 29 17:33:24 2016, use inband interfaces only
ZTP, Wed Jun 29 17:33:24 2016, get link down on all the interfaces
ZTP, Wed Jun 29 17:33:24 2016, retry in 10 seconds
ZTP, Wed Jun 29 17:33:34 2016, inband ports are enabled
ZTP, Wed Jun 29 17:33:34 2016, serial number = EXH3343L014
ZTP, Wed Jun 29 17:33:34 2016, model name = SLX9140
ZTP, Wed Jun 29 17:33:34 2016, use inband interfaces only
ZTP, Wed Jun 29 17:33:35 2016, checking inband interfaces link status
ZTP, Wed Jun 29 17:34:25 2016, find link up on intefaces: Eth0.6 Eth0.8
ZTP, Wed Jun 29 17:34:25 2016, start dhcp process on interfaces: Eth0.6 Eth0.8
ZTP, Wed Jun 29 17:34:34 2016, interface Eth0.8 receives dhcp response
ZTP, Wed Jun 29 17:34:34 2016, config ip address 192.169.0.147/24 on interface Eth0.8
ZTP, Wed Jun 29 17:34:39 2016, ping ftp server 192.169.0.2
ZTP, Wed Jun 29 17:34:40 2016, ping succeed
ZTP, Wed Jun 29 17:34:41 2016, download ZTP config file from ftp://192.169.0.2/config/ztp.cfg
ZTP, Wed Jun 29 17:34:41 2016, receive ZTP configuration file [ztp.cfg]
ZTP, Wed Jun 29 17:34:41 2016, interface Eth0.8 connectivity test pass
ZTP, Wed Jun 29 17:34:41 2016, download script file [ztp.py]
ZTP, Wed Jun 29 17:34:41 2016, ZTP configuration sanity check pass
ZTP, Wed Jun 29 17:38:22 2016, ========== ZTP continue ==========
ZTP, Wed Jun 29 17:38:22 2016, disable raslog
ZTP, Wed Jun 29 17:38:22 2016, CLI is ready
ZTP, Wed Jun 29 17:38:58 2016, running configuration script [ztp.py]
ZTP, Wed Jun 29 17:39:25 2016, commit configuration
ZTP, Wed Jun 29 17:39:25 2016, ZTP succeed
ZTP, Wed Jun 29 17:39:25 2016, enable raslog
ZTP, Wed Jun 29 17:39:25 2016, ========== ZTP completed ==========
device# dhcp ztp cancel
device# dhcp ztp cancel

Warning: This command will terminate the existing ZTP session
After ZTP has been confirmed canceled, you need to run "reload system" before configuring the switch.
Do you want to continue? [y/n]
Note
ZTP is enabled by default for switch in factory default or after running "write erase". User must cancel ZTP and reload system. After switch restarts, switch is ready for all commands.ZTP session is designed to retry forever to detect the DHCP server and establish network connection for firmware download. If it is in the middle of firmware download, firmware download is completed successfully and the switch is in normal mode.