The Networks screen provides status and management for networks attached to the ExtremeGuest application.

Note
For ExtremeWireless WiNG deployments, enter the ExtremeGuest IP address on the WiNG Controller or AP for automatic synchronization of networks. In these deployments there is no need to add or edit networks.Note
For ExtremeCloud Appliance deployments, enter the ExtremeGuest IP on the ExtremeCloud Appliance host for automatic synchronization of networks. In these deployments there is no need to add or edit networks.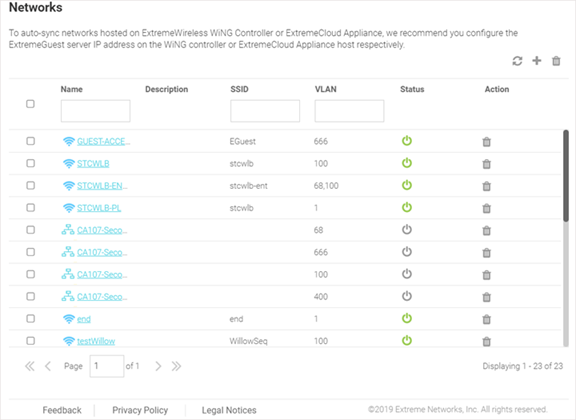
| Name | Displays the name
associated with each known wired or wireless network. Selecting a
network name displays a dialogue for editing the network's Name,
Description, SSID,
or VLAN. To filter by name or portion of a name, enter
the string in the box at the top of the Name
column. Note SSID is only applicable to wireless networks. |
| Description | Displays the optional description associated with each wired or wireless network. |
| SSID | Displays the SSID associated with each wireless network. Wired networks do not have SSIDs and are blank. To filter by SSID or partial SSID, enter the string in the box at the top of the SSID column. |
| VLAN | Displays the VLAN ID associated with each network. To filter by VLAN, enter the VLAN number in the box at the top of the VLAN column. |
| Status | The status icon displays green for networks that are online and grey for networks that are disabled. Selecting that icon will toggle the status between online and disabled. |
| Action | Select the  icon to remove the associated wired or
wireless network from ExtremeGuest. icon to remove the associated wired or
wireless network from ExtremeGuest. |
 icon periodically to refresh the data.
 icon to add a new network.
| Name | Provide a name for the network. Note: This
field is mandatory.
|
| Description | Optionally, provide a brief description for the network. |
| SSID | Optionally, specify the network's SSID. |
| VLAN | Optionally, specify the VLAN associated with this network. |
| Status | Use the  icon to disable/enable the
network. icon to disable/enable the
network.Note: Green/Grey colors indicate the network is
enabled/disabled respectively. By default the network is
enabled.
|
| Save/Cancel | Select Save to save your changes. Select Cancel to exit without saving your changes. |
icon available on the top, right-hand corner of the screen.
 Print
this page
Print
this page Email this topic
 Feedback
 View PDF
 Download EPUB