| Description |
Enter a description for this criteria uniquely identifying its
purpose. |
| Condition(s) |
Select one or more of the following conditions to match.
- User Email Domain
- Sponsor Email Domain
- Social Type
- User Type
- Loyalty User
- LDAP/Directory Group
- User's Device Count
- Any
These conditions determine when the corresponding
Action is triggered. Adding multiple
conditions requires all conditions be met before the action is
triggered. Multiple conditions can be specified to enact different
policies based on matching conditions. |
| Action |
Select an Action from the menu. The
Action is triggered when all of the
Condition(s) are met. Select from the following:
| Deny Access |
Denies network access to any guests matching the
configured Condition(s). |
| Register Device |
Registers guests matching the configured
Condition(s). Note Specify
the Validity for guest access
in Days,
Hours, and
Minutes. Select a
Group for the guest user to
join. |
| Send One-Time-Passcode to User |
Delivers a single-use passcode to guests matching the
configured
Condition(s).Note Specify
the Validity for guest access
in Days,
Hours, and
Minutes. Select a
Group for the guest user to
join. Select a user Notification
Policy for sending the
One-Time-Passcode to the guest. |
| Send Passcode to User |
Delivers a multiple use passcode to guests matching the
configured
Condition(s).Note Specify
the Validity for guest access
in Days,
Hours, and
Minutes. Select a
Group for the guest user to
join. Select a configured user
Notification Policy for
sending the One-Time-Passcode to the
guest. |
| Send One-Time-Pass. on Sponsor Approval |
Delivers a single-use passcode to guests matching the
configured Condition(s) once the
guest has been approved by a sponsor.Note Specify the
Validity for guest access
in Days,
Hours, and
Minutes. Select a
Group for the guest user to
join. Select a sponsor Notification
Policy for sending the approval
request to the sponsor. |
| Send Passcode on Sponsor Approval |
Delivers a multiple use passcode to guests matching the
configured Condition(s) once the
guest has been approved by a sponsor. Note Specify the
Validity for guest access
in Days,
Hours, and
Minutes. Select a
Group for the guest user to
join. Select a configured sponsor
Notification Policy for
sending the One-Time-Passcode to the
guest. |
| Send One-Time-Passcode to Sponsor |
Delivers a single-use passcode to the sponsor when the
configured Condition(s) are met.
Note The sponsor can then provide the single-use
passcode to the guest. Specify the
Validity for guest access
in Days,
Hours, and
Minutes. Select a
Group for the guest user to
join. Select a sponsor Notification
Policy for sending the approval
request to the sponsor. |
| Send Passcode to Sponsor |
Delivers a multiple use passcode to the sponsor when the
configured Condition(s) are
met.Note The sponsor can then provide the passcode
to the guest. Specify the
Validity for guest access
in Days,
Hours, and
Minutes. Select a
Group for the guest user to
join. Select a sponsor Notification
Policy for sending the approval
request to the sponsor. |
|
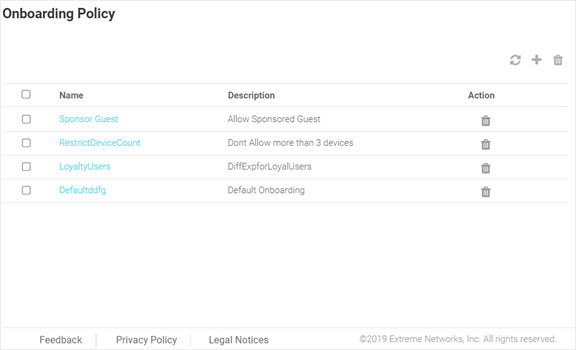
 icon to remove the associated
onboarding policy from ExtremeGuest.
icon to remove the associated
onboarding policy from ExtremeGuest. icon to update the data in the onboarding policy table.
 icon to add a new onboarding policy.
 Print
this page
Print
this page Email this topic
 Feedback
 View PDF
 Download EPUB