Enabling SNMPv3
To enable SNMPv3
parameters:
-
From the top menu, click
Controller.
-
In the left pane, click
.
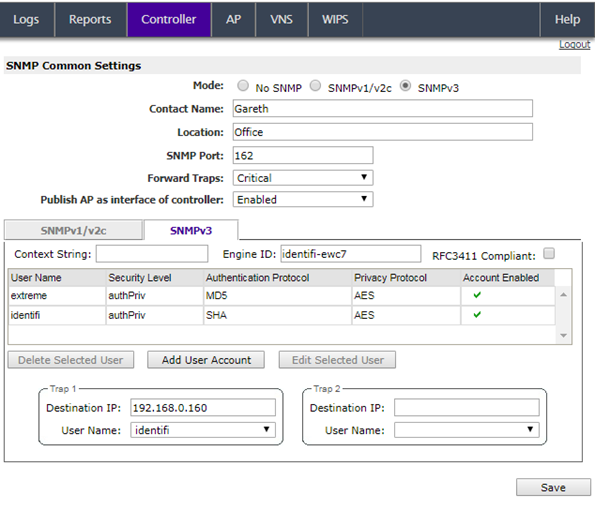
The
SNMP Common Settings screen is displayed.
-
To enable SNMP (Simple Network Management Protocol), select the SNMPv3
Mode option.
-
Type the following information:
- Contact Name – Specifies
the name of the SNMP administrator.
- Location – Specifies the
location of the SNMP administration.
- SNMP Trap Port – Specifies
the destination port for SNMP traps. The industry standard is 162. If left blank,
no traps are generated.
-
In the Forward Traps drop-down list, click the security level of the traps to be forwarded: Informational, Minor, Major, or Critical.
-
In the Publish AP as interface of controller drop-down list, click to enable
or disable publishing the wireless AP and their interfaces as interfaces of the
controller. By default this option is enabled.
When this option is enabled,
all wireless APs and their interfaces are published as interfaces of the
controller when you retrieve topology statistics and configuration information
using SNMP.
Topology statistics and
configuration information on wireless APs are retrievable using both proprietary
and standard MIBs. The Publish AP as interface of controller option only affects
information retrieved through standard MIBs, i.e. IF-MIB, RFC1213. All information
that is retrieved through proprietary MIBs is not affected. If the Publish AP as
interface of controller option is disabled, the wireless APs' interfaces are not
considered interfaces of the controller.
For example, if the Publish AP
as interface of controller option is disabled, querying the ifTable would return
information on the controller physical interfaces, plus all VNSs that are
configured on that controller. If enabled, querying the same table would return
the above information, in addition to information on each wireless APs‘
interfaces.
-
In the SNMP v3 section, type the SNMP engine ID in Engine ID. The SNMP engine ID is a 5 – 32 character ID for the
EWC SNMP agent. Do not use spaces, control characters, or tabs.
-
Add user accounts.
-
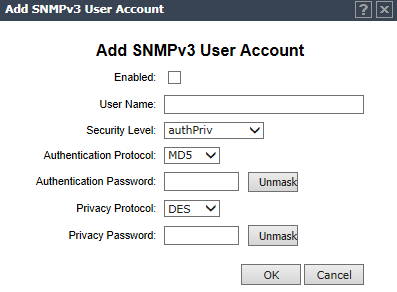
Click Add User Account.
The
Add SNMPv3 User Account screen is displayed.
-
Select Enabled to enable the user.
-
In User Name, type a user name.
-
In the Security Level drop-down list, select the appropriate security level for the user: authPriv, authNoPriv, NoAuthNoPriv.
If NoAuthNoPriv is selected, click
OK and go to the next step.
-
In the Authentication Protocol drop-down list, select the authentication
protocol: None, MD5 (Message-Digest algorithm 5), SHA.
-
In Authentication Password, type the password, which must be at least eight characters long. If desired, click Unmask to display the password in plain text.
If authNoPriv is the selected security
level, click OK and go to the next step.
-
In the Privacy Protocol drop-down list, select the encryption protocol: None, DES.
-
In Privacy Password, type the password, which must be at least eight characters long. If desired, click Unmask to display the password in plain text.
-
Click OK to save the user account information. The
SNMP Common Settings screen is displayed.
-
In Trap 1 Destination IP and Trap 2 Destination IP, type the IP addresses of the servers on the network where the SNMP traps are monitored.
-
In the Trap 1 User Name and Trap 2 User Name drop-down lists, select the user name associated with the Trap 1 and Trap 2 destination servers. Only enabled users appear in these drop-down lists.
-
To save your changes, click Save.
 Print
this page
Print
this page Email this topic
 Feedback
 View PDF
 Download EPUB