Use a Client Bridge to extend a wired LAN using a wireless infrastructure. To
configure a Client Bridge to work with ExtremeCloud IQ
Controller take the
following steps:
From ExtremeCloud IQ
Controller,
create a device group for your Client Bridge AP.
For RF Management, select
Default Smart
RF.
Edit the default configuration
Profile for the AP model, specifying the client bridge settings.
To edit the configuration Profile, select .
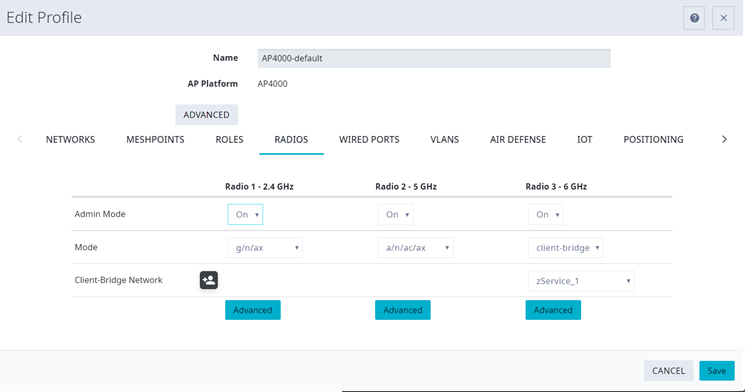
From the Radios tab,
select Client
Bridge as the Radio Mode value for either radio.
Note
Consider the following when
configuring a radio as a Client Bridge:
Only one radio can be
configured as a Client Bridge. This can be either radio. Regardless
of which radio is configured as the Client Bridge, both radios will
continue to provide service.
Radio 1
enables Client Bridge on the 2.4GHz band only.
Radio 2
enables Client Bridge on the 5GHz band only.
The Client Bridge
radio will connect on the radio channel that is determined by the
infrastructure AP.
When Client Bridge is configured on a single interface AP, the single
interface is used as the client port, not as an uplink, and you will not see the
GE2 Port Function field in the configuration Profile
Advanced Settings.
Eight networks can be
configured per radio. If one network is configured as a Client
Bridge, seven additional networks can be configured for service on
that radio.
Select the Client
Bridge Network.
The following WLAN parameters
are passed to the Client Bridge AP to configure station mode on the radio:
Network SSID
Encryption or
Authentication type
Pre-shared key
The selected network must be configured with one of the following
supported authentication types:
Open
WPA2-Personal
(PSK)
WPA2-Enterprise
802.1x/EAP
WPA3-Enterprise 802.1x/EAP
MAC-base
Authentication (MBA)
When using authentication types WPA2-Enterprise 802.1x/EAP and WPA3-Enterprise
802.1x/EAP, select the icon to configure the user ID and
password.
Configuration
Profile with Client Bridge Configuration
Note
A Client
Bridge AP will not
associate to the infrastructure network with authentication types Open or
WPA2-Personal (PSK) in combination with captive portal. These scenarios
require user interaction.
Note
The Client Bridge network and
the infrastructure AP network must match on the same radio. On the Client
Bridge AP, if the 2.4 GHz radio is configured as Client Bridge, the
infrastructure AP must broadcast that network on a 2.4GHz
radio.
From the configuration Profile
Advanced settings, the GE2 Port Function
is automatically set to Client after
configuring the Client Bridge radio.
To configure a transparent point-to-point bridge that supports
tagged traffic, set the GE2 Port
Function to Bridge.
Note
The ETH1/GE2 Bridge port is not supported on access points with a
single Ethernet port.
Ports on the Universal APs are labeled with the prefix ETH.
When Client Bridge is configured on a single interface AP, the single
interface is used as the client port, not as an uplink, and you will not see the
GE2 Port Function field in the configuration Profile
Advanced Settings.
Save the configuration Profile.
If you are planning to connect the end-system to the Client Bridge AP through
the GE2 port, edit the configuration Profile again.
On the Networks tab, the
Client Bridge network is indicated with a black highlight.
Note
The Client Bridge is always assigned the primary BSSID (Basic Service Set
Identifier). If you change the Client Bridge network assignment, the radio
is reset, resulting in a service interruption.
On the Networks tab,
select GE2
port.
Only allow one network
assignment to Client Bridge and GE2 interfaces respectively.
Connect the Client Bridge AP to
ExtremeCloud IQ
Controller
using the GE1 Port, which is designated as the primary port.
Assign the Client Bridge AP to
the device group and assign the device group to the site.
After the Client Bridge link is
established, disconnect the Client Bridge AP from the GE1 Port and ExtremeCloud IQ
Controller.
After the bridge is
established, you can find the Client Bridge AP on the Clients
List.
The end-system device
traffic is connected through GE2 port (or ETH/POE port for the single interface). The
Client Bridge AP communicates with the infrastructure AP on the wireless network.
When Client Bridge is configured on a single interface AP, the single
interface is used as the client port, not as an uplink, and you will not see the
GE2 Port Function field in the configuration Profile
Advanced Settings.
Configuration Profile
Network Configuration – Client Bridge on a single interface AP
The wired port speed is configured on the Wired Ports
tab.
 .
.