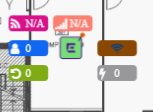
Badges display real-time statistics that can be configured for
each AP. If a metric is not assigned to a badge position, it is not shown on the
user interface. By default, all the badges are assigned to an AP. The following
metrics can be assigned to badges:
RSS. Filter range: [-100, -10] dBm
SNR. Filter range: [0, 50] dB
TX Power. Filter range: [0, 30] dBm
Radio Status
Green. Radio is on and providing service.
Red. Radio is on but not providing service.
Blue. Radio is off.
Channel. Filter range: [1, 200]
Clients. Filter range: [0, 200]
Throughput.
Select min/max for the filter range. Available
ranges:
[0, 1000] Kbps
[1, 50] Mbps
[50, 1000] Mbps
[1, 10] Gbps
Delta throughput since last statistics
collection.
Retries:
Filter range: [0, 100] %
Delta retries since last stats collection
Channel Width. Depending on frequency band, set in segments 20MHz wide: 20,
40, 80 MHz, etc.
To configure badges on APs manually:
From the right panel, select (Options) > Select Badges.
In the Badge Configuration
dialog, drag and drop the badges from the left panel to the AP.
Badge Configuration
Dialog
The badges display around
the AP and are visible when you zoom in on the map.
Select to display the badges legend that identifies the active badges.
 .
.

 to display the badges legend that identifies the active badges.