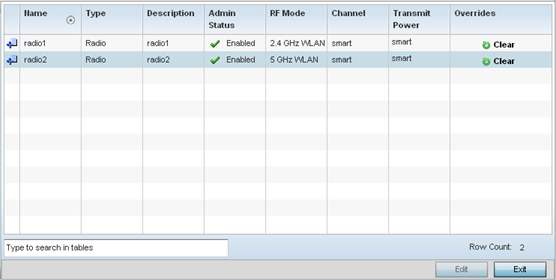
| Name |
Displays whether
the reporting radio is the access point's radio1, radio2
or radio3.
|
| Type |
Displays whether the radio has been designated as a
typical WLAN radio or if the radio has been designated as a
sensor. |
| Description |
A brief description provided by the administrator when
the radio's configuration was added or modified. |
| Admin Status |
A green check mark means the radio is enabled for client
or sensor support. A red “X” means the radio is currently
disabled. |
| RF Mode |
Displays whether each listed radio is operating in the
802.11a/n or 802.11b/g/n radio band. If the radio is a
dedicated sensor, it will be listed as a sensor to define
the radio as not providing typical WLAN support. If the
radio is a client bridge, it provides a typical bridging
function and does not provide WLAN support. The radio band
is set in the Radio Settings tab. |
| Channel |
Lists the channel setting for the radio. Smart is the default setting. Smart indicates
the acces spoint is set for dynamic Smart RF support. If set
to Smart, the access point scans non-overlapping
channels listening for beacons from other access points.
After the channels are scanned, it selects the channel with
the fewest access points. In the case of multiple access
points on the same channel, it selects the channel with the
lowest average power level. |
| Transmit Power |
Lists the transmit
power for each radio displayed as a value in milliwatts.
Selecting smart allows the radio to perform power
adjustments to compensate for failed neighboring
radios.
|
| Overrides |
A Clear option
appears for each radio configuration that has an
override applied to the profile‘s configuration. Select
Clear to revert this specific radio
configuration to the profile configuration originally
defined by the administrator for this radio.
|