To define a profile's Ethernet port security configuration:
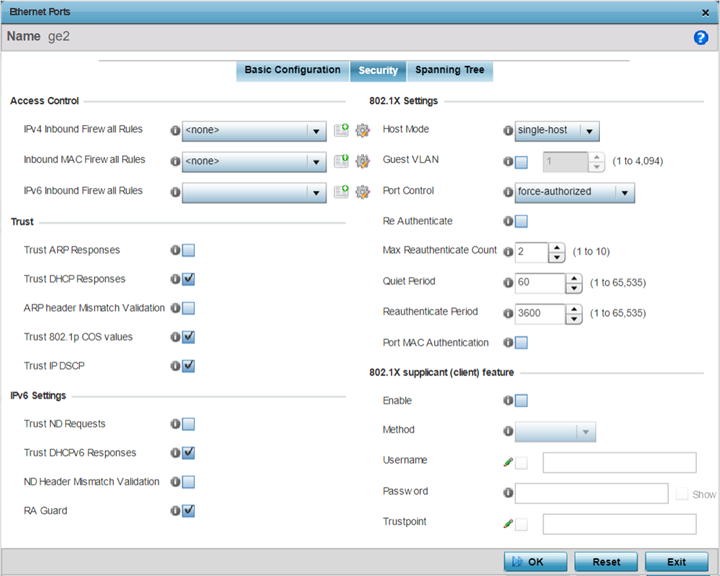
Use the Inbound IP Firewall Rules and MAC Inbound Firewall Rules pull-down menus to select the firewall rules to apply to this profile's Ethernet port configuration.
The firewall inspects IP and MAC traffic flows and detects attacks typically not visible to traditional wired firewall appliances.
| Trust ARP Responses | Select the check box to enable ARP trust on this port. ARP packets received on this port are considered trusted and information from these packets is used to identify rogue devices within the network. The default value is disabled. |
| Trust DHCP Responses | Select the check box to enable DHCP trust on this port. If enabled, only DHCP responses are trusted and forwarded on this port, and a DHCP server can be connected only to a DHCP trusted port. The default value is enabled. |
| ARP header Mismatch Validation | Select this option to enable a mismatch check for the source MAC in both the ARP and Ethernet header. The default value is disabled. |
| Trust 802.1p COS values | Select the check box to enable 802.1p COS values on this port. The default value is enabled. |
| Trust IP DSCP | Select the check box to enable IP DSCP values on this port. The
default value is enabled. Note: Some vendor
solutions with VRRP enabled send ARP packets with Ethernet SMAC as
a physical MAC and inner ARP SMAC as VRRP MAC. If this
configuration is enabled, a packet is allowed, despite a conflict
existing.
|
| Host Mode | Use the drop-down menu to select the host mode configuration to apply to this port. Options include single-host or multi-host. The default setting is single-host. |
| Guest VLAN | Specify a guest VLAN for this port from 1 - 4094. This is the VLAN traffic is bridged on if this port is unauthorized and the guest VLAN is globally enabled. |
| Port Control | Use the drop-down menu to set the port control state to apply to this port. Options include force-authorized, force-unauthorized and automatic. The default setting is force-authorized. |
| Re Authenticate | Select this setting to force clients to re-authenticate on this port. The default setting is disabled, thus clients do not need to reauthenticate for connection over this port until this setting is enabled. |
| Max Reauthenticate Count | Set the maximum re-authentication attempts (1 - 10) before this port is moved to unauthorized. The default setting is 2. |
| Maximum Request | Set the maximum number of authentication requests (1 - 10) before returning a failed message to the requesting client. The default setting is 2. |
| Quiet Period | Set the quiet period for this port from 1 - 65,535 seconds. This is the maximum wait time 802.1x waits upon a failed authentication attempt. The default setting is 60 seconds. |
| Reauthenticate Period | Use the spinner control to set the re-authentication period for this port from 1 - 65,535 seconds. The default setting is 60 seconds. |
| Port MAC Authentication | When enabled, a port's MAC address is authenticated, as only one
MAC address is supported per wired port. When successfully
authenticated, packets from the source are processed. Packets from all
other sources are dropped. Port MAC authentication is supported on
NX9500 and NX9600 series service platforms. Port MAC authentication may be enabled on ports in conjunction with Wired 802.1x settings for a MAC Authentication AAA policy. |
| Enable | Select to enable 802.1X port-based authentication of
802.1X-capable supplicant (client) on the selected wired port. The IEEE 802.1X port-based authentication protocol restricts unauthorized LAN access by enforcing supplicant authentication at the port. When a supplicant associates with a IEEE 802.1X enabled wired port, normal traffic across the port is suspended until the supplicant is successfully authenticated. Once the supplicant is successfully authenticated, the port status changes to authorized and normal traffic flow resumes. During the suspended state, only EAP over LAN traffic is allowed across the wired port. Note: This feature is
disabled by default.
|
| Method | Select the mode of authentication:
|
| Username | Select this checkbox and specify the supplicant‘s username. Note: This is required
only if the Method
of authentication is set to Username.
|
| Password | Sets the password associated with the supplicant username
specified above. Note: This is required only if the Method
of authentication is set to Username.
|
| Trustpoint | Select this checkbox and specify the trustpoint
name. In EAP-TLS authentication, the supplicant and RADIUS server authenticate each other using trustpoint certificates. A trustpoint represents a CA/identity pair containing the identity of the CA, CA specific configuration parameters, and an association with an enrolled identity certificate. Note: Ensure that the
trustpoint certificate is installed on the supplicant and the
RADIUS server.
|