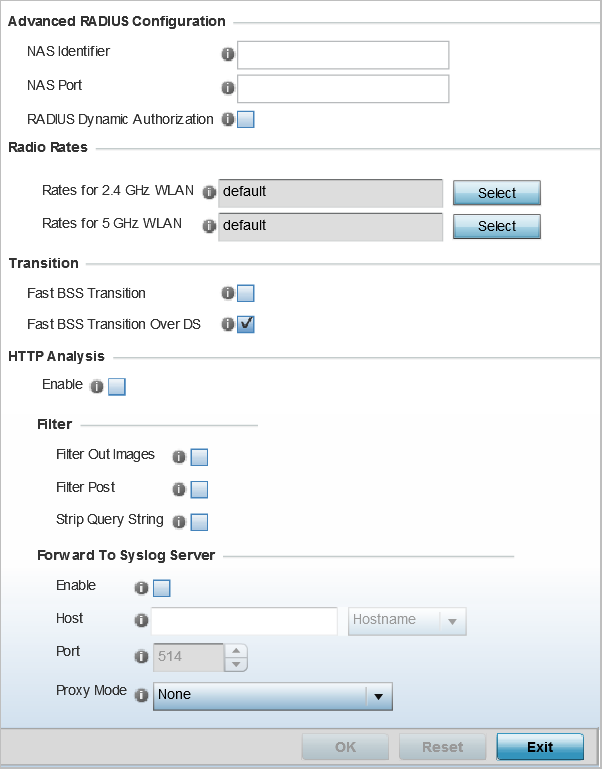
Configuring Advanced WLAN Settings

About this task

Procedure

  1. Select Configuration → Wireless → Wireless LANs to display a high-level display of the existing WLANs.
  2. Click Add to create an additional WLAN, or click Edit to modify the properties of an existing WLAN.
  3. Click Advanced.
    Click to expand in new window
    WLAN - Advanced Configuration Screen
    GUID-F43B6B49-8123-4EE2-A6E7-288942C5D10A-low.png
  4. Refer to the Protected Management Frames (802.11w) field to set a frame protection mode and security association for the WLAN‘s advanced configuration.
    ModeSelect a radio button for the mode (either Disabled, Optional or Mandatory). Disabled is the default setting.
    SA Query AttemptsUse the spinner control to set the number of security association query attempts, between 1 and 10. The default value is 5.
    SA Query Retry TimeoutSet the timeout (from 100-1,000 milliseconds) for waiting for a response to a SA query before resending it. The default is 201 milliseconds.
  5. Refer to the Advanced RADIUS Configuration field to set the WLAN‘s NAS configuration and RADIUS Dynamic Authorization.
    NAS IdentifierSpecify what is included in the RADIUS NAS-Identifier field for authentication and accounting packets. This is an optional setting, and defaults are used if no values are provided.
    NAS PortThe profile database on the RADIUS server consists of user profiles for each connected NAS (network access server) port. Each profile is matched to a user name representing a physical port. When the access point authorizes users, it queries the user profile database using a user name representative of the physical NAS port making the connection.

    Set the numeric port value between 0 and 4,294,967,295.

    RADIUS Dynamic AuthorizationSelect this check box to enable the RADIUS protocol to support unsolicited messages sent from the RADIUS server. These messages allow administrators to issue CoA (change of authorization) messages, which affect session authorization, or DM (Disconnect Messages), which cause a session to terminate immediately. This option is disabled by default.
  6. Refer to the Radio Rates field to define selected data rates for both the 2.4 GHz and 5.0 GHz bands.
    Click to expand in new window
    Advanced WLAN Rate Settings 2.4 GHz Screen
    GUID-6C83ABB8-9AD9-492D-8458-A1F812E9114F-low.png
    Click to expand in new window
    Advanced WLAN Rate Settings 5 GHz Screen
    GUID-F96292E9-5652-4DFA-8911-4F5F15DB9DBA-low.png

    Define both minimum Basic and optimal Supported rates as required for the 802.11b rates, 802.11g rates and 802.11n supported by the 2.4 GHz band and the 802.11a and 802.11n rates supported by the 5.0 GHz band. These are the supported client rates within this WLAN.

    802.11n MCS rates are defined as follows, both with and without short guard intervals (SGI):

    Table 1. MCS-1 Stream
    MCS Index Number of Streams20 MHz No SGI20 MHz With SGI40 MHz No SGI40 MHz With SGI
    016.57.213.515
    111314.42730
    2119.521.740.545
    312628.95460
    413943.48190
    515257.8108120
    6158.565121.5135
    716572.2135150
    Table 2. MCS-2 Stream
    MCS-2Stream Index Number of Streams20 MHz No SGI20 MHz With SGI40 MHz No SGI40 MHz With SGI
    021314.42730
    122628.95460
    223943.48190
    325257.8108120
    427886.7162180
    52104115.6216240
    62117130243270
    72130144.4270300
    Table 3. MCS-3 Stream
    MCS-3Stream Index Number of Streams20 MHz No SGI20 MHz With SGI40 MHz No SGI40 MHz With SGI
    0319.521.740.545
    133943.38190
    2358.565121.5135
    337886.7162180
    43117130.7243270
    53156173.3324360
    63175.5195364.5405
    73195216.7405450

    802.11ac MCS rates are defined as follows, both with and without short guard intervals (SGI):

    Table 4. MCS-802.11ac (Theoretical Throughput for Single Spatial Streams)
    MCS Index 20 MHz No SGI20 MHz With SGI40 MHz No SGI40 MHz With SGI80 MHz No SGI80 MHz With SGI
    06.57.213.51529.332.5
    11314.4273058.565
    219.521.740.54587.897.5
    32628.95460117130
    43943.38190175.5195
    55257.8108120234260
    658.565121.5135263.3292.5
    76572.2135150292.5325
    87886.7162180351390
    9N/AN/A180200390433.3
  7. Set the following Transition options:
    Fast BSS TransitionIf needed, select Fast BSS Transition to enable 802.11r fast roaming on this WLAN. This setting is disabled by default. 802.11r is an attempt to undo the burden that security and QoS added to the handoff process, and restore it to an original four message exchange process. The central application for the 802.11r standard is VOIP using mobile phones within wireless Internet networks.
    Fast BSS Transition Over DSOptionally select Fast BSS Transition Over DS to enable 802.11r over DS fast roaming on this WLAN. This setting is enabled by default.
  8. Enable HTTP Analysis for log file analysis on this WLAN.
    This setting is disabled by default.
  9. Set the following Filter settings for HTTP analysis on this WLAN:
    Filter Out ImagesSelect this option to filter images out of this WLAN‘s log files. This setting is disabled by default.
    Filter PostSelect this option to filter posts out of this WLAN‘s log files. This setting is disabled by default.
    Strip Query StringSelect this option to filter query strings out of this WLAN‘s log files. This setting is disabled by default.
  10. Set the following Forward to Syslog Server settings for HTTP analysis on this WLAN:
    EnableSelect the check box to forward any firewall HTTP analytics to a specified syslog server for this WLAN. This setting is disabled by default.
    Host

    Enter a Hostname or IP Address for the syslog server to forward HTTP analytics. Hostnames cannot include an underscore character.

    PortSpecify the port number utilized by the syslog server. The default port is 514.
    Proxy ModeIf a proxy is needed to connect to the syslog server, select a proxy mode of either Through RF Domain Manager or Through Wireless Controller. If no proxy is needed, select None.
  11. Click OK when completed to update this WLAN‘s advanced settings.
    Click Reset to revert the screen to its last saved configuration.