Override Services Configuration

About this task

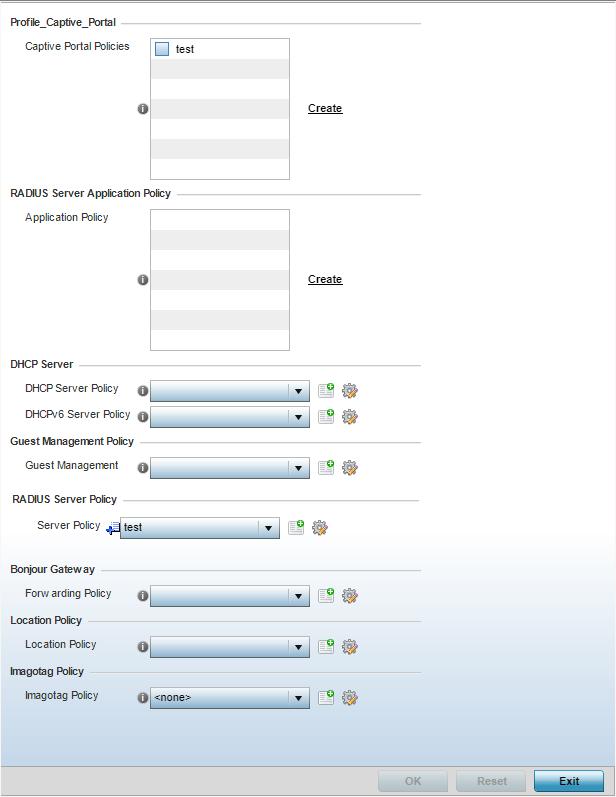
A profile can contain specific guest access (captive portal), DHCP, server and RADIUS server configurations supported by the controller, service platform, or access point's own internal resources. These access, IP assignment, and user authorization resources can be defined uniquely as profile requirements dictate.

To define or override a profile's services configuration:

Procedure

  1. Select ConfigurationDevices from the web UI.
    The Device Configuration screen displays a list of managed devices or peer controllers, service platforms, or access points.
  2. Select a target device in the lower left-hand side of the UI. The selected device's configuration menu displays.
    You can also select a target device by double-clicking it in the list in the Device Configuration screen.
  3. Expand the Profile Overrides menu and select Services.
    Note

    Note

    A blue override icon (to the left of a parameter) defines the parameter as having an override applied. To remove an override go to the Basic Configuration section of the device and click Clear Overrides. This removes all overrides from the device.
    Click to expand in new window
    Device Overrides - Services Screen
    GUID-C8608BAE-BC82-4E28-B71F-AE13A431B019-low.png
  4. Refer to the Captive Portal Hosting field to set or override a guest access configuration (captive portal) for use with this profile.

    A captive portal is guest access policy for providing temporary and restrictive access to the wireless network.

    A captive portal configuration provides secure authenticated access using a standard Web browser. A captive portal provides authenticated access by capturing and re-directing a user's Web browser session to a captive portal login page where the user must enter valid credentials to access to the network. After the administrator has logged into the captive portal, additional Agreement, Welcome, and Fail pages provide the administrator with several options for the captive portal‘s screen flow and user appearance.

    Select an existing captive portal policy, use the default captive portal policy, or click the Create link to create a new configuration that can be applied to this profile. For more information, see Captive Portal Policies.

  5. Use the RADIUS Server Application Policy drop-down menu to select an application policy to authenticate users and authorize access to the network.
    A RADIUS policy provides the centralized management of authentication data (usernames and passwords). When an client attempts to associate, the controller or service platform sends the authentication request to the RADIUS server. If an existing RADIUS server policy does not meet your requirements, click the Create link to create a new policy.
  6. Use the DHCP Server Policy drop-down menu assign this profile a DHCP server policy.
    If an existing DHCP policy does not meet the profile‘s requirements, click the Create icon to create a new policy configuration that can be applied to this profile, or click the Edit icon to modify the parameters of an existing DHCP Server policy.

    Dynamic Host Configuration Protocol (DHCP) allows hosts on an IP network to request and be assigned IP addresses as well as discover information about the network where they reside. Each subnet can be configured with its own address pool. Whenever a DHCP client requests an IP address, the DHCP server assigns an IP address from that subnet‘s address pool. When the onboard DHCP server allocates an address for a DHCP client, the client is assigned a lease, which expires after an predetermined interval. Before a lease expires, wireless clients (to which leases are assigned) are expected to renew them to continue to use the addresses. When the lease expires, the client is no longer permitted to use the leased IP address. The profile‘s DHCP server policy ensures all IP addresses are unique, and no IP address is assigned to a second client while the first client's assignment is valid (its lease has not expired).

  7. Use the DHCPv6 Server Policy drop-down menu assign this profile a DHCPv6 server policy.
    If an existing DHCP policy for IPv6 does not meet the profile‘s requirements, click the Create icon to create a new policy configuration that can be applied to this profile, or click the Edit icon to modify the parameters of an existing DHCP Server policy.

    DHCPv6 is a networking protocol for configuring IPv6 hosts with IP addresses, IP prefixes, or other configuration attributes required on an IPv6 network. DHCP in IPv6 works in with IPv6 router discovery. With the proper RA flags, DHCPv6 works like DHCP for IPv4. The central difference is the way a device identifies itself if assigning addresses manually instead of selecting addresses dynamically from a pool.

    For more information, see Captive Portal Policy Basic Configuration.

  8. Use the Guest Management Policy drop-down menu to select an existing Guest Management policy to use as a mechanism to manage guest users with this profile.
  9. Use the RADIUS Server Policy drop-down menu to select an existing RADIUS server policy to use as a user validation security mechanism with this profile.
    A profile can have its own unique RADIUS server policy to authenticate users and authorize access to the network. A profile‘s RADIUS policy provides the centralized management of controller or service platform authentication data (usernames and passwords). When an client attempts to associate, an authentication request is sent to the RADIUS server. For more information, see RADIUS Server Policies.
  10. Set Bonjour Gateway settings.
    Bonjour is Apple‘s implementation of zero-configuration networking (Zeroconf). Zeroconf is a group of technologies that include service discovery, address assignment and hostname resolution. Bonjour locates devices such as printers, other computers and services that these computers offer over a local network.

    Bonjour provides a general method to discover services on a local area network (LAN). It allows users to set up a network without any configuration. Services such as printers, scanners and file-sharing servers can be found using Bonjour. Bonjour only works within a single broadcast domain. However, with special DNS configuration, it can be extended to find services across broadcast domains.

    From the Forwarding Policy drop-down menu, select the Bonjour Gateway forwarding policy.

  11. Use the Location Policy drop-down menu to select and apply a location policy to the controller/virtual controller. The location policy provides the ExtremeLocation server's hostname and ExtremeLocation tenant's location API key. This information is required by the controller to authenticate and authorize with the ExtremeLocation server. Use the Create or Edit icons to create a new policy or edit an existing policy.
    Note

    Note

    For information on creating location policies, see Location Policy.
  12. Refer to the Imagotag Policy field to select or set a Imagotag Policy. Use the drop-down menu to select and apply an Imagotag Policy to the AP's profile. You can use the Create or Edit icons to create a new policy or edit an existing policy. The Imagotag feature is supported only on the AP8432 model access point.

    For information on enabling support for SES-imagotag‘s ESL tags on WiNG APs with USB interfaces, seeSetting the Imagotag Policy.

  13. Click OK to save the changes or overrides made to the profile‘s services configuration.
    Click Reset to revert to the last saved configuration.