Controllers and service platforms have mechanisms to allow or deny management access to the network for separate interfaces and protocols: HTTP, HTTPS, Telnet, SSH, and SNMP.
These management access configurations can be applied strategically to profiles as resource permissions dictate for the profile. Additionally, overrides can be applied to customize a device‘s management configuration, if deployment requirements change and a device's configuration must be modified from its original device profile configuration.
Additionally, an administrator can define a profile with unique configuration file and device firmware upgrade support. In a clustered environment, these operations can be performed on one cluster member, then propagated to each member of the cluster and onwards to devices managed by each cluster member.
To define or override a profile‘s management configuration:

Note
A blue override icon (to the left of a parameter) defines the parameter as having an override applied. To remove an override go to the Basic Configuration section of the device and click Clear Overrides. This removes all overrides from the device.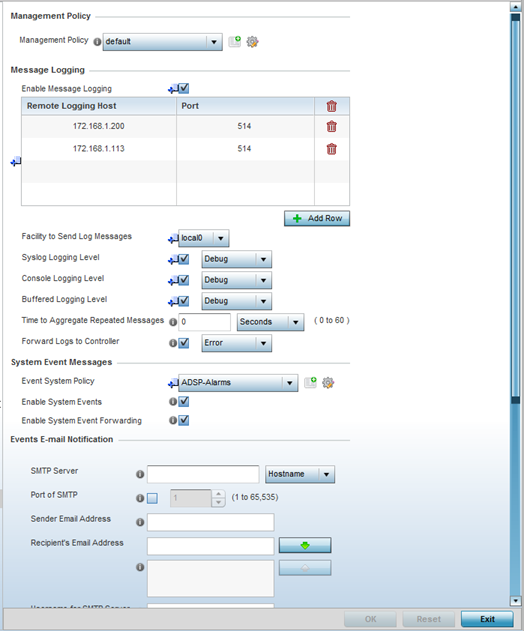
Use the drop-down menu to select an existing management policy to apply to this profile. If there are no management policies that meet the data access requirements of this profile, click the Create icon to access screens used to define administration, access control, and SNMP configurations. Alternatively, select an existing policy and click the Edit icon to modify the configuration of an existing management policy. For more information, see Viewing Management Access Policies.
| Enable Message Logging | Select this option to enable the profile to log system events to a log file or a syslog server. Selecting this check box enables the rest of the parameters required to define the profile‘s logging configuration. This option is disabled by default. |
| Remote Logging Host |
Use this table to define numerical (non DNS) IP addresses for up to three external resources where logged system events can be sent on behalf of the profile. Select the Delete icon as needed to remove an IP address. |
| Facility to Send Log Messages | Use the drop-down menu to specify the local server (if used) for profile event log transfers |
| System Logging Level | Event severity coincides with the syslog logging level defined for the profile. Assign a numeric identifier to log events based on criticality. Severity levels include 0 - Emergency, 1 - Alert, 2 - Critical, 3 - Errors, 4 - Warning, 5 - Notice, 6 - Info and 7 - Debug. The default logging level is 4. |
| Console Logging Level | Event severity coincides with the syslog logging level defined for the profile. Assign a numeric identifier to log events based on criticality. Severity levels include 0 - Emergency, 1 - Alert, 2 - Critical, 3 - Errors, 4 - Warning, 5 - Notice, 6 - Info and 7 - Debug. The default logging level is 4. |
| Buffered Logging Level | Event severity coincides with the syslog logging level defined for the profile. Assign a numeric identifier to log events based on criticality. Severity levels include 0 - Emergency, 1 - Alert, 2 - Critical, 3 - Errors, 4 - Warning, 5 - Notice, 6 - Info and 7 - Debug. The default logging level is 4. |
| Time to Aggregate Repeated Messages | Define the increment (or interval) system events are logged on behalf of the profile. The shorter the interval, the sooner the event is logged. Either define an interval in seconds (0 - 60) or minutes (0 -1). The default value is 0 seconds. |
| Forward Logs to Controller | Select this option to define a log level for forwarding event logs to the control. Log levels include Emergency, Alert, Critical, Error, Warning, Notice, Info and Debug. The default logging level is Error. |
| SMTP Server | Specify either the hostname or IP address of the outgoing SMTP server where notification emails are originated. Hostnames cannot include an underscore character. |
| Port of SMTP | If a non-standard SMTP port is used on the outgoing SMTP server, select this option and specify a port from 1 - 65,535 for the outgoing SMTP server to use. |
| Sender E-mail Address | Specify the email address from which notification email is originated. This is the from address on notification email. |
| Recipient's E-mail Address |
Specify up to 6 email addresses to be the recipients of event email notifications. |
| Username for SMTP Server | Specify the username of the sender on the outgoing SMTP server. Many SMTP servers require users to authenticate with an username and password before sending email through the server. |
| Password for SMTP Server | Specify password associated with the username of the sender on the outgoing SMTP server. Many SMTP servers require users to authenticate with an username and password before sending email through the server. |
| Compress | Select this option to use data compression to when sending updates to the controller. This option is disabled by default. |
| Update Interval |
Define an interval in either seconds (1 - 3,600), minutes (1 - 60), or hours (1) for pushing buffered packets. The default setting is 1 minute. |
| Controller | Select this option to provide service platform analytics to a local device. This setting is enabled by default. |
| URL | When using an external analytics engine with an NX 9000 series service platform, enter the IP address or uniform resource locator (URL) for the system providing external analytics functions. |
| User Name | Enter the user name needed to access the external analytics engine. |
| Password | Enter the password associated with the username on the external analytics engine. |
| Update Interval | Set the interval in either seconds (1 - 3,600), minutes (1 - 60), or hours (1) to forward buffered information to an external server resource, even when the buffers are not full. The default setting is 1 minute. |