To review a profile‘s original configuration requirements and the options available for a target device, refer to General Profile Configuration.
To override the selected device‘s general profile configuration:

Note
Devices can also be selected directly from the device browser in the lower, left-hand side of the UI.
Note
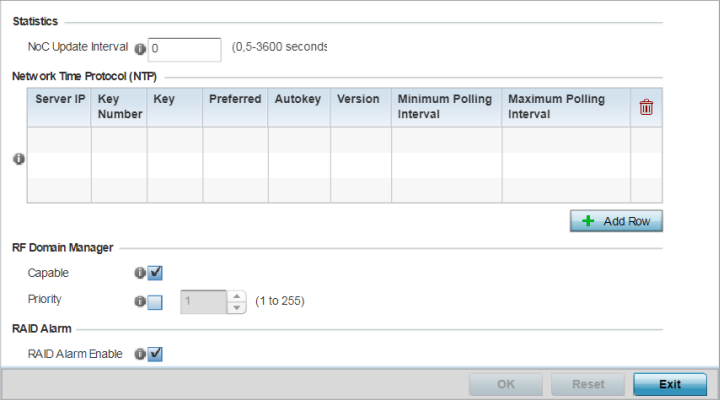
A blue override icon (to the left of a parameter) defines the parameter as having an override applied. To remove an override go to the Basic Configuration section of the device and click the Clear Overrides button. This removes all overrides from the device.The default value is 0 seconds, which indicates the auto mode. In the auto mode the controller automatically adjusts the interval based on the information load.
| Server IP | Set the IP address of each server as a potential NTP resource. |
| Key Number | Select the number of the associated Authentication Key for the NTP resource. |
| Key | If an autokey is not being used, manually enter a 64 character maximum key the controller or service platform and NTP resource share to securely interoperate. |
| Preferred | Select the radio button to designate this particular NTP resource as preferred. If using multiple NTP resources, preferred resources are given first opportunity to connect to the controller and provide NTP calibration. |
| AutoKey | Select the radio button to enable an Autokey configuration for the controller and NTP resource. The default setting is disabled. |
| Version | Use the spinner control to specify the version number used by this NTP server resource. The default setting is 0. |
Refer to the RF Domain Manager field to elect RF Domain Manager devices and assign them a priority in the election process
|
Capable |
Select this option to elect this controller a RF Domain manager capable of storing and provisioning configuration and firmware images for other members of the RF Domain. The RF-domain-manager updates any state changes to the rest of the devices in the RF Domain. This setting is enabled by default. |
|
Priority |
Select this option to set the priority of this device becoming the RF Domain Manager versus other capable RF Domain members. The higher the value (1 - 255) the higher priority assigned to the device in the RF Domain Manager election process. |
RAID controller drive arrays are available within the NX 95XX and NX 96XX series service platforms.
These service platforms include a single Intel MegaRAID controller (virtual drive) with RAID-1 mirroring support enabled. The online virtual drive supports up to two physical drives that could require hot spare substitution if a drive were to fail. With the WiNG 5.5 release, an administrator can manage the RAID controller event alarm and syslogs supporting the array hardware from the service platform user interface and is not required to reboot the service platform BIOS.
Click Reset to revert to the last saved configuration.