Installing a Versatile Interface Module or
Clock Module in an X460-G2 Series Switch
This section describes how to install a versatile interface module (VIM) or a clock
module in the rear slot of an X460-G2 switch.

Note
Clock module ports are output ports. They are not to be used
as input ports.
You need the following tools and materials to install a VIM or
clock module:
- ESD-preventive wrist strap
- #1 Phillips screwdriver (for clock module) or flat-bladed
screwdriver (for all other VIM modules)

Caution
Extreme
Networks VIMs and clock modules are not
hot-swappable. Disconnect power to the switch before removing an installed VIM or
clock module or installing a new VIM or clock module.
The installation procedure is the same for all X460-G2 VIMs and
clock modules, with the exception that the VIMs use slotted retaining screws and the
clock module uses Phillips retaining screws.
To install a versatile interface module or clock module, follow
these steps:
-
Attach an ESD-preventive wrist strap to your wrist
and connect the metal end to an appropriate ground point on the rack.
-
Disconnect the switch power.
-
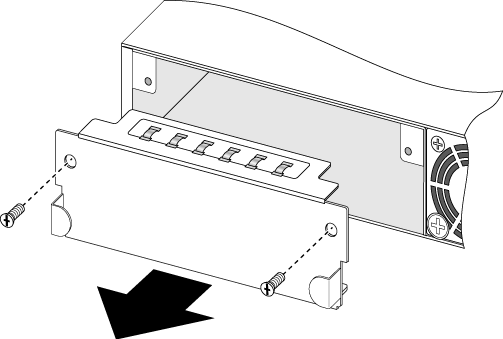
Remove the cover plate from the VIM or clock
module slot:
-
Remove the retaining screws at the top
corners of the slot cover plate, and set the screws aside in a safe
place.
-
Save the retaining screws to secure the
new module in the switch.
-
Pull the cover plate away from the module
slot.
Removing a slot Cover Plate (VIM slot
cover shown)
-
Remove the new VIM or clock module from its
anti-static packaging.
-
Install the VIM or clock module in the
switch:
-
Carefully slide the module into the
switch.
-
Insert and tighten the retaining screws
you removed in step 3. The clock module uses Phillips
screws and the VIM modules use slotted screws.
Tighten Screws on the Inserted VIM
Module
| 1 = VIM module retaining screw
locations |
Tighten Screws on the Inserted Clock
Module
| 1 = clock module retaining
screw locations |


 Print
this page
Print
this page Email this topic
 Feedback
 View PDF
 Download EPUB