Setting a device's Basic Configuration is required to assign a device name, deployment location, and system time. Similarly, the Basic Configuration screen is where profile and RF Domain assignments/adjustments are made. RF Domains allow administrators to assign configuration data to multiple devices deployed in a common coverage area, such as in a floor, building or site. Each RF Domain contains policies that can determine a Smart RF or WIPS configuration.
Profiles enable administrators to assign a common set of configuration parameters and policies to access points, controllers and service platforms. Profiles can be used to assign common or unique network, wireless and security parameters to devices across a large, multi segment, site. The configuration parameters within a profile are based on the hardware model the profile was created to support. Controllers and service platforms support both default and user defined profiles implementing new features or updating existing parameters to groups of devices. The central benefit of a profile is its ability to update devices collectively without having to modify individual device configurations one at a time.

Note
Once devices have been assigned membership in either a profile or RF Domain, an administrator must be careful not to assign the device a configuration update that removes it from membership from a RF Domain or profile. A RF Domain or profile configuration must be re-applied to a device once its configuration has been modified in a manner that differentiates it from the configuration shared by the devices comprising the RF Domain or profile.To assign a device a Basic Configuration:
Select the Configuration tab from the Web UI.
Select Devices from the Configuration tab.
The Device Configuration screen displays a list of managed devices or peers. The listed devices can either be other access points, controllers or service platforms.
Select a target device (by double-clicking it) from amongst those displayed.
Devices can also be selected directly from the Device Browser in the lower, left-hand, side of the UI.
The Basic Configuration screen displays by default.
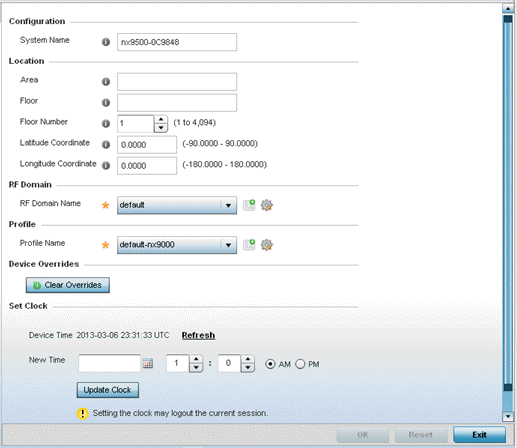
Set the following Configuration settings for the target device:
|
System Name |
Provide the selected device a system name up to 64 characters. This is administrator defined device name appearing within the RF Domain or Profile the device supports. |
|
Area |
Assign the device an Area name representative of the location the access point, controller or service platform was physically deployed. The name cannot exceed 64 characters. Assigning an area name is helpful when grouping devices in RF Domains and profiles, as devices in the same physical deployment location may need to share specific configuration parameters in respect to radio transmission and interference requirements specific to that location. |
|
Floor |
Assign the target a device a building Floor name representative of the location the access point, controller or service platform was physically deployed. The name cannot exceed 64 characters. Assigning a building Floor name is helpful when grouping devices within the same general coverage area. |
|
Floor Number |
Use the spinner control to assign a numerical floor designation in respect to the floor's actual location within a building. Set a value from 1 - 4094. the default setting is the 1st floor. |
|
Latitude Coordinate |
Set the latitude coordinate where devices are deployed within a floor. When looking at a floor map, latitude lines specify the east-west position of a point on the Earth's surface. The exact location of a device deployment can be ascertained by aligning the latitude and longitude points on the earth's surface. |
|
Longitude Coordinate |
Set the long i tutu de coordinate where devices are deployed within a floor. When looking at a floor map, longitude lines specify the north-south position of a point on the Earth's surface. The exact location of a device deployment can be ascertained by aligning the longitude and latitude points on the earth's surface. |
Use the RF Domain drop-down menu to select an existing RF Domain for device membership.
If a RF Domain configuration does not exist suiting the deployment requirements of the target device, select the Create icon to create a new RF Domain configuration, or select the Edit icon to modify the configuration of a selected RF Domain.
For more information, see RF Domains or Managing RF Domains.
Use the Profile drop-down menu to select an existing RF Domain for device membership.
If a profile configuration does not exist suiting the deployment requirements of the target device, select the Create icon to create a new profile configuration, or select the Edit icon to modify the configuration of a selected profile.
If necessary, select the Clear Overrides button to remove all existing overrides from the device.
Refer to the Set Clock parameter to update the system time of the target device.
Refer to the Device Time parameter to assess the device's current time, or whether the device time is unavailable. Select Refresh as required to update the device's reported system time.
Use the New Time parameter to set the calendar day, hour and minute for the target device. Use the AM and PM radio buttons to refine whether the updated time is for the morning or afternoon/evening.
When completed, select Update Clock to commit the updated time to the target device.
Select OK to save the changes made to the device's Basic Configuration. Selecting Reset reverts the screen to its last saved configuration.
 Print
this page
Print
this page Email this topic
 Feedback
 View PDF
 Download EPUB