A certificate links identity information with a public key enclosed in the certificate. Each certificate is digitally signed by a trustpoint. The trustpoint signing the certificate can be a certificate authority, corporation or individual. A trustpoint represents a CA/identity pair containing the identity of the CA, CA-specific configuration parameters and an association with an enrolled identity certificate.
To import trustpoints, certificate authorities, CRLs and signed certificates:
Select Operations > Manage Certificates.
Select a device from amongst those displayed in either the RF Domain or Network panes on the left-hand side of the screen.
To import a certificate to the controller or service platform, select the Import button from the bottom of the Manage Certificates screen.
An Import New Trustpoint screen displays where CA certificates, CRLs and signed certificates can optionally be imported to the controller or service platform once the network credentials of the file transfer have been defined.

To optionally import a CA certificate, select the Import CA button from the Import New Trustpoint screen.
A CA is a network authority that issues and manages security credentials and public keys for message encryption. The CA signs all digital certificates it issues with its own private key. The corresponding public key is contained within the certificate and is called a CA certificate.
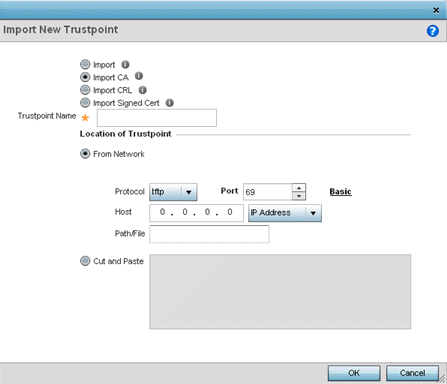
Define the following configuration parameters required for the Import of the CA certificate:
|
Trustpoint Name |
Enter the 32 character maximum name assigned to the target trustpoint signing the certificate. A trustpoint represents a CA/identity pair containing the identity of the CA, CA specific configuration parameters, and an association with an enrolled identity certificate. |
|
URL |
Provide the complete URL to the location of the trustpoint. If needed, select Advanced to expand the dialog to display network address information to the location of the target trustpoint. The number of additional fields populating the screen is dependent on the selected protocol. |
|
Advanced / Basic |
Click the Advanced or Basic link to switch between a basic URL and an advanced location to specify trustpoint location. |
|
Protocol |
Select the protocol used for importing the target CA certificate. Available options include: tftp ftp sftp http cf usb1-4 |
|
Port |
Use the spinner control to set the port. This option is not valid for cf and usb1-4. |
|
Host |
Provide the hostname or numeric IP address of the server used to export the trustpoint. This option is not valid for cf and usb1-4. |
|
Path/File |
Specify the path or filename of the CA certificate. Enter the complete relative path to the file on the server. |
|
Cut and Paste |
Select the Cut and Paste radio button to simply copy an existing CA into the cut and paste field. When pasting, no additional network address information is required. |
Select OK to import the defined CA certificate. Select Cancel to revert the screen to its last saved configuration.
Select the Import CRL button from the Import New Trustpoint screen to optionally import a CRL to the controller, service platform or access point.
If a certificate displays with a CRL, that CRL can be imported into the controller, service platform or access point. A certificate revocation list (CRL) is a list of certificates that have been revoked or are no longer valid. A certificate can be revoked if the CA had improperly issued a certificate, or if a private-key is compromised. The most common reason for revocation is the user no longer being in sole possession of the private key.
For information on creating a CRL to use with a trustpoint, refer to Setting the Certificate Revocation List (CRL) Configuration.

Define the following configuration parameters required for the Import of the CRL:
|
Trustpoint Name |
Enter the 32 character maximum name assigned to the target trustpoint signing the certificate. A trustpoint represents a CA/identity pair containing the identity of the CA, CA-specific configuration parameters, and an association with an enrolled identity certificate. |
|
From Network |
Select the From Network radio button to provide network address information to the location of the target CRL. The number of additional fields that populate the screen is also dependent on the selected protocol. This is the default setting. |
|
URL |
Provide the complete URL to the location of the CRL. If needed, select Advanced to expand the dialog to display network address information to the location of the CRL. The number of additional fields that populate the screen is also dependent on the selected protocol. |
|
Protocol |
Select the protocol used for importing the CRL. Available options include: tftp ftp sftp http cf usb1-4 |
|
Port |
Use the spinner control to set the port. This option is not valid for cf and usb1-4. |
|
Host |
Provide the hostname or numeric IP address of the server used to export the trustpoint. This option is not valid for cf and usb1-4. |
|
Path/File |
Specify the path to the CRL. Enter the complete relative path to the file on the server. |
|
Cut and Paste |
Select the Cut and Paste radio button to simply copy an existing CRL into the cut and paste field. When pasting, no additional network address information is required. |
Select OK to import the CRL. Select Cancel to revert the screen to its last saved configuration.
To import a signed certificate, select the Import Signed Cert button from the Import New Trustpoint screen.
Signed certificates (or root certificates) avoid the use of public or private CAs. A self-signed certificate is an identity certificate signed by its own creator, thus the certificate creator also signs off on its legitimacy. The lack of mistakes or corruption in the issuance of self signed certificates is central.
Self-signed certificates cannot be revoked which may allow an attacker who has already gained controller access to monitor and inject data into a connection to spoof an identity if a private key has been compromised. However, CAs have the ability to revoke a compromised certificate, preventing its further use.
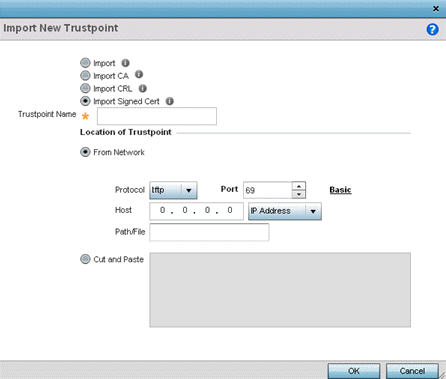
Define the following parameters required for the Import of the Signed Certificate:
|
Trustpoint Name |
Enter the 32 character maximum trustpoint name with which the certificate should be associated. |
|
From Network |
Select the From Network radio button to provide network address information to the location of the signed certificate. The number of additional fields that populate the screen is dependent on the selected protocol. From Network is the default setting. |
|
URL |
Provide the complete URL to the location of the signed certificate. If needed, select Advanced to expand the dialog to display network address information to the location of the signed certificate. The number of additional fields populating the screen is dependent on the selected protocol. |
|
Protocol |
Select the protocol for importing the signed certificate. Available options include: tftp ftp sftp http cf usb1-4 |
|
Port |
Use the spinner control to set the port. This option is not valid for cf and usb1-4. |
|
Host |
Provide the hostname or numeric IP address of the server used to export the signed certificate. This option is not valid for cf and usb1-4. |
|
Path/File |
Specify the path to the signed certificate. Enter the complete relative path to the file on the server. |
|
Cut and Paste |
Select the Cut and Paste radio button to simply copy an existing certificate into the cut and past cut and paste field. When pasting, no additional network address information is required. |
Select OK to import the signed certificate. Select Cancel to revert the screen to its last saved configuration
 Print
this page
Print
this page Email this topic
 Feedback
 View PDF
 Download EPUB