
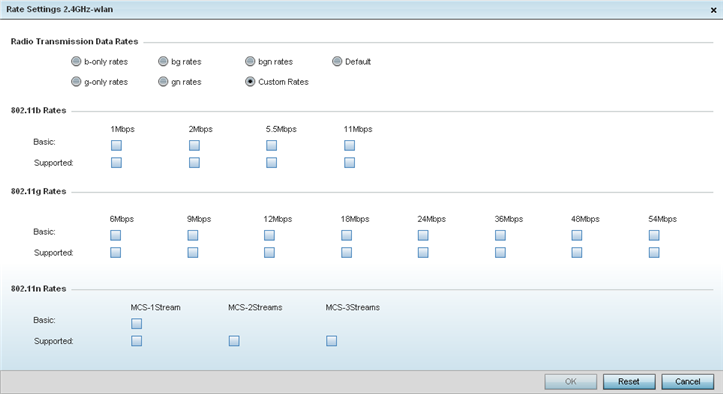
For 2.4 GHz WLAN radio transmission rate settings, define the minimum basic and supported rates in the 802.11b Rates, 802.11g Rates and 802.11n Rates sections. These rates are applicable to client traffic associated with this WLAN only.
If supporting 802.11n, select a Supported MCS index. Set an MCS (modulation and coding scheme) in respect to the radio‘s channel width and guard interval. An MCS defines (based on RF channel conditions) an optimal combination of 8 data rates, bonded channels, multiple spatial streams, different guard intervals, and modulation types. Clients can associate as long as they support basic MCS (as well as non-11n basic rates).
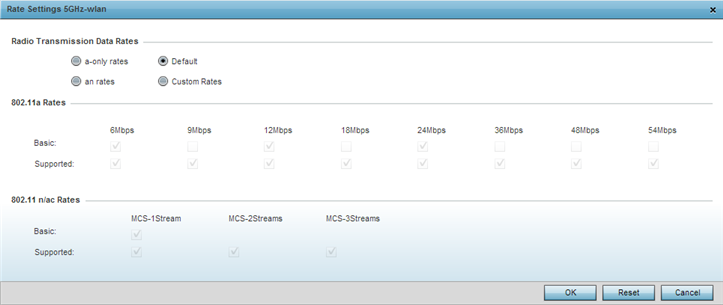
For 5.0 GHz WLAN radio transmission rate settings, define the minimum basic and supported rates in the 802.11b Rates and 802.11n Rates sections. These rates are applicable to client traffic associated with this WLAN only.
If supporting 802.11n, select a Supported MCS index. Set an MCS (modulation and coding scheme) in respect to the radio‘s channel width and guard interval. An MCS defines (based on RF channel conditions) an optimal combination of 8 data rates, bonded channels, multiple spatial streams, different guard intervals, and modulation types. Clients can associate as long as they support basic MCS (as well as non-11n basic rates).
802.11n MCS rates are defined as follows, both with and without short guard intervals (SGI):
| MCS Index | Number of Streams | 20 MHz No SGI | 20 MHz With SGI | 40 MHz No SGI | 40 MHz With SGI |
|---|---|---|---|---|---|
| 0 | 1 | 6.5 | 7.2 | 13.5 | 15 |
| 1 | 1 | 13 | 14.4 | 27 | 30 |
| 2 | 1 | 19.5 | 21.7 | 40.5 | 45 |
| 3 | 1 | 26 | 28.9 | 54 | 60 |
| 4 | 1 | 39 | 43.4 | 81 | 90 |
| 5 | 1 | 52 | 57.8 | 108 | 120 |
| 6 | 1 | 58.5 | 65 | 121.5 | 135 |
| 7 | 1 | 65 | 72.2 | 135 | 150 |
| MCS-2Stream Index | Number of Streams | 20 MHz No SGI | 20 MHz With SGI | 40 MHz No SGI | 40 MHz With SGI |
|---|---|---|---|---|---|
| 0 | 2 | 13 | 14.4 | 27 | 30 |
| 1 | 2 | 26 | 28.9 | 54 | 60 |
| 2 | 2 | 39 | 43.4 | 81 | 90 |
| 3 | 2 | 52 | 57.8 | 108 | 120 |
| 4 | 2 | 78 | 86.7 | 162 | 180 |
| 5 | 2 | 104 | 115.6 | 216 | 240 |
| 6 | 2 | 117 | 130 | 243 | 270 |
| 7 | 2 | 130 | 144.4 | 270 | 300 |
| MCS-3Stream Index | Number of Streams | 20 MHz No SGI | 20 MHz With SGI | 40 MHz No SGI | 40 MHz With SGI |
|---|---|---|---|---|---|
| 0 | 3 | 19.5 | 21.7 | 40.5 | 45 |
| 1 | 3 | 39 | 43.3 | 81 | 90 |
| 2 | 3 | 58.5 | 65 | 121.5 | 135 |
| 3 | 3 | 78 | 86.7 | 162 | 180 |
| 4 | 3 | 117 | 130.7 | 243 | 270 |
| 5 | 3 | 156 | 173.3 | 324 | 360 |
| 6 | 3 | 175.5 | 195 | 364.5 | 405 |
| 7 | 3 | 195 | 216.7 | 405 | 450 |
802.11ac MCS rates are defined as follows, both with and without short guard intervals (SGI):
| MCS Index | 20 MHz No SGI | 20 MHz With SGI | 40 MHz No SGI | 40 MHz With SGI | 80 MHz No SGI | 80 MHz With SGI |
|---|---|---|---|---|---|---|
| 0 | 6.5 | 7.2 | 13.5 | 15 | 29.3 | 32.5 |
| 1 | 13 | 14.4 | 27 | 30 | 58.5 | 65 |
| 2 | 19.5 | 21.7 | 40.5 | 45 | 87.8 | 97.5 |
| 3 | 26 | 28.9 | 54 | 60 | 117 | 130 |
| 4 | 39 | 43.3 | 81 | 90 | 175.5 | 195 |
| 5 | 52 | 57.8 | 108 | 120 | 234 | 260 |
| 6 | 58.5 | 65 | 121.5 | 135 | 263.3 | 292.5 |
| 7 | 65 | 72.2 | 135 | 150 | 292.5 | 325 |
| 8 | 78 | 86.7 | 162 | 180 | 351 | 390 |
| 9 | N/A | N/A | 180 | 200 | 390 | 433.3 |