Configuring MEPs on Switch 2

  1. From the web browser, navigate to Configuration > MEP.
  2. Click Add New MEP to add a new MEP on port 1 using the following configuration:
    Tip

    Tip

    When configuring MEPs, set the Instance to be the same as the MEP ID. During configuration you will be asked for a MEP, and this may be either the MEP "Instance" or the MEP ID, so setting them to the same value lessens confusion during configuration.
    Instance
    3
    Domain
    Port
    Mode
    Mep
    Direction
    Down
    Residence Port
    1
    Level
    0
    Tagged VID
    3001
  3. Click Add New MEP to add a new MEP on port 2 using the following configuration:
    Instance
    4
    Domain
    Port
    Mode
    Mep
    Direction
    Down
    Residence Port
    2
    Level
    0
    Tagged VID
    3001
    Click to expand in new window
    Switch 2 MEPs
  4. Edit the first MEP by clicking the Instance number and configure the MEP as follows:
  5. Configure the MEP as follows:
    1. Set the Mep id to match the MEP instance number (it defaults to 1).
    2. Click Add New Peer MEP and enter the Peer MEP ID according to the following:
      On MEP Instance... Set Peer MEP ID To...
      1 5
      2 3
      3 2
      4 6
      5 1
      6 4
      Note

      Note

      The Unicast Peer MAC can remain empty because it will be learned by receiving the CCM from the peer side.
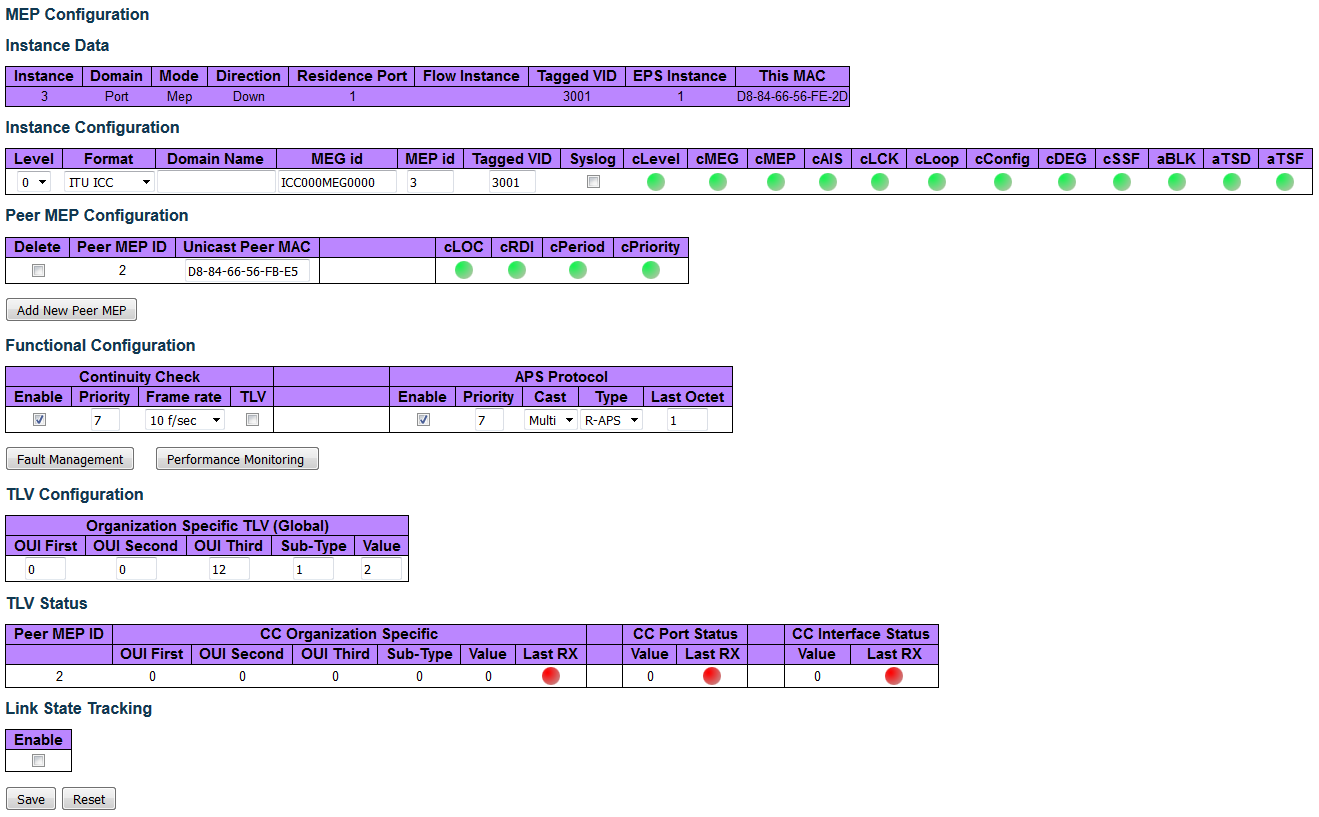
    3. Enable Contunuity Check.
    4. Select 10 f/sec from the Frame rate drop-down menu.
    5. Enable APS Protocol.
    6. Set the APS Protocol Type to R-APS (default is L-RPS).
    Click to expand in new window
    MEP 3 Configuration
  6. Click Save button.
  7. Edit the other MEP by returning to the Configuration > MEP page and clicking the Instance number.
  8. Repeat step 5 to configure MEP 4.
  9. Click Save button.