Create Templates and Run Reports

Use the Templates page to create, edit, run, or delete custom reports. You can customize reports to suit specific report data capture requirements.
Note

Note

You can also run predefined reports for PCI compliance and security from the Templates page using the templates with those names. The predefined reports are not customizable.

Reports are created from templates by using the scheduler. The scheduler can be configured to generate the report once, immediately, or it can request that the report be run periodically.

To create a template and schedule a report:

  1. From the main menu, select Reports.
    The reports page opens and displays a list of templates.
  2. On the default Templates page, select Add.
    The Create Template page opens.
    Click to expand in new window
    Create Report Template
    GUID-3DD44563-37DD-40B6-95F9-BD7C32AF2617-low.png
  3. In the Name field, enter a name for the report.
  4. From the right menu, drag and drop one or more content types that you want to include in the report to the Report Title pane.
  5. Select Save.
    Your report is saved. The list of report templates are displayed automatically and your new report is included in the list. templates.
  6. To schedule a report, select a report name in the Templates list.
    A group of management icons display to the left of the report name.
  7. Select an icon to make changes to, clone, or delete the template. For the PCI Compliance and Security reports, the Schedule option is the only available option.
    • GUID-B6AEFAEB-A5F4-4B62-BD68-92699420DEAE-low.png - View the configuration details of the selected report template.
    • GUID-FED58FF1-3667-4564-A97D-2D8C086F3CDF-low.png - Edit the configuration of the selected report template.
    • GUID-35E3DFC3-62AB-4F9B-92F9-A6A0C0D49E2F-low.png - Copy the selected report template to save effort in creating a similar report, and then make changes to the copied template.
    • GUID-0192BEFF-C161-4733-8A42-C2B5BF6B54A6-low.png - Schedule the selected report template to run a report.
    • GUID-06472F01-1728-4224-BEB9-30C8BAAFF702-low.png - Delete the selected report template.
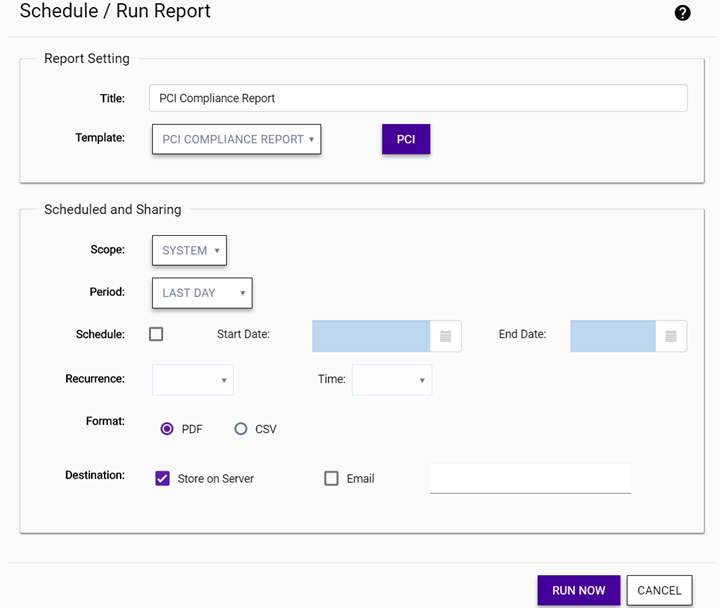
  8. To schedule a report to run, select GUID-0192BEFF-C161-4733-8A42-C2B5BF6B54A6-low.png.
    The Schedule/Run Reports dialog opens.
    Click to expand in new window
    Schedule / Run Report Dialog
    GUID-98A3868D-252E-423C-BFFB-70013CB3BB73-low.png
  9. Edit the fields, and select Run Now.
    Title Enter a report title to apply significance to the data that is captured.
    Template Select the report template that you want to run from the drop-down list. This list includes the Security report template, the PCI Compliance report template, and any custom report templates for your organization.
    Scope Specify the scope as System to generate a report for the whole system, including each configured network. Otherwise, select a network from the drop-down list to restrict the report to the selected network.
    Period Specify the reporting period (Last Hour, Last Day, Last Week, Last Month). These are not relevant for the Security report.
    Schedule To schedule the report generation, select the Schedule, and then specify a start date and end date using the calendar function. The report will only run on or after the date set in the Start Date field. The report will not run after the date set in the End Date. If you do not select the Schedule check box, the report will run as soon as it is submitted and it run only once.
    Recurrence (Optional) Specify the recurrence frequency and the time this report is run, either daily, weekly, or monthly.
    Daily Runs the report daily. Use the Time drop-down menu to set the time at which to run the daily report.
    Weekly Runs the report on a particular day of the week. Use the Day of Week field to set the weekday to run the report on. Use the Time drop-down menu to set the time the weekly report is generated.
    Monthly Runs the report on a particular date of the month, every month. Use the Day of Month field to set the date. Use the Time drop-down menu to set the time to begin the historical report data gathering process.
    Format Specify the output format for this report: PDF or CSV.
    Destination Select a destination option to configure how a generated report is stored:
    Store on Server Select this check box to stores and archive a generated report on the server. Generated reports are listed on the Generated Reports tab.
    Email Select this check box to send the report by email. In the adjoining text box, enter one or more email addresses (separated by commas) to which the report will be sent.
    The report is run at the configured interval. The generated report is available from the Generated Reports page.