
Note
A maximum of 16 enabled SSIDs (eight per radio) can be assigned to a site.For example, If you want to allow a completely open network, replace the default policy with a policy that allows traffic. You can use the predefined Allow All policy or create a more restrictive policy (the latter is recommended).
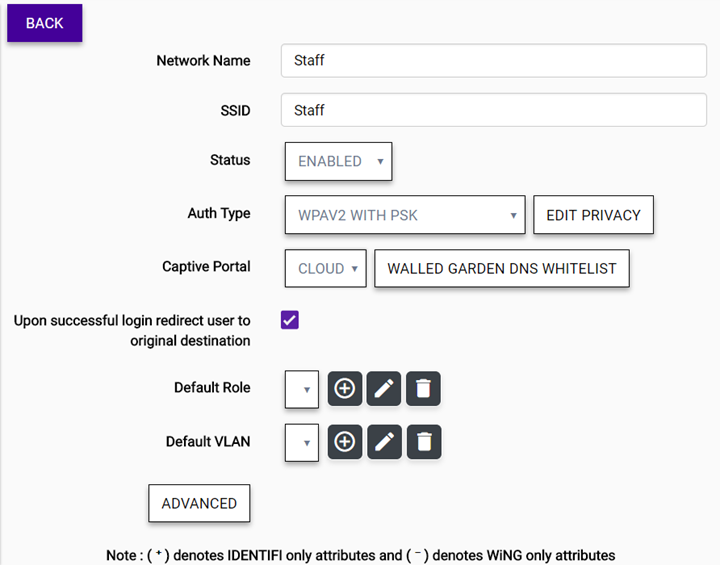
| Network Name | Enter any unique, user-friendly value that makes sense for your business. Example: Staff |
| SSID | Enter a character string to identify the network. 32 characters maximum. Upper and lowercase allowed. Example: PermanentStaff |
| Status | Choose an option:
|
| AuthType | Define the authorization type. You must edit the privacy settings for WEP, WPAv2PSK, and WPA2 Enterprise w/ RADIUS.
|
| MAC-based Authentication | Select this option to enable MAC-based authentication with a RADIUS server, which restricts network access to specific devices by MAC address. |
| MBA Timeout Role | (For ExtremeWireless APs only) Select the role that will be assigned to a wireless client during MAC-based authentication (MBA) if the RADIUS server access request times out. If no MBA Timeout Role is selected, then a RADIUS server timeout is treated like an Access-Reject, which prevents the client from accessing the network. If a moderately restrictive role is set (one allowing internet access but no local access), then clients can continue to function when the RADIUS server is unavailable. |

| Auth Type | Set the authentication protocol type for the RADIUS server (PAP, CHAP, MS-CHAP, or MS-CHAP2). |
| IP Address | Enter a valid IP address for the RADIUS server. A primary IP address is required, and a secondary IP address is optional. |
| Shared Secret | Enter the password that will be used between ExtremeCloud and the RADIUS server. If you are using a secondary IP address, you must provide a password for that IP address also. |
Partial FQDN matching is based on case sensitive suffix matching. For example, companyname.com will match companyname.com, www.companyname.com, xyz-abc.companyname.com or anything that ends with companyname.com.
Note
Select to delete an FQDN.
 to create a new role or select
  to
edit an existing role. (You can also delete roles by selecting .)
to
edit an existing role. (You can also delete roles by selecting .)
| Default Unauth Role | Displays when the captive portal option is set to Other. Define a non-authenticated role that covers all traffic from devices that have not yet authenticated with the captive portal. Create a role with at least one rule that redirects at least some HTTP traffic (port 80, 8080, 443) to the captive portal web page. The role must allow DHCP and DNS traffic also. The role can allow other traffic. (This redirection is independent of the network's Authentication Type.) Only policies with redirection display in the drop-down list for this field. |
| Default Auth Role | Displays when an external captive portal is enabled. Define an authenticated role. |
| Default Role | Displays when captive portal is not enabled or when the Cloud captive portal is enabled. Define the access control role. This role is mandatory and covers all traffic from authenticated devices. The role filters network packets, either disallowing them or boosting the priority. Open, WPAv2PSK, and WPA2 Enterprise w/ RADIUS can use the Default Role, which is useful for simple deployments. |
Note
If you are assigning an ExtremeCloud-created captive portal to a network that does not yet have an IP subnet to it, a pop-up IP Subnet dialog opens. You must provide an IP subnet for the captive portal to work.| Default VLAN | The default VLAN is the VLAN on
which the client traffic is placed by the AP if the policy assigned
to the client does not explicitly place the client's traffic on a
specific VLAN. In addition to the VLAN ID, the destination VLAN can
be marked Untagged. (Complex
deployments can attach to different VLANs simultaneously, but only
one VLAN can be untagged.) Multicast filters can also be configured
to control multicast forwarding to the wireless network. To edit
multicast filters and the IP subnet, select or and then select Advanced. |
 , you can set the Class of Service to use an
existing CoS, which makes the aggregate bandwidth unlimited, or configure CoS
advanced settings for the priority, ToS/DSCP and mask.
, you can set the Class of Service to use an
existing CoS, which makes the aggregate bandwidth unlimited, or configure CoS
advanced settings for the priority, ToS/DSCP and mask.
 Print
this page
Print
this page Email this topic
 Feedback
 View PDF
 Download EPUB