Run PCI Compliance Reports
PCI Compliance reports list the compliance status of the Payment Card
Industry (PCI) Data Security Standard parameters. The information in these reports
are used by vendors to prove compliance to credit card companies and identify areas
where they need to make changes in order to be compliant.
You can define, schedule, download, and delete PCI reports, and
configure reports to be sent to a list of email addresses.
These reports can be requested for an entire tenant or for a specific
tenant site.
If you have a site with ExtremeWireless WiNG APs,
the PCI compliance report also contains a Threat AP information section.
To run a PCI compliance report:
-
From the main menu, select Reports.
The reports page opens and
displays a list of templates.
-
Select the PCI Compliance template from the list.
The Schedule button (

) displays.
-
To schedule a report to run, select .
The
Schedule/Run Reports
dialog opens.
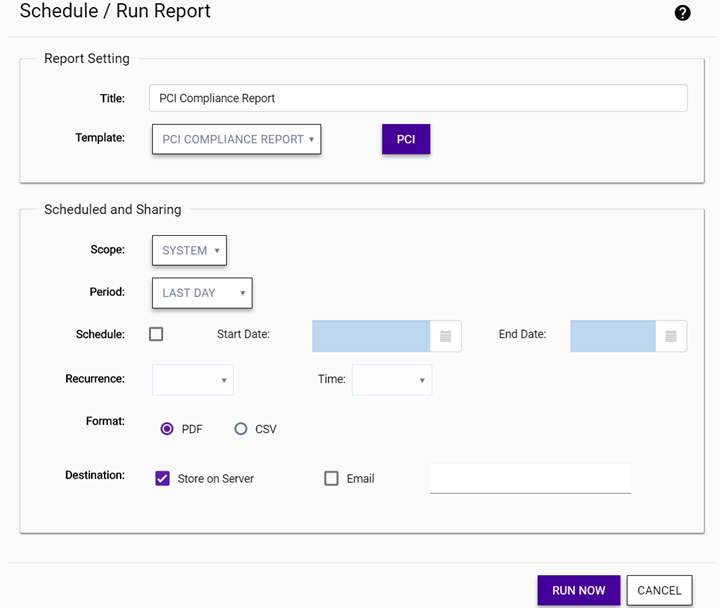
Schedule / Run Report Dialog
-
Edit the fields.
| Title |
Enter a report title to apply significance to the data that
is captured. |
| Template |
From the drop-down list, select PCI Compliance
Report. Select the PCI button that
displays. |
The
PCI Details dialog
opens.
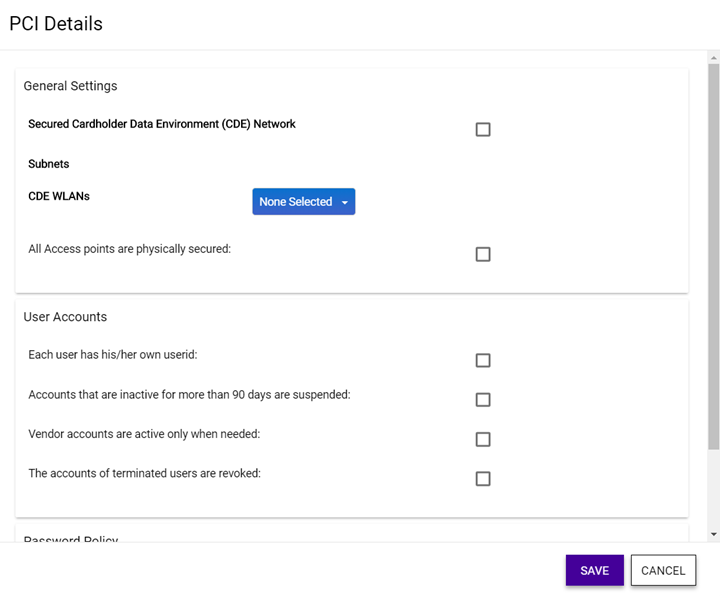
-
In the General Settings pane,
edit the fields.
| Secured Cardholder Data Environment (CDE)
Network |
Specify whether to include the Cardholder Data
Environment (CDE) networks when creating the report. |
| CDE WLANs |
From the drop-down list, select the WLANs to
include when generating the report. Use the Search box to
find WLANs if the list is long. |
| All access points are physically secured |
When enabled, the report indicates that all
access points are verified as being physically secured. |
-
In the Accounts and Password panes, enable the
options that reflect how your environment is set. The options include:
- Each user has his/her own user ID
- Accounts that are inactive for more than 90 days are
suspended
- Vendor accounts are active only when needed
- The accounts of terminated users are revoked
- Password contains both numeric and alphabetic
characters
-
Select Save.
You return to the Schedule/Run Report
dialog.
-
Edit the remaining fields.
| Scope |
Specify the scope as
System to generate a report for the whole system, including each
configured network. Otherwise, select a network from the drop-down list to restrict the
report to the selected network. |
| Period |
Specify the reporting period (Last
Hour, Last Day, Last Week, Last Month). These are not relevant for the Security
report. |
| Schedule |
To schedule the report generation,
select the Schedule, and then specify a start date and end date using
the calendar function. The report will only run on or after the date set in the Start Date field. The report will not run
after the date set in the End
Date. If you do not select the Schedule check box, the
report will run as soon as it is submitted and it run only once. |
| Recurrence |
(Optional) Specify the recurrence frequency and the time this
report is run, either daily, weekly, or monthly.
| Daily |
Runs the report daily. Use the Time drop-down menu to set the
time at which to run the daily report. |
| Weekly |
Runs the report on a particular day of the week. Use the
Day of Week field to
set the weekday to run the report on. Use the Time drop-down menu to set the
time the weekly report is generated. |
| Monthly |
Runs the report on a particular date of the month, every
month. Use the Day of
Month field to set the date. Use the Time drop-down menu to set the
time to begin the historical report data gathering process. |
|
| Format |
Specify the output format for this
report: PDF or CSV. |
| Destination |
Select a destination option to configure how a generated report is stored:
| Store on Server |
Select this check box to stores and archive a generated report on the server.
Generated reports are listed on the Generated Reports
tab. |
| Email |
Select this check box to send the report by email. In the adjoining text box,
enter one or more email addresses (separated by commas) to which the report will
be sent. |
|
-
Select Run Now.
The report is generated and sent to the destination you have
configured.
 Print
this page
Print
this page Email this topic
 Feedback
 View PDF
 Download EPUB