Create, Modify, or Disable Administrator
Accounts
The first administrator account created is a Power Administrator with full
privileges, and can create additional power administrators, administrators with
read/write privileges, and accounts with read-only privileges. For more information
about the access types and roles, see the field description that follows for
Access Level.
When a new account is created using email validation, the account displays on
the Accounts
page in the Not
Activated state. The user is sent an email with a link to complete
the activation. Enabled indicates that the account is active.
This procedure also lets you disable accounts. You can disable this option to
suspend the account while preserving the account record. Disabling can be useful
when an employee is on temporary leave and is expected to be reinstated at a later
date.
-
Select from the menu.
-
To create a new account, select Add. To modify or disable an
existing account, select an account from the list and edit the details.
-
Edit the fields.
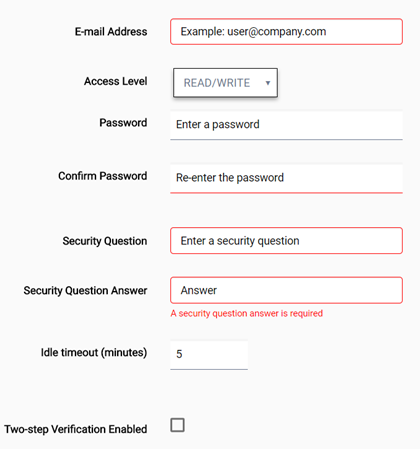
Administrator Accounts Configuration
| Admin Role |
Define the type of administrator role based on the privileges you want to
grant. |
| Access Level |
Assign the access level for the account:
| Read-only |
The account has read-only privileges. |
| Read/Write |
The account is an Administrator role with read and write
privileges. |
| Power Admin |
The account is a Power Administrator role with the
ability to create additional accounts with any role or
access level. |
|
| Security Question and Answer |
Enter a customized question and answer. |
| Idle Timeout |
Specify an inactivity timeout value between 1 - 1440
minutes. |
| Enabled |
This attribute displays after the account creation is
validated. After validation, initially the account is in a Not Activated state. The user is sent an
email with a link to complete the activation. Enabled indicates that the account is active. You can disable the account,
such as when an employee is on temporary leave. |
-
(Optional) Enable two-step verification (2FA) for
increased security. This feature lets you either manually enter back-up codes
use the Google Authenticator app to generate a code. The backup code must be
entered during login, in addition to the account password.
-
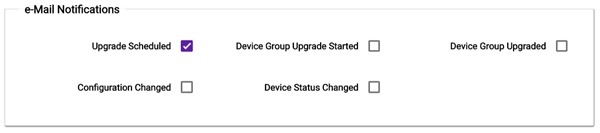
(Optional) Enable or disable email
notifications.
Email Notification Configuration
-
Select Save.
Your account settings are
saved and, if you selected two-step verification, the Google Authenticator pane
displays a QR code and backup code generation.
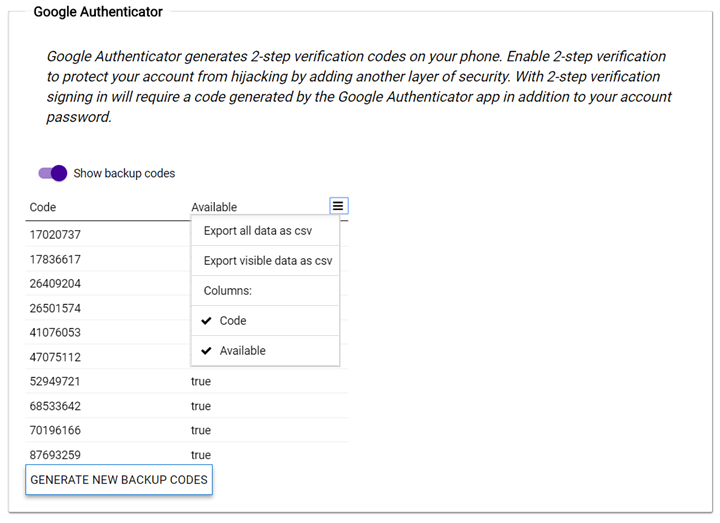
-
To complete
configuration of two-step verification, generate the backup codes and store them
securely, and download the Google Authenticator app to your Apple or Android
mobile device. Select
 to export the
data to CSV and manage which columns display.
to export the
data to CSV and manage which columns display.
Important
The backup codes
are intended for use if the administrator loses the device that has the
Google authenticator application and configuration.
- To use backup codes for account verification:
- Select Show backup Codes.
- Export the backup codes to a CSV file and store them in a safe
place. (These codes can also be used if you are using the Goggle
Authenticator app and your mobile device becomes
unavailable).
- Generate additional backup codes when needed. Each back-up code
can be used only once. After a code is used, its status changes
from true to
false.
- To enable the Google Authenticator app, do one of
the following steps:
- Select the scanning option in the app, and
then scan the QR code that displays in the ExtremeCloud user interface.
- In the mobile app, choose the option to
enter keys manually. By default, Time Based is
enabled and it is the only
supported option.
Important
Do
not select "Counter
Based" because the account will be locked and the user will
not be able to retrieve the account from the
Forgot
Password link.
 Print
this page
Print
this page Email this topic
 Feedback
 View PDF
 Download EPUB