Proxy Mode
In proxy mode, the controller generates the public and private key pair used in the certificate. You can specify the criteria used to create the Certificate Request. The Certificate Request that is generated by the controller is then used by the third-party Certificate Authentication application to create the certificate used for authentication of the Wireless AP. To successfully configure 802.1x authentication of a Wireless AP, the AP must first be configured for 802.1x authentication before the AP is deployed on a 802.1x enabled switch port.
To Configure 802.1x EAP-TLS Authentication in Proxy Mode:
- From the top menu, click
AP.
- In the AP list, click the
wireless AP (not the checkbox) for which you want to configure 802.1x EAP-TLS
authentication.
- Click the 802.1x tab.
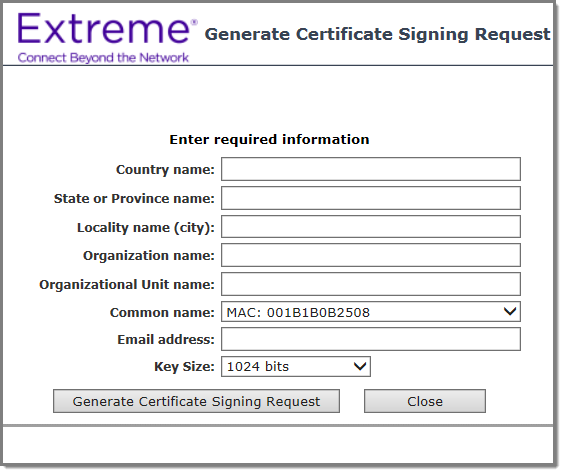
- Click Generate Certificate Signing
Request. The Generate Certificate Signing
Request window is displayed.
- Type the criteria to be used to create the certificate request. All fields are required:
- Country
name — The two-letter ISO abbreviation of the name of
the country
- State or Province
name — The name of the State/Province
- Locality name
(city) — The name of the city
- Organization
name — The name of the organization
- Organizational
Unit name — The name of the unit within the
organization
- Common name — Click
the value you want to assign as the common name of the wireless AP. (See
Credential Parameters for credential parameters and values).
- Email
address — The email address of the organization
- Click Generate Certificate Signing
Request. A certificate request file is generated (.csr file
extension). The name of the file is the AP serial number. The File Download
dialog is displayed.
- Click Save. The Save as window is
displayed.
- Navigate to the location on your computer that you want to save the generated certificate request file, and then click Save.
- In the third-party Certificate Authentication application, use the content of the generated certificate request file to generate the certificate file (.cer file extension).
- On the 802.1x tab, click Browse. The Choose file
dialog is displayed.
- Navigate to the location of the certificate file, and click Open. The name of the certificate file is displayed in the X509 DER / PKCS#12 file box.
- To save your changes, click
Save.
The 802.1x EAP-TLS (certificate
and private key) authentication in proxy mode is assigned to the AP. The
wireless AP can now be deployed to a 802.1x enabled switch port.
 Print
this page
Print
this page Email this topic
 Feedback
 View PDF
 Download EPUB