
Note
You must identify and mark the Preferred Parents, Backup Parents and the Child APs in the proposed WDS topology before starting the configuration process.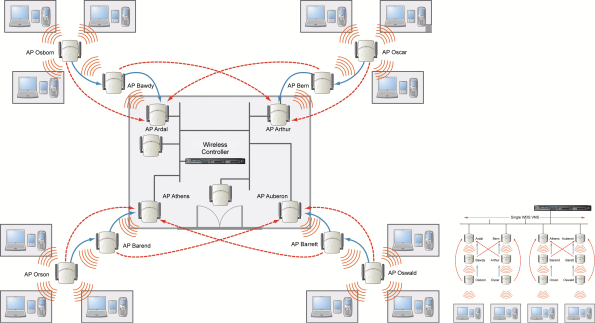
Note
With the single WDS VNS, the tree structure for the WDS deployment will be as depicted on the bottom right of the figure above. You can also implement the same deployment using four WDS VNSs, each for a set of APs in the four corners of the building. Each set of APs will form an isolated topology and will operate using a separate SSID and a separate Pre-shared key. For more information, see Examples of WDS Deployment.To configure the WDS wireless APs through the wireless controller:
Note
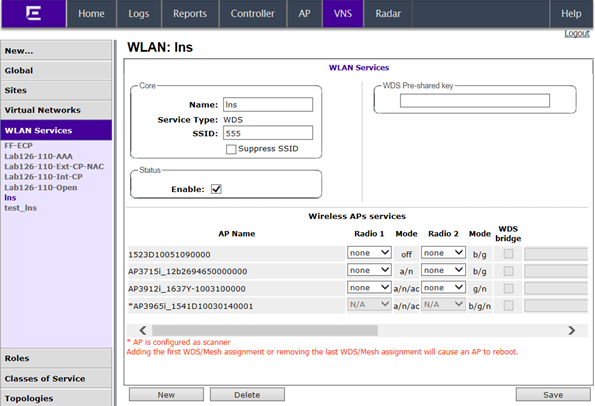
The pre-shared key must be 8 to 63 characters long. The WDS APs use this pre-shared key to establish a WDS link between them.Note
Changing the pre-shared key after the WDS is deployed can be a lengthy process. For more information, see Changing the Pre-shared Key in a WDS WLAN Service.Note
The roles — parent, child, and both — are assigned to the Radios of the APs. An AP may connect to its parent wireless AP and children APs on the same Radio, or on a different Radio. Similarly, a AP can have two children operating on two different Radios.The Radio on which the child AP operates is determined by the parent AP.If the AP will be serving both as parent and child, you must select both as its role.Wireless APs and Their Roles
|
ExtremeWireless AP |
Radio b/g | Radio a | Preferred Parent | Backup Parent |
|---|---|---|---|---|
| Ardal | Parent | Parent | See the note below. | See the note below. |
| Arthur | Parent | Parent | See the note below. | See the note below. |
| Athens | Parent | Parent | See the note below. | See the note below. |
| Auberon | Parent | Parent | See the note below. | See the note below. |
| Bawdy | Both | Child | Ardal | Arthur |
| Bern | Both | Child | Arthur | Ardal |
| Barend | Both | Child | Athens | Auberon |
| Barett | Both | Child | Auberon | Athens |
| Osborn | Child | Child | Bawdy | Ardal |
| Oscar | Child | Child | Bern | Arthur |
| Orson | Child | Child | Barend | Athens |
| Oswald | Child | Child | Barett | Auberon |
Note
Since the Root APs — Ardal, Arthur, Athens and Auberon —are the highest entities in the tree structure, they do not have parents. Therefore, the Preferred Parent and Backup Parent drop-down lists of the Root APs do not display any AP. You must leave these two fields blank.Note
You must first assign the ‘parent‘ role to the APs that will serve as the parents. Unless this is done, the Parent APs will not be displayed in the Preferred Parent and Backup Parent drop-down lists of other APs.Note
The WDS Bridge feature on the user interface relates to WDS Bridge configuration. When you are configuring the WDS Bridge topology, you must select WDS Bridge for Satellite AP that is connected to the wired network. For more information, see Wireless Bridge Configuration.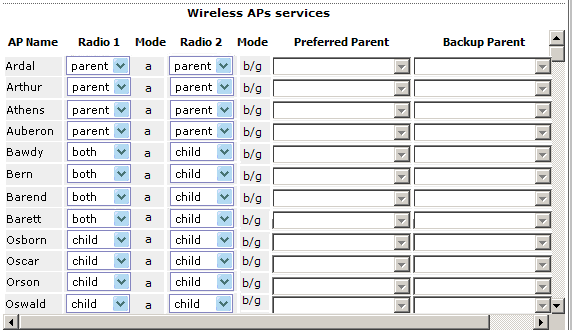
 Print
this page
Print
this page Email this topic
 Feedback
 View PDF
 Download EPUB