Importing and Exporting a Guest File

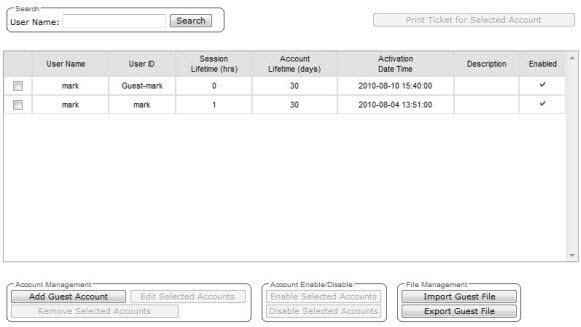
To help administrators manage large numbers of guest accounts, you can import and export .csv (comma separated value) guest files for the controller.

The following describes the column values of the .csv guest file.

Click to expand in new window

Guest Account Import and Export .csv File Values

Column Value
A User ID
B User name
C Password
D Description
E Account activation date
F Account lifetime, measured in days
G Session lifetime, measured in hours
H Is the account enabled (1) or disabled (0)
I Time of day, start time
J Time of day, duration
K Total session used time, measured in seconds. A user session starts when the guest user is authenticated, and ends when the guest user is disassociated.
L Is the guest user account synchronized on a secondary controller in an availability pair, yes (1) no (0)
  1. To export a guest file, do one of the following:
    • If you have GuestPortal Manager rights, log onto the controller.
    • If you have full administrator rights:
      • From the top menu, click VNS. The Virtual Network Configuration screen displays.
      • In the left pane, expand the WLAN Services pane, click the dedicated WLAN (Wireless Local Area Network) Service that provides the temporary guest network services. The WLAN Services configuration window for that service displays.

      • Click the Auth & Acct tab, and then click Configure. The Settings screen displays.
      • In the Guest Splash section, click Manage Guest Users.
    The Guest Splash Administration screen displays.
    Click to expand in new window
    Graphics/GuestPortal_Admin.jpg
  2. In the File Management section, click Export Guest File.
    A File Download dialog is displayed.
  3. Click Save.
    The Save As dialog is displayed.
  4. Name the guest file, and then navigate to the location where you want to save the file.
    By default, the exported guest file is named exportguest.csv.
  5. Click Save.
    The File Download dialog is displayed as the file is exported.
  6. Click Close.
    A confirmation message is displayed in the Guest Splash Administration screen footer.
  7. To import a guest file, do one of the following:
    • If you have Guest Splash Manager rights, log onto the controller.
    • If you have full administrator rights:
      • From the top menu, click VNS. The Virtual Network Configuration screen displays.
      • In the left pane, expand the WLAN Services pane, click the dedicated WLAN Service that provides the temporary guest network services. The WLAN Services configuration window for that service displays.
      • Click the Auth & Acct tab, and then click Configure. The Settings screen displays.
      • In the Guest Splash section, click Manage Guest Users.
      • The GuestPortal Guest Administration screen displays.
  8. Click to expand in new window
    Graphics/GuestPortal_Admin.jpg

  9. In the File Management section, click Import Guest File.
    The Import Guest File dialog is displayed.
  10. Click Browse to navigate to the location of the .csv guest file that you want to import, and then click Open.
  11. Click Import.
    The file is imported and a confirmation message is displayed in the Import Guest File dialog.
  12. Click Close.