Configuring Availability Using the Availability Wizard
The availability wizard allows you to create an availability pair from one of the controllers that will be in the availability pair. When creating the availability pair, you also have the option to synchronize VNS definitions and GuestPortal user accounts between the paired controllers.
To Configure Availability Using the Availability Wizard:
-
From the top menu, click
Controller.
-
In the left pane, click
.
-
In the Availability Wizard section, click Start.
The
Availability Pair Wizard screen displays.
-
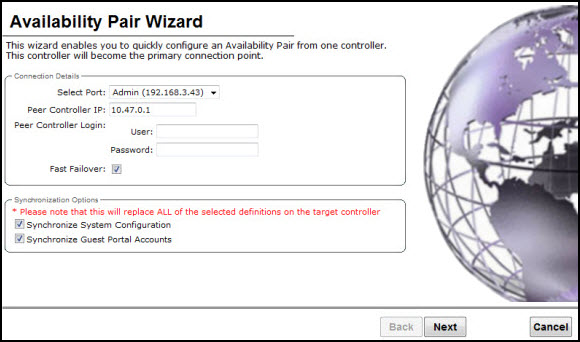
In the Connection Details section, do the following:
- Select Port — Select the
port and IP address of the primary controller that is to be used to establish the
availability link.
- Peer Controller IP — Type
the IP address of the peer (secondary) controller.
- User — Type the login user
name credentials of an account that has full administrative privileges on the peer
controller.
- Password — Type the login
password used with the user ID to login to the peer controller.
- Enable Fast Failover — Select this checkbox to enable Fast Failover for the availability pair.
-
In the Synchronize Options section, do the following:
- Synchronize System
Configuration — Select this checkbox to push the configured
Routed and Bridge Traffic Locally at
Controller VNS definitions from the primary controller to the peer
controller. WDS and 3rd Party AP VNS
definitions are ignored and not synchronized.

Note
Synchronizing the
VNS definitions will delete and replace existing VNS definitions on the peer
controller.
- Synchronize Guest Portal
Accounts — Select this checkbox to push GuestPortal user accounts
to the peer controller.
-
Click Next.
-
If you are synchronizing topology definitions, the Topology Definitions screen displays. Do the following:
-
In the Synchronization Settings section, complete the topology properties that
are missing. Any topology that did not already exist on the peer controller
will have missing properties on the Topology Definitions
screen.
The fields configured are
actual parameter values that are configured at the remote Controller with
respect to associated topologies chosen for synchronization. Some of these
parameters are: Interface IP address, Netmask, L2 port, VLAN (Virtual LAN) ID, DHCP (Dynamic Host Configuration Protocol) range, etc.
-
Click Finish.
-
If you are not synchronizing topology definitions, the availability wizard completes the configuration.
-
Click Close.
This operation marks the desired topologies for synchronization. The two controllers exchange information and the configuration is applied to the remote controller.
On the local controller, the
“Enable Synchronization of System Configuration” becomes selected. This can be double
checked by navigating to VNS > Global > Sync Summary. This tab also lists all
topologies, roles, WLAN (Wireless Local Area Network) Services and VNSes with their
synchronization status (on or off).
The Sync status for any of these elements can also be changed from this tab.
All these configurable elements have a Synchronize check box (on their main/general configuration tab) that allows for individual control and selection of availability from the main element configuration page.
 Print
this page
Print
this page Email this topic
 Feedback
 View PDF
 Download EPUB