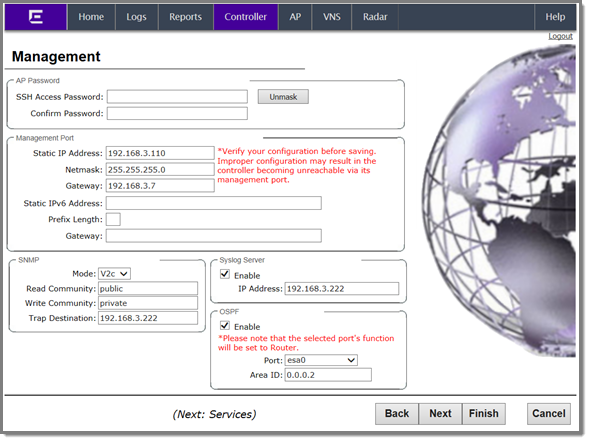
Basic Installation Wizard - Management Screen
The Management screen displays:
-
In the AP Password section,
enter a password for the AP. Click Unmask to display the password characters as you type. Access
Points are shipped with default passwords. You must create a new SSH Access
Password here.

Note
Passwords can include the following characters: A-Z a-z 0-9
~!@#$%^&*()_+|-=\{}[];<>?,. Password cannot include the following characters: / ` ' "
: or a space.
-
In the Management Port section,
confirm the port configuration values that were defined when the controller was
physically deployed on the network. If applicable, edit these values:
- Static IP Address —
Displays the IPv4 address for the controller‘s management port. Revise this
as appropriate for the enterprise network.
- Netmask — Displays the
appropriate subnet mask for the IP address to separate the network portion
from the host portion of the address.
- Gateway — Displays the
default gateway of the network.
- Static IPv6 Address —
Displays the IPv6 address for the controller‘s management port. Revise this
as appropriate for the enterprise network.
- Prefix Length — Length of
the IPv6 prefix. Maximum is 64 bits.
- Gateway — Displays the
default gateway of the network.
-
In the SNMP section, click
V2c or V3 in the Mode drop-down list to enable
SNMP (Simple Network Management Protocol), if applicable.
If you
selected V2c, the Community options display:
-
In the OSPF section, select the
Enable checkbox to enable
OSPF (Open Shortest Path First), if applicable. Use OSPF to allow the
controller to participate in dynamic route selection. OSPF is a protocol
designed for medium and large IP networks with the ability to segment routes
into different areas by routing information summarization and propagation.
- Area ID — Type the
desired area. Area 0.0.0.0 is the main area in OSPF.
-
In the Syslog Server section, select
the Enable checkbox to enable the
syslog protocol for the controller, if applicable. Syslog is a protocol used for
the transmission of event notification messages across networks.
In the
IP
Address box, type the IP address of the syslog server.
Note
The Syslog Server IP Address field supports both IPv4
and IPv6 addresses.
-
Click Next. The Services screen displays.
 Print
this page
Print
this page Email this topic
 Feedback
 View PDF
 Download EPUB