
Note
The Configuration Manager (CM) checks overall configuration as configuration is entered. If CM detects mixed B@AC and B@AP rules in the same role, and the role has L7 filter rules, then the configuration is rejected. For more information, see Configuration Rules with L7 Filters.In general, CoS (Class of Service) refers to a set of attributes that define the importance of a frame while it is forwarded through the network relative to other packets, and to the maximum throughput per time unit that a station or port assigned to the role is permitted. The CoS defines actions to be taken when rate limits are exceeded.
To configure VLAN (Virtual LAN) and Class of Service for a role:
VLAN & Class of Service Tab - Fields and Buttons
| Field/Button | Description |
|---|---|
| Core | |
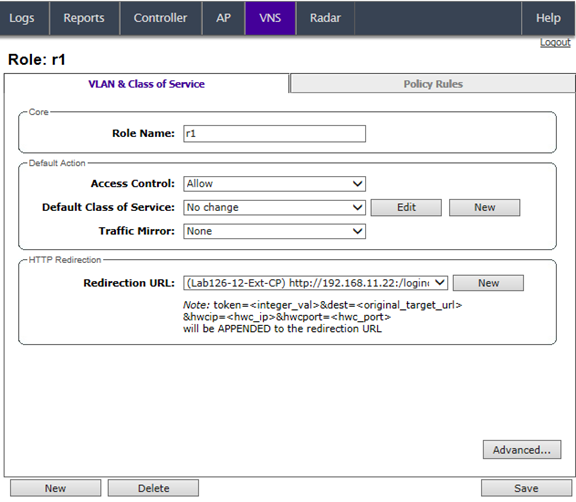
| Role Name | Enter a name to assign to this role. |
| Default Action | |
| Access Control |
Select from one of the following:
|
| VLAN |
Note: VLAN is only visible when the user
selects "Contain to VLAN" as the default access control
action.
Select an existing Topology, Topology Group, or click New to create a new Topology. To edit an existing Topology, select the VLAN and then click Edit. The Edit Topology page displays. For more information, see Configuring a Basic Topology. |
| Default Class of Service | Select an existing class of service from the
Default Class of Service drop-down list, or click New to create a
new topology. To edit an existing class of service, select the class of service and then click Edit. The Edit Class of Service page displays. For more information, see Configuring Classes of Service. |
| Traffic Mirror | When enabled, this option sends a copy of the
network packets to a mirroring L2 port for analysis, in an effort to monitor network
traffic. The Purview Engine analyses the traffic. The assigned port can only be used for
traffic analysis. You can enable traffic mirroring from the WLAN Service, from the Role, or from the Filter Rule. Setting traffic mirroring at the Filter Rule takes precedence over settings for the Role and WLAN Service. The order of precedence for the traffic mirror setting is: Filter Rule, Role, WLAN Service. To set the L2 port, go to . Valid values for Filter Rule and Role are:
|
| HTTP Redirection | HTTP Redirection appears when the following conditions are
present:
|
| Redirection URL: | Select from one of the previously configured redirection URLs or
click New
to create a new redirection URL. For more information about setting
up a redirection URL, see Managing Redirection URLs. WLAN (Wireless Local Area Network)
Services with Captive Portals are included in this list. The default value for the redirection URL is Own WLAN, which indicates the current WLAN. This is identical to the current redirection behaviour. |
| Status | |
| Synchronize | Enable automatic synchronization with its availability peer. For more information about viewing synchronization status, see Using the Sync Summary. If this VNS is part of an availability pair, Extreme Networks recommends that you enable Synchronize. By default the WLAN Service is enabled. Clear this checkbox to disable the WLAN Service. |
| Advanced Button | |
| Static Egress Untagged VLANs | Lists those VLANs (for multicast, broadcast,
unicast) that a station assigned to a role receives from, even if it
hasn‘t sent on it. Choose a VLAN as follows:
|
For more information about rate control profiles, see Working with Bandwidth Control Profiles.
 Print
this page
Print
this page Email this topic
 Feedback
 View PDF
 Download EPUB