Installing a Certificate for a Controller Interface

To install a certificate for a Controller Data Interface:

  1. From the top menu, click Controller.
  2. In the left pane, click Network > Topologies. The Topologies tab is displayed.
  3. Click the Certificates tab. Topologies with an L3 interface will be listed.
  4. In the Interface Certificates table, click to select the topology for which you want to install a certificate.
    Note

    Note

    There are separate certificates if IPv4 and IPv6 is configured for Admin topology.

    The Configuration for Topologies section and the Generate Signing Request button become available. Use the field and button descriptions in Topologies Page: Certificates Tab Fields and Buttons to create and install certificates.

    Note

    Note

    The certificate Common Name (CN) must match the interface IP or DNS addresses (Admin only).

    The Configuration for Topologies section displays.

    Click to expand in new window
    Graphics/topology_cert_configration.jpg
    Click to expand in new window

    Topologies Page: Certificates Tab Fields and Buttons

    Field/Button Description
    Interface Certificates
    Topology Topology name
    Expiry Date Date when the certificate expires
    CA Cert. Identifies whether or not a CA certificate has been installed on the topology.
    Name (CN) The IP address of DNS address associated with the topology that the certificate applies to.
    Note: The Name field supports both IPv4 or IPv6 addresses.
    Org Unit (OU) Name of the organization‘s unit.
    Organization Name of the organization
    Configuration for Topology
    Replace/Install selected Topology‘s certificate To replace/install the existing port‘s certificate and key using this option, do the following:
    1. From the click the Generate Signing Request button to create the certificate and key.
    2. Download the CSR when prompted.
    3. Use a 3rd party certificate service to sign the CSR and create a certificate and a Certificate Authority (CA) file.
    4. Save the certificate on your computer.
    5. Return to the Certificates tab on the ExtremeWireless UI.
    6. Select the topology for which you created the certificate and select Replace/Install selected Topologies certificate.
    7. Click Browse next to the Signed certificate to install box.
    8. Navigate to the certificate file you want to install for this port, and then click Open. The certificate file name is displayed in the Certificate file to install box.
    9. (Optional) Click Browse next to the Optional:Enter PEM-encoded CA public certificates file box. The Choose file dialog is displayed.
    10. (Optional) Navigate to the certificate file you want to install for this port, and then click Open. The certificate file name is displayed in the Optional:Enter PEM-encoded CA public certificates file box.
      Note: If you choose to install a CA public certificate, you must install it when you install the PEM/DER certificate and key.
    Replace/Install selected Topology‘s certificate and key from a single file To replace the existing port‘s certificate and key using this option, do the following:
    1. Click Browse next to the PKCS #12 file to install box. The Choose file dialog is displayed.
    2. Navigate to the certificate file you want to install for this port, and then click Open. The certificate file name is displayed in the PKCS #12 file to install box.
    3. In the Private key password box, type the password for the key file. The key file is password protected.
    4. (Optional) Click Browse next to the Optional:Enter PEM-encoded CA public certificates file box. The Choose file dialog is displayed.
    5. (Optional) Navigate to the certificate file you want to install for this port, and then click Open. The certificate file name is displayed in the Optional:Enter PEM-encoded CA public certificates file box.
      Note: If you choose to install a CA public certificate, you must install it when you install the PEM/DER certificate and key.
    Replace/Install selected Topology‘s certificate and key from separate files To replace the existing port‘s certificate and key using this option, do the following:
    1. Click Browse next to the PKCS #12 file to install box. The Choose file dialog is displayed.
    2. Navigate to the certificate file you want to install for this port, and then click Open. The certificate file name is displayed in the PKCS #12 file to install box.
    3. Click Browse next to the Private key file to install box. The Choose file dialog is displayed.
    4. Navigate to the key file you want to install for this port, and then click Open. The key file name is displayed in the Private key file to install box
    5. In the Private key password box, type the password for the key file. The key file is password protected.
    6. (Optional) Click Browse next to the Optional:Enter PEM-encoded CA public certificates file box. The Choose file dialog is displayed.
    7. (Optional) Navigate to the certificate file you want to install for this port, and then click Open. The certificate file name is displayed in the Optional:Enter PEM-encoded CA public certificates file box.
      Note: If you choose to install a CA public certificate, you must install it when you install the PEM/DER certificate and key.
    Reset selected Topology to the factory default certificate and key Remove custom certificate that user installed.
    No change No change.
    Generate Signing Request To generate a CSR for the controller, click Generate Signing Request. The Generate Certificate Signing Request window displays (Generate Certificate Signing Request Window)
    Save Click to save the changes to this Topology.
    Note

    Note

    To avoid the certificate-related web browser security warnings when accessing the Wireless Assistant, you must also import the customized certificates into your web browser application.
    Click to expand in new window
    Generate Certificate Signing Request Window
    Graphics/generate_certificate_request.jpg
    Click to expand in new window

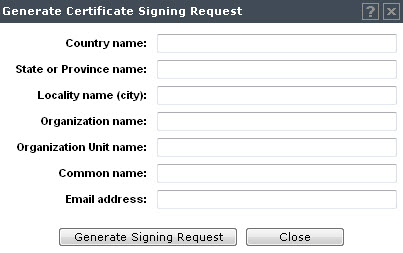
    Generate Certificate Signing Request Page - Fields and Buttons

    Field/Button Description
    Country name The two-letter ISO abbreviation of the name of the country
    State or Province name The name of the State/Province
    Locality name (city) The name of the city.
    Organization name The name of the organization
    Organizational Unit name The name of the unit within the organization.
    Common Name Set the common name to be one of the following:

    the IP address of the interface that the CSR applies to.

    a DNS address associated with the IP address of the interface that the CSR applies to.

    Email address The email address of the organization
    Generate Signing Request Click to generate a signing request. A certificate request file is generated (.csr file extension). The name of the file is the IP address of the topology you created the CSR for. The File Download dialog is displayed.