Configuration Tab - Fields and Buttons
| Field/Button | Description |
|---|---|
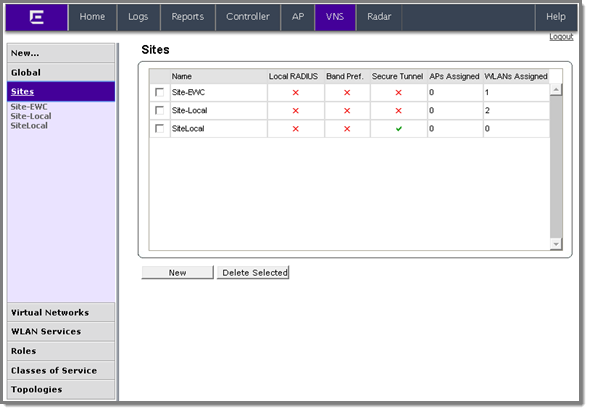
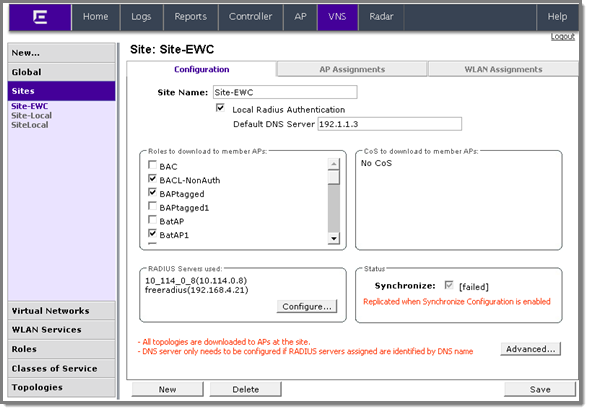
| Site Name | Enter a name to assign to this Site.The name is unique among Sites on the controller. AP load group names and Site names are part of the same space so a load group and a Site cannot have the same name. |
| Local Radius Authentication | Select this checkbox to choose a local RADIUS Server for login credentials and authentication. |
| Default DNS Server | This field is used to resolve RADIUS server names to IP addresses if necessary. |
| Roles to download to member APs | Select roles that will be applied to APs with this specific Site configuration. Physical topologies and third party AP enabled topologies cannot be assigned to a Site. |
| CoS (Class of Service) to download to member APs | Displays the Class of Service that will be applied to APs with this specific Site configuration. |
| RADIUS Server used | Displays the list of available RADIUS servers used for this Site (for more information, see Radius Configuration). The RADIUS servers assigned to a Site override the list of RADIUS servers in the WLAN (Wireless Local Area Network) Service definition for APs that are part of the Site. |
| Status: Synchronize: (unknown) |
Select this checkbox to enable automatic synchronization with an availability peer. Refer to Using the Sync Summary for information about viewing synchronization status. If this Site is part of an availability pair, Extreme Networks recommends that you enable this feature. |
| Advanced Button | |
| Secure Tunnel | This feature, when
enabled, provides encryption, authentication, and key
management between the AP and/or controllers. Select the desired Secure Tunnel mode from the drop-down list: Disabled — Secure Tunnel is turned off and no traffic is encrypted. All SFTP/SSH/TFTP traffic works normally. Encrypt control traffic between AP & Controller — An IPSEC tunnel is established from the AP to the controller and all SFTP/SSH/TFTP/WASSP control traffic is encrypted. The AP skips the registration and authentication phases and when selected, the Secure Tunnel Lifetime feature can be configured. Encrypt control and data traffic between AP & Controller — This mode only benefits routed/bridged@AP Controller Topologies. An IPSEC tunnel is established from the AP to the controller and all SFTP/SSH/TFTP/WASSP control and data traffic is encrypted. The AP skips the registration and authentication phases, and when selected, the Secure Tunnel Lifetime feature can be configured. Note: This option is not available for
AP3805 models.
Debug mode — An IPSEC tunnel is established from the AP to the controller, no traffic is encrypted, and all SFTP/SSH/TFTP traffic works normally. The AP skips the registration and authentication phases and when selected, the Secure Tunnel Lifetime feature can be configured. Note: Changing a Secure Tunnel mode
will automatically disconnect and reconnect the
AP.
|
| Secure Tunnel Lifetime | When Secure Tunnel is
enabled, enter an interval (in hours) at which time the keys
of the IPSEC tunnel are renegotiated. Only applies if both
the AP and controller are running V8.31 or newer. Note: Changing the Secure
Tunnel Lifetime setting will not cause any AP
disruption.
|
| Encrypt control traffic between APs | Select checkbox to provide encryption, authentication, and key management between APs and/or controllers. |
| Band Preference | Select this checkbox to enable APs to become members of both this Site and a load group at the same time. |
| Load Control | Select the following
parameters for each radio assigned to this Site:
|
| RADIUS Authentication: Replace Called Station ID with Zone |
Select this checkbox to allow the RADIUS client to send the AP Zone as the Called-Station ID instead of the radio MAC address. This feature can be enabled regardless of whether the Site is using centrally located or local RADIUS servers. |
 Print
this page
Print
this page Email this topic
 Feedback
 View PDF
 Download EPUB