Setting Up OSPF
Routing
To enable OSPF (Open Shortest Path First) (OSPF RFC2328) routing, you must:
- Specify at
least one topology on which OSPF is enabled on the Port Settings option of the
OSPF tab. This is the interface on which you can establish OSPF adjacency.
- Enable OSPF
globally on the controller.
- Define the
global OSPF parameters.
Ensure that
the OSPF parameters defined here for the controller are consistent with the adjacent
routers in the OSPF area. This consistency includes the following:
- If the peer
router has different timer settings, the protocol timer settings in the
controller must be changed to match to achieve OSPF adjacency.
- The MTU of
the ports on either end of an OSPF link must match. The MTU for ports on the
controller is fixed at 1500. This matches the default MTU in standard routers.
The maximum MTU can be increased to 1800 bytes by enabling Jumbo Frames support
(for more information, see Setting Up the Data Ports).
It is
important to ensure that the MTU of the ports on either end of an OSPF link match.
If there is a mismatch in the MTU, then the OSPF adjacency between the controller
and the neighboring router might not get established.
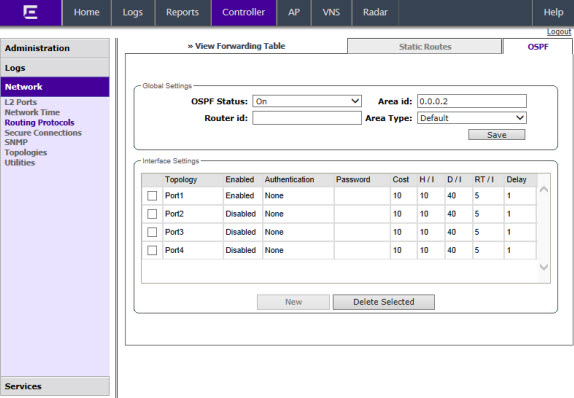
To Set OSPF Routing Global Settings on
the controller:
-
From the top menu, click
Controller.
-
In the left pane, click
. The Static Routes tab is
displayed by default.
-
Click the OSPF tab.
-
From the OSPF Status drop-down list,
click On to enable OSPF.
In the Router ID box, type the
IP address of the controller. This ID must be unique across the OSPF area.
If left blank, the OSPF daemon automatically picks a router ID from one of
the controller‘s interface IP addresses.
-
In the Area ID box, type the area.
0.0.0.0 is the main area in OSPF.
-
In the Area Type drop-down list,
click one of the following:
- Default — The default
acts as the backbone area (also known as area zero). It forms the core of an
OSPF network. All other areas are connected to it, and inter-area routing
happens via a router connected to the backbone area.
- Stub — The stub area does
not receive external routes. External routes are defined as routes which
were distributed in OSPF via another routing protocol. Therefore, stub areas
typically rely on a default route to send traffic routes outside the present
domain.
- Not-so-stubby — The
not-so-stubby area is a type of stub area that can import autonomous system
(AS) external routes and send them to the default/backbone area, but cannot
receive AS external routes from the backbone or other areas.
-
To save your changes,
click Save.
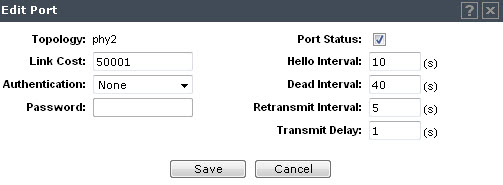
To Set OSPF Routing Port
Settings on the Controller:
-
In the left pane, click
.
-
Click the OSPF tab.
-
To add a new OSPF
interface, click New or select a port to
configure by clicking on the desired port in the Port Settings table.
The
Edit Port dialog displays.
-
In the Link Cost box, type the OSPF
standard value for your network for this port. This is the cost of sending a
data packet on the interface. The lower the cost, the more likely the interface
is to be used to forward data traffic.

Note
If more than one
port is enabled for OSPF, it is important to prevent the controller from
serving as a router for other network traffic (other than the traffic from
wireless device users on routed topologies controlled by the controller).
For more information, see
Policy Rules.
-
In the Authentication drop-down
list, click the authentication type for OSPF on your network: None or Password. The default setting
is None.
-
If Password is selected as the
authentication type, in the Password box, type the password.
If None is selected as the
Authentication type, leave this box empty. This password must match on
either end of the OSPF connection.
-
Type the
following:
- Hello-Interval —
Specifies the time in seconds (displays OSPF default).The default setting is
10 seconds.
- Dead-Interval — Specifies
the time in seconds (displays OSPF default). The default setting is 40
seconds.
- Retransmit-Interval —
Specifies the time in seconds (displays OSPF default). The default setting
is 5 seconds.
- Transmit Delay— Specifies
the time in seconds (displays OSPF default). The default setting is 1
second.
-
To save your changes,
click Save.
To Confirm That Ports Are Set
for OSPF:
-
To confirm that the
ports are set up for OSPF, and that advertised routes from the upstream router
are recognized, click View Forwarding Table. The
Forwarding Table is
displayed.
The following additional
reports display OSPF information when the protocol is in
operation:
- OSPF Neighbor — Displays
the current neighbors for OSPF (routers that have interfaces to a common
network)
- OSPF Linkstate — Displays
the Link State Advertisements (LSAs) received by the currently running OSPF
process. The LSAs describe the local state of a router or network, including
the state of the router‘s interfaces and adjacencies.
-
To update the display,
click Refresh.
 Print
this page
Print
this page Email this topic
 Feedback
 View PDF
 Download EPUB