Configuring the Mesh Wireless APs Through the Controller

Configuring the Mesh wireless APs involves the following steps:

  1. Creating a Mesh WLAN (Wireless Local Area Network) Service.
  2. Defining the SSID name and the pre-shared key.

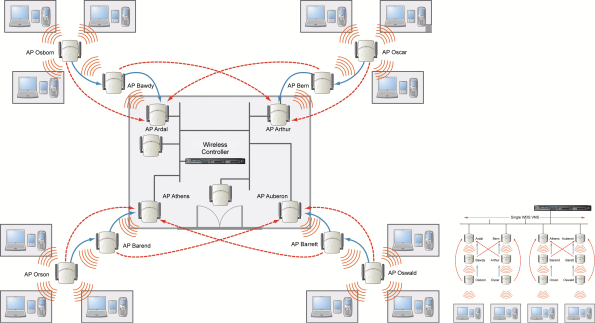
For ease of understanding, the Mesh configuration process is explained with an example. Mesh Deployment depicts a site with the following features:

  • An office building, denoted by a rectangular enclosure.
  • Four APs — Ardal, Arthur, Athens and Auberon — are within the confines of the building, and are connected to the wired network.
  • The space around the building is the warehouse.
  • The solid arrows point toward Current Parents.
  • The dotted arrows point toward Alternative Parents.
Click to expand in new window
Mesh Deployment
Graphics/WDS_Deployment.png
Note

Note

With the single Mesh VNS, the tree structure for the Mesh deployment will be as depicted on the bottom right of Mesh Deployment. You can also implement the same deployment using four Mesh VNSs, each for a set of APs in the four corners of the building. Each set of APs will form an isolated topology and will operate using a separate SSID and a separate Pre-shared key. For more information, see Examples of Mesh Deployment.

To Configure the Mesh wireless APs through the controller:

Before configuring Mesh, be sure that the following conditions are met:

  • Energy Save is set to Off
  • Beacon Interval is set to 100 msec
  • AP names are 32 characters or less for statistics display purposes
  • ATPC and DCS are both disabled.

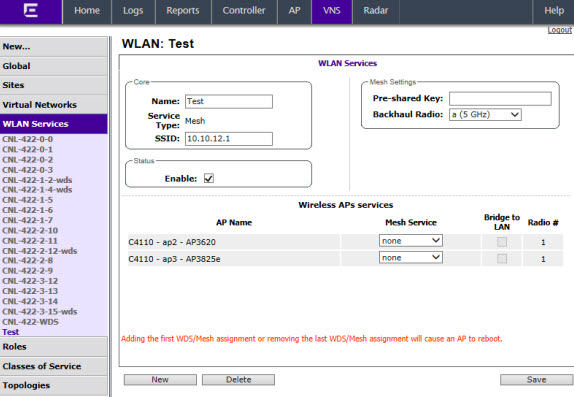
If possible, follow these guidelines for the backhaul radio to achieve a balance of stability, throughput, and latency:

  • Use a 5.2 GHz band for backhaul
  • Select a non-DFS channel for the Mesh Portal
  • Use a 40 MHz Channel Width and Short guard interval
  • Disable Aggregate MSDUs
  • Enable Aggregate MPDUs
  • Enable ADDBA support
  • Configure the settings on the Radio configuration page the same for all APs in the Mesh.
  • Set the Poll Timeout to be at least 60 seconds.
  1. From the top menu, click VNS. The Virtual Network Configuration screen displays.
  2. In the left pane, expand the WLAN Services pane and select a Mesh service to edit or click the New button.
  3. Enter a name for the service in the Name field.
  4. The SSID field is automatically filled in with the name, but you can change it if desired.
  5. For Service Type, select Mesh.
    Click to expand in new window
    Graphics/mesh_wlan_svc.jpg
  6. To save your changes, click Save. The WLAN configuration window is re-displayed to show additional configuration fields.
    Click to expand in new window
    Graphics/mesh_wlan_svc2.jpg
  7. In the Mesh Pre-shared Key box, type the key.
    Note

    Note

    The pre-shared key must be 8 to 63 characters long. The Mesh APs use this pre-shared key to establish a Mesh link between them.
    Note

    Note

    Changing the pre-shared key after the Mesh is deployed can be a lengthy process. For more information, see Changing the Pre-shared Key in a Mesh WLAN Service.
  8. Assign a backhaul radio.
    Note

    Note

    After you save the configuration, you cannot change the backhaul radio. Please configure this setting wisely.
  9. To save your changes, click Save.
    Note

    Note

    The Mesh Bridge feature on the user interface relates to Mesh Bridge configuration. When you are configuring the Mesh Bridge topology, you must select Mesh Bridge for Mesh AP that is connected to the wired network. For more information, see Wireless Bridge Configuration.